Farm Fresh to You: Get Produced Delivered, Eat More Vegetables

I’m going to be honest. This is not what I had in mind for dinner tonight.

salad

I had a salad for lunch and because I’m all about balance, I’m generally of the belief that if I had a salad for lunch, I’m certainly not having one for dinner.  But here I am.  Having a salad for dinner after I had one for lunch.  I don’t want to be one of those girls.  I’m not one of those girls.

Let me tell you the story of this salad, because really it started a few weeks ago.

Several weeks ago, Living Social was running a deal for Farm Fresh to You. It’s like a CSA delivered to your house, but instead of buying in at the beginning of the season, you can just order whenever you want it and pay weekly.  So I saw the deal: $15 for a delivery box of vegetables.

farmfresh

If you used to read my blog when I was in grad school, you’ll know that I had a CSA share in Ithaca, NY from the Early Morning Farm and I absolutely loved it.  Every week I was so excited to pick up my share at the farmer’s market.  I got to try new and exciting vegetables like rhubarb and kohlrabi.  For a foodie writing her thesis on Sustainable Food Systems, you can probably imagine how amazing that was for me.

When I left Ithaca, I was sad that I wouldn’t have a CSA share to pick up weekly anymore. CSA shares in Southern California are basically twice as expensive as my share was in Ithaca (I paid about $20 per week back then).  So I was bummed.  I couldn’t afford to get one.  Let’s be honest, healthy living can be expensive.  (Remember how I got a second job to pay for Crossfit… omm yeah).

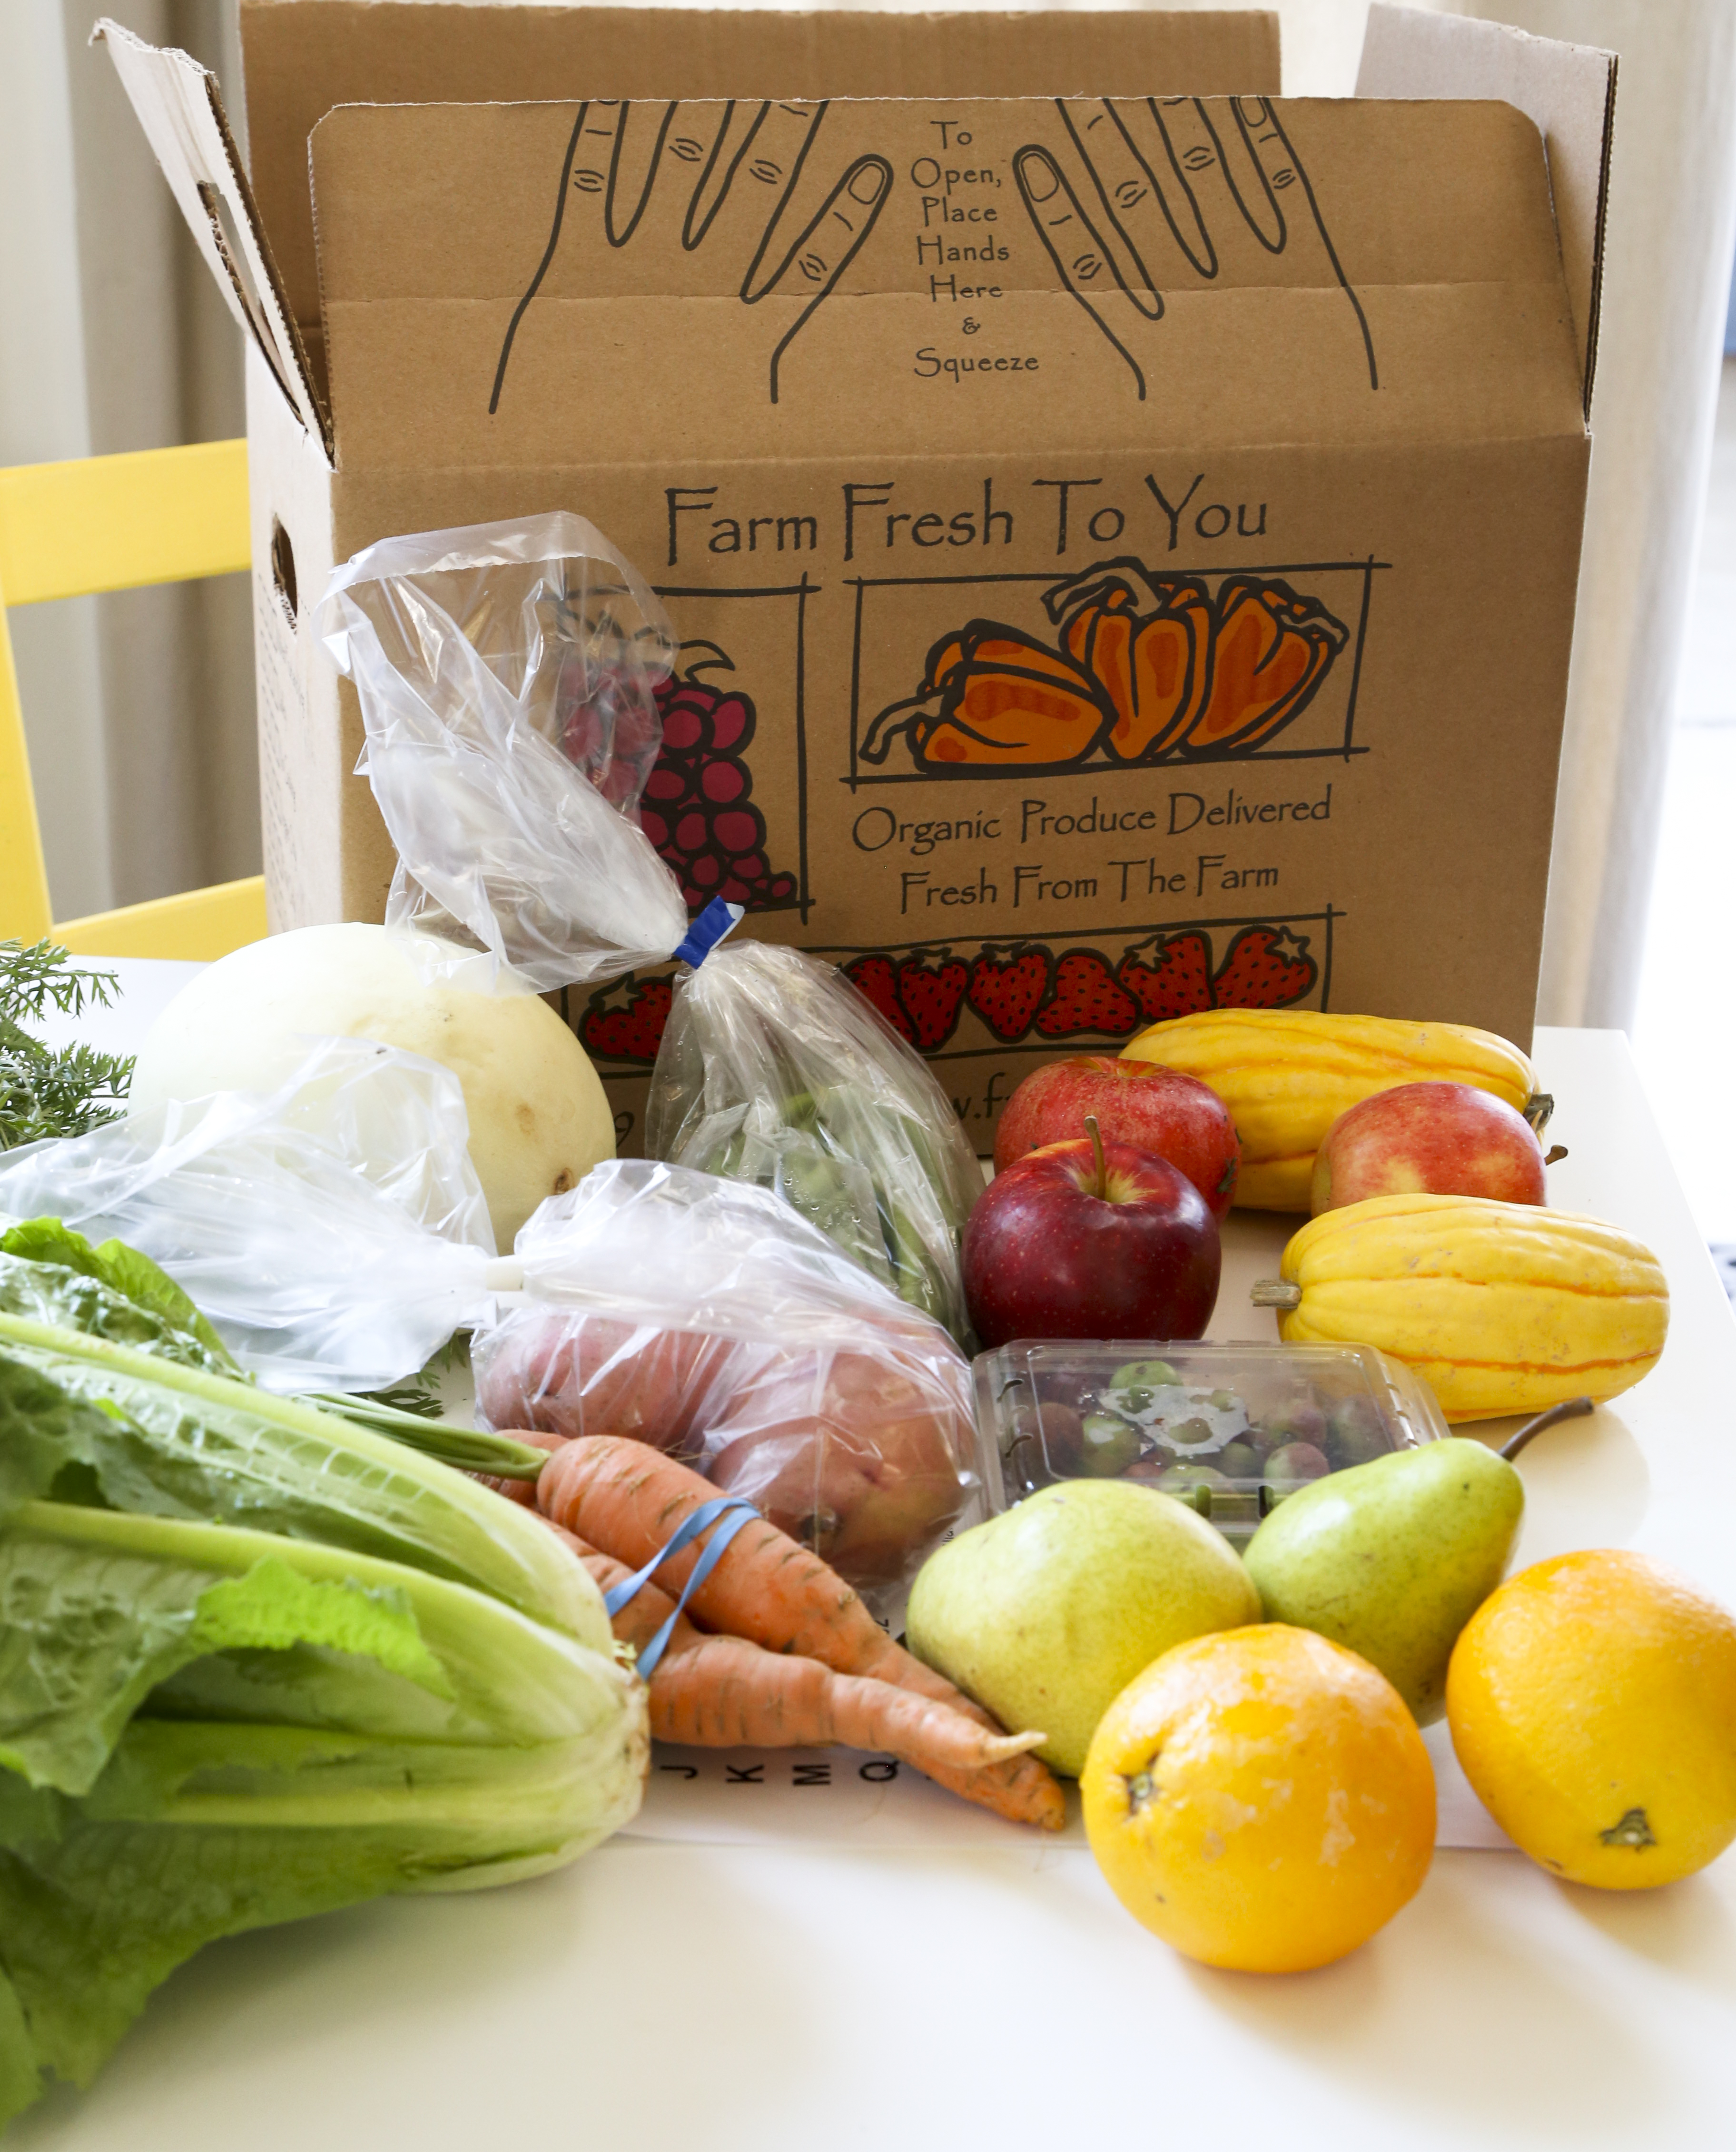
So when I saw this Living Social deal for Farm Fresh to You, I was all over it.  Last week, I placed my order and my box arrived today.  I had it delivered to my office because I was worried I wouldn’t be home when they delivered it and the heat wave here has been rough.  Now let me tell you, during my drive home, I was thinking about all the possible things to have for dinner, completely forgetting the box was in the backseat.

By the time I got home I had pretty much decided I wanted polenta with a poached egg.  But then I remembered the box full of vegetables.  I unpacked them and saw everything that was inside:
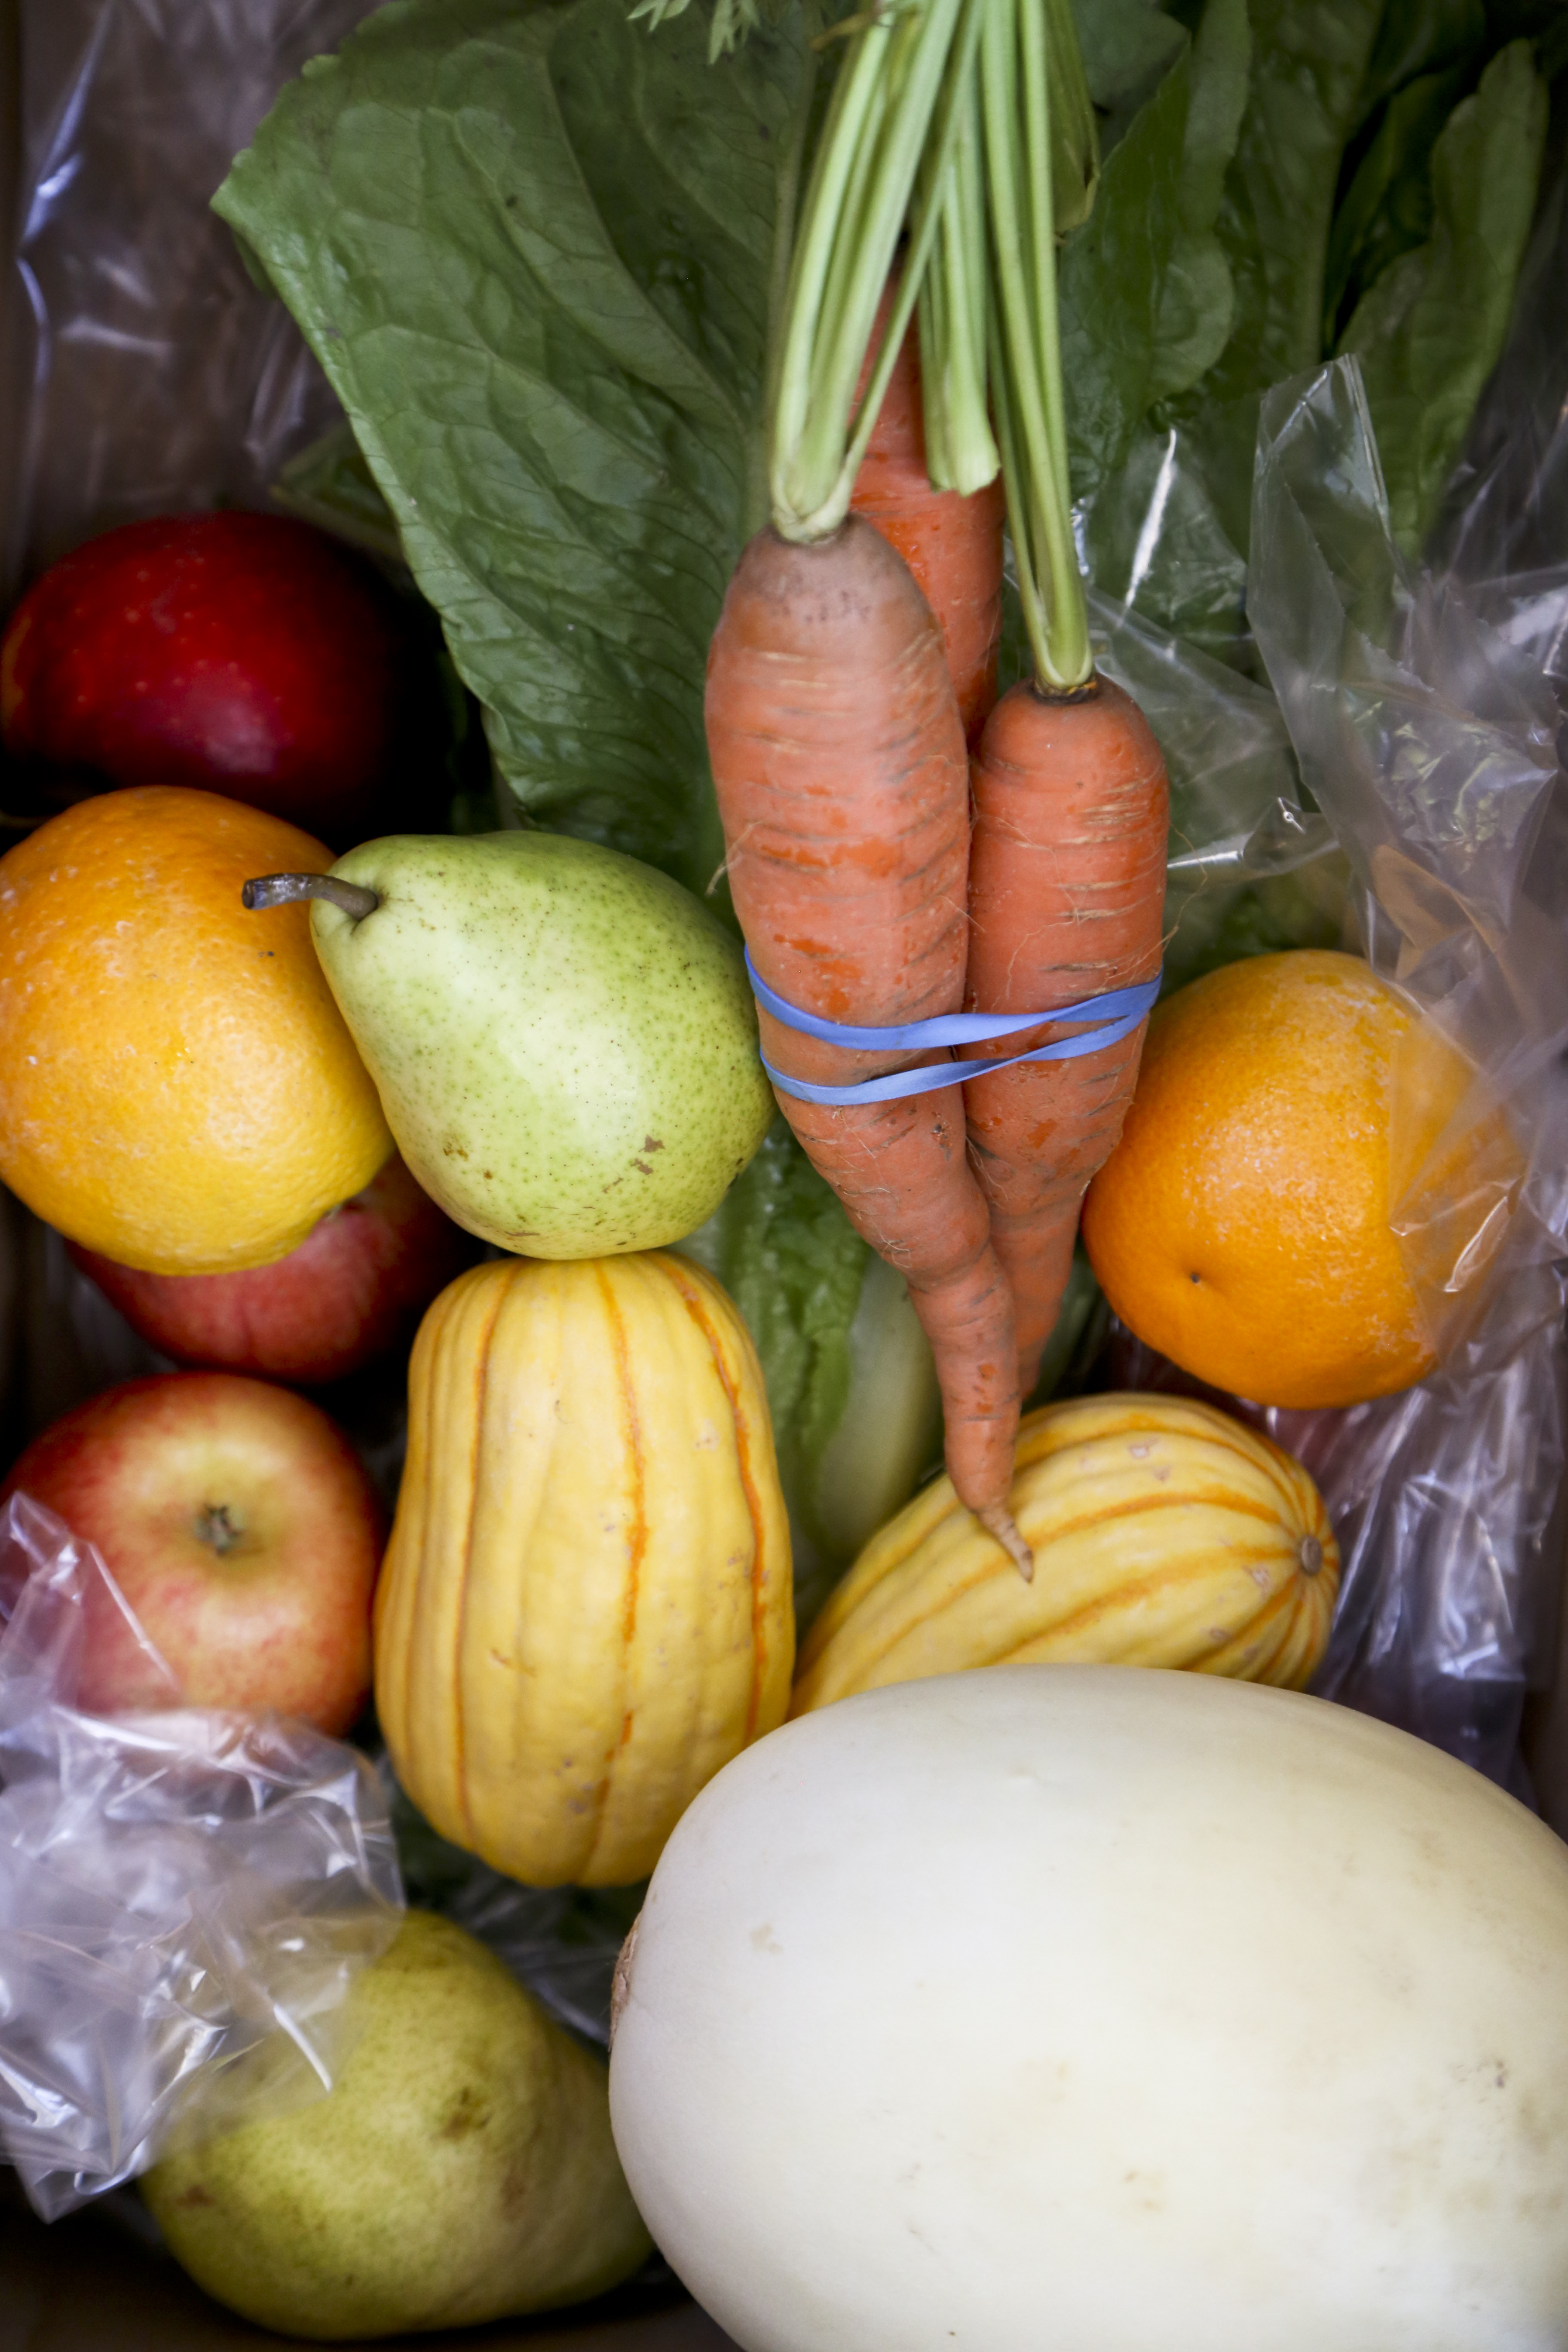
  • 1 head of lettuce
  • 1 honeydew melon
  • 2 delicata squash
  • 1lb potatoes
  • 3 apples
  • 2 oranges
  • 2 pears
  • 1 pack of Berry Kiwi
  • 1/2 lb green beans
  • 1 bunch of carrots

That’s when I remembered: Oh yeah, I used to eat salads all the time because that shit goes bad real fast AND I hate to waste food. There’s no two ways around it, you have to be a voracious vegetable eater if the box is just for you (and that’s the case for me, since I live alone).

produce

And you know what goes bad first?  Lettuce.  You can wrap it in a paper towel to keep it crisper longer, but let’s be honest, it’s not making it past 4 days.  I wish the box included kale instead of lettuce… but alas not reality.  So that’s when I knew salad was for dinner.

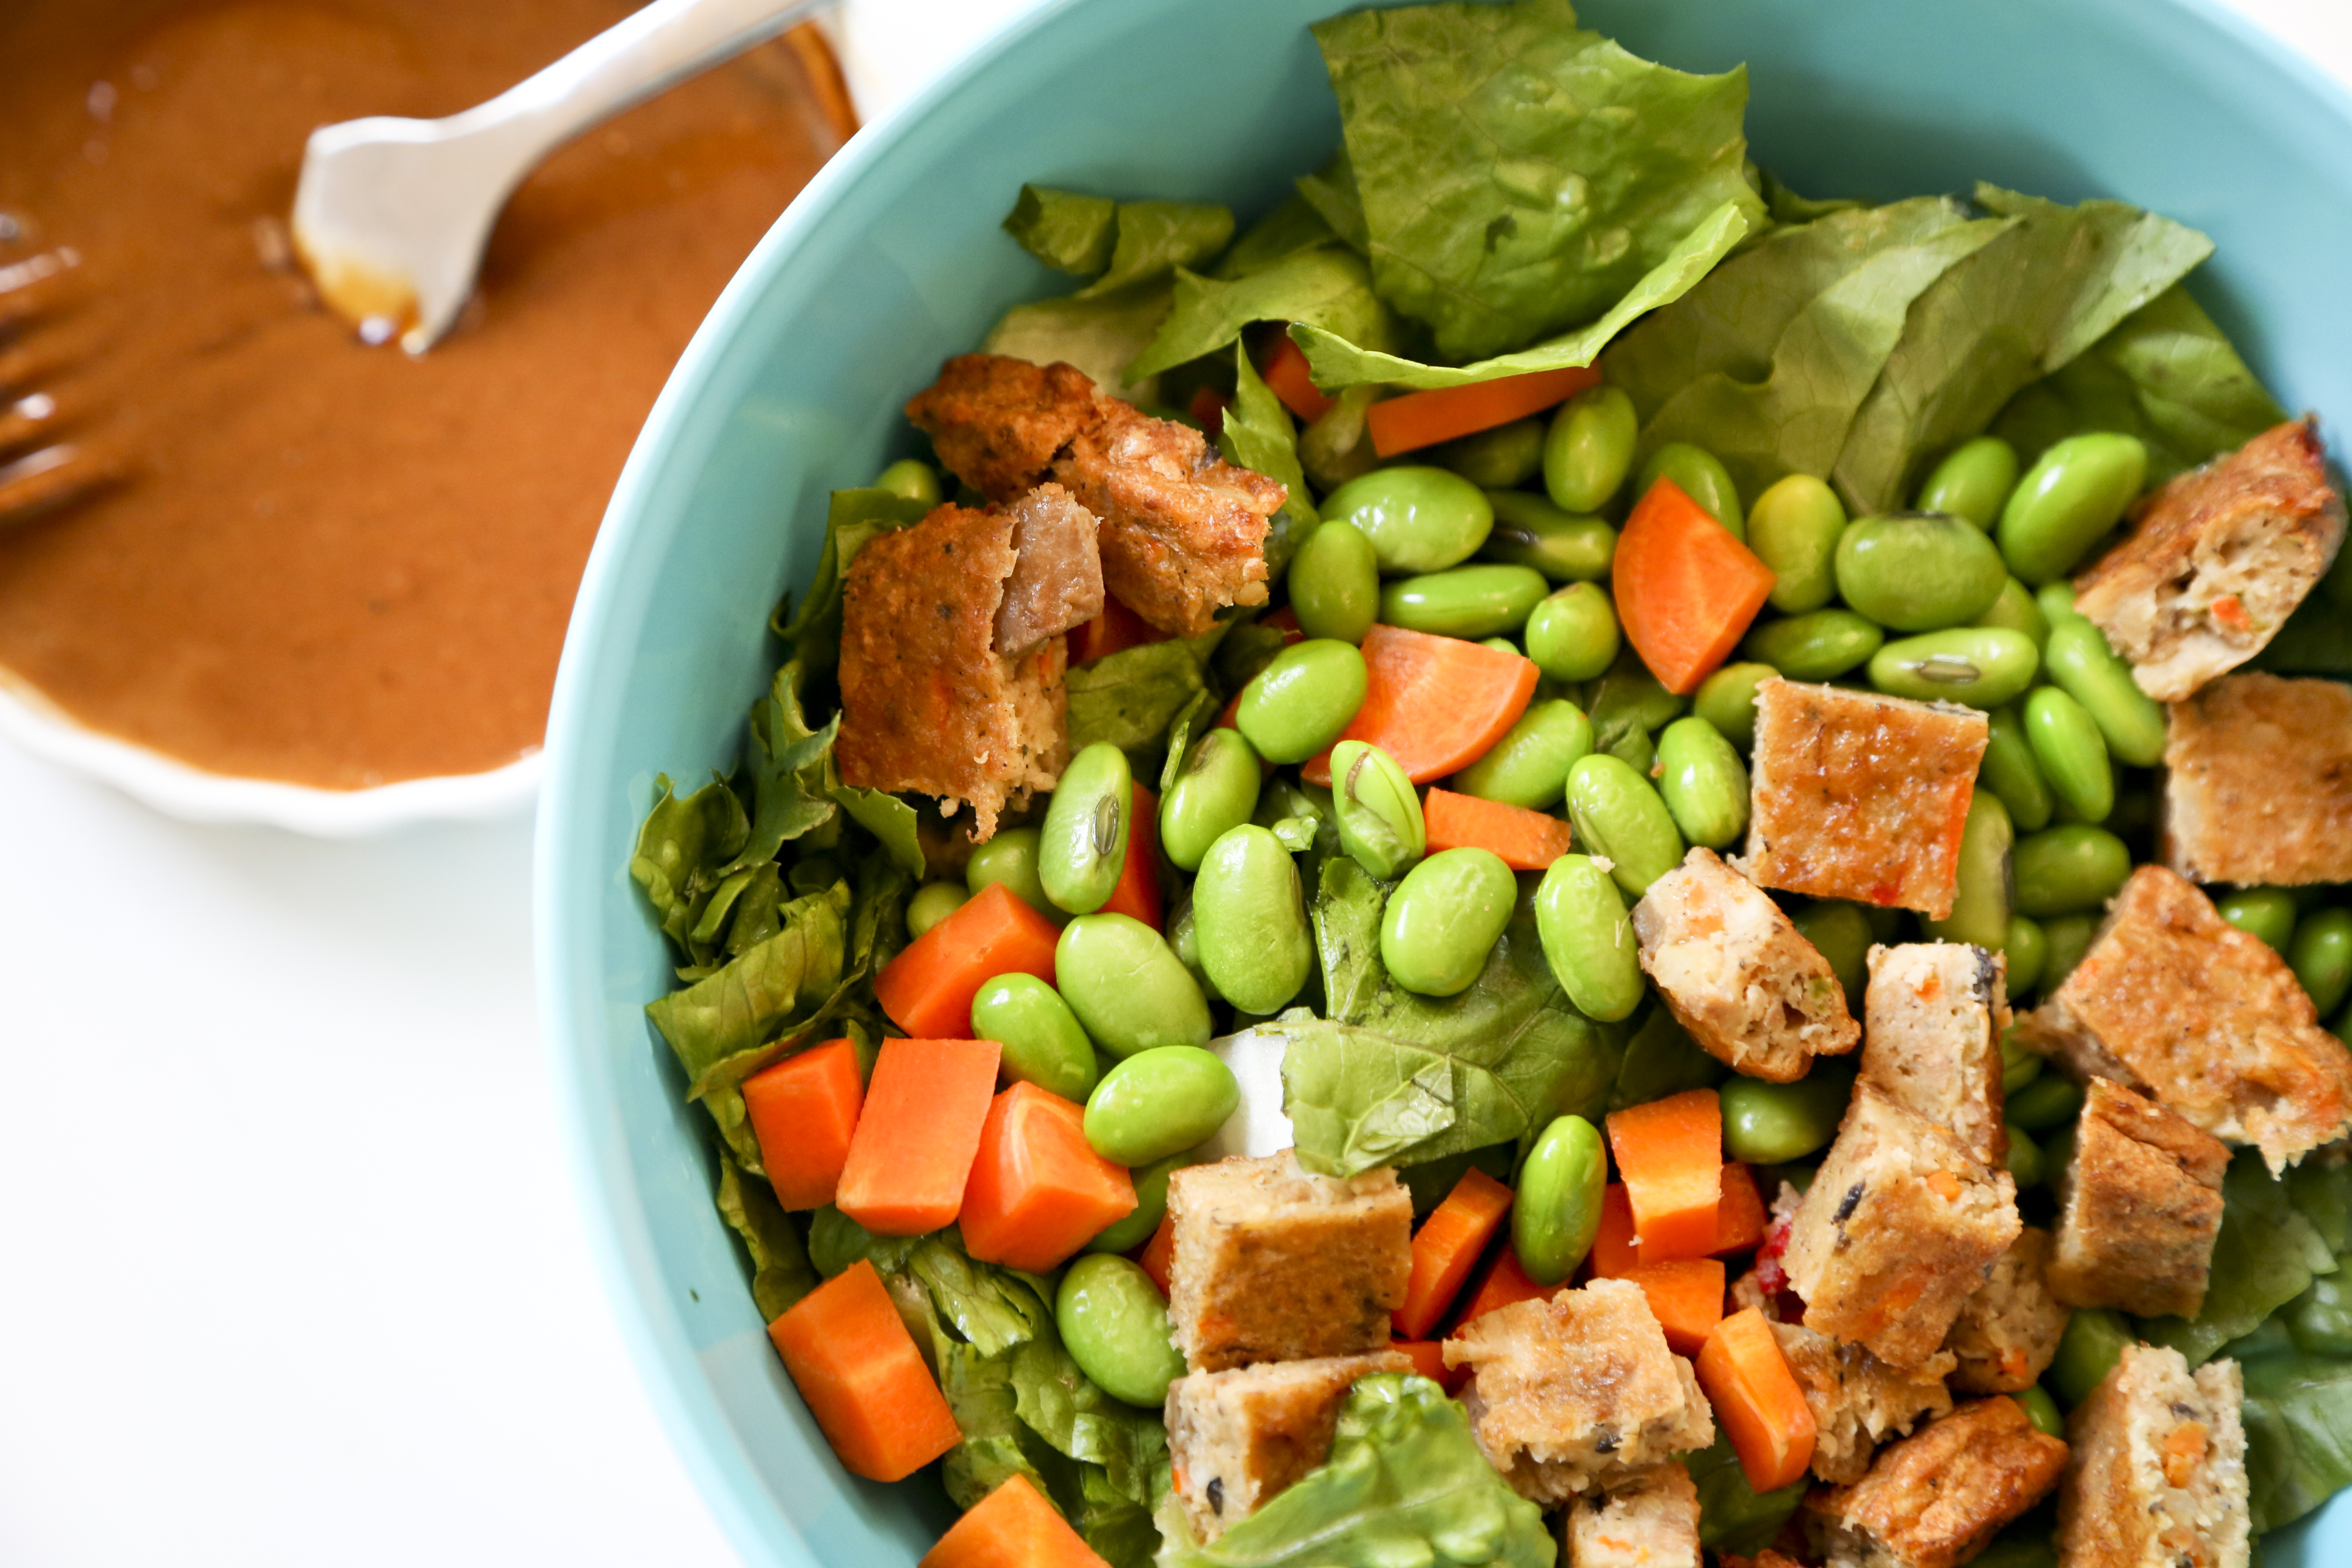
Instead of that polenta and poached egg dinner I had in mind, I threw together a salad of lettuce, carrot, edamame and a Moringstar Farms Veggie Patty.  For dressing, I mixed together some natural peanut butter, hoisin sauce, sriracha and vegetable broth, for a little Asian inspiration (Note: that’s basically how you make the dipping sauce for Vietnamese Spring Rolls).

So you’re probably thinking… good for you! Pat on the back for having a salad! Who gives a crap!?! 

Well really the whole point of all this was to tell you one of the top benefits of having one of these produce delivery services (or a CSA share) and why I’m considering getting it again: it forces you to eat more vegetables.  And not just that… organic vegetables, even better!

Farm Fresh to You brought my count of vegetables for the day from 4 to 6 (plus 3 servings of fruit).  While I probably would have added spinach to my polenta with poached eggs, the box diversified my vegetable intake, because I already had spinach in my smoothie this morning.  Even better, different nutrients!

Overall: I was pleased with what was in the box.  It had a little too much fruit for my liking, but I love the idea.  I think in the future I’ll just choose the vegetable-only box.  I’m all for eating more organic vegetables, because with a sweet tooth like mine, I can always use extra vegetables to balance it out (I’ll be completely honest, after the salad I had a spoonful of peanut butter mixed with sweetened condensed milk for dessert… I know… we won’t talk about it anymore).

Oh and just so you know, I was not compensated by Farm Fresh to You.  I bought the Living Social deal on my own and these are just my opinions.

Have you tried a produce delivery service?  Did you like it?

Advertisement

Creamy Potato Leek Soup: The Cure for the Forgetful

I have a tendency to be very forgetful.  Aside from the little things like forgetting to pick up shoes or forgetting to shave my legs, there are the more important things in life like remembering to pick something up for a friend (sorry, Sara!!!!).

Consequently, I’m a fan of reminders.

I remind myself to sleep, exercise and eat well by leaving notes for myself.

I sometimes forget to eat protein.  So then I make up for it… 1 cup milk + 1 scoop protein powder + 1/2 cup mango chunks… blend, blend, blend…

I, apparently, also need a reminder to wash my travel mug daily so as not to depend on jars for transporting beverages.

I definitely don’t need a reminder that ugly omelets

made with egg beaters, cheddar cheese, mushrooms, onions, oregano and paprika have tons of protein too.

Next I need to find a way to remind myself that produce doesn’t last forever.

So if you’re forgetful like me and have a few leeks sitting in the back of your fridge for nearly a month, here’s something to save the day.

Creamy Potato Leek Soup

1 tbsp olive oil
3 leeks, sliced, white part only
3 garlic cloves, minced
4 small potatoes, peeled and diced
1 tsp dried thyme
4 cups vegetable broth
1/2 cup heavy cream
salt and pepper to taste

Heat oil in a pot.  Add leeks and garlic, cook until leeks are tender about 10 mins.  Add potatoes and thyme, cook for 10 more minutes, add broth and simmer until potatoes are tender.   In a small bowl mix cream with a bit of the soup, add mixture to the rest of pot.  Add salt and pepper.  Allow to cool then blend and reheat if necessary.

Serve with goat cheese!

Don’t forget to make this ASAP!

Mango Pico de Gallo

Friends, it’s hot.

I can’t deal.

This weekend is supposed to be in the 60s but honestly, that cool weather can’t get here fast enough.  Consequently, there’s noooooo way I’m turning on an oven, heck even the stove is getting lonely!

So what do you do when you really want to make something but it’s too damn hot?

Make something that doesn’t require an oven or a lot of cooking time. I have a suggestion…

Mango Pico de Gallo

1 cup mango, diced
1 onion, diced
1 jalapeno, seeded and finely chopped
2-3 tomatoes, diced
juice of 2 limes
1-2 tbsp (or more) fresh chopped cilantro
salt to taste

Combine all the ingredients in a bowl.  Toss together and serve with chips, tortillas, fish, rice, beans, sauteed greens, salads, etc.

Super easy, right?

I also have another suggestion: BBQ Tofu with Mango Pico de Gallo

Press, slice and marinate some tofu in your BBQ sauce of choice.  Using a handy George Foreman grill (or a pan or a BBQ), grill the tofu. On a plate, place one slice of grilled BBQ tofu, top it with some sharp cheddar cheese, top that with another slice of grilled BBQ tofu, then layer on some of the Mango Pico de Gallo.

Aaaamazing!  Sweet, smokey, spicy, salty, citrusy all in one delicious little package!

Perfect for a hot summer day!  You should probably enjoy this outside with friends and a cold beer.

Any other way would probably just be blasphemous.

Go make it now!

Goya Stuffed Tomatoes

So I’ve been pretty bad about blogging this week.  I think it’s the combination of the heat, the start of classes, new part time job and my strange desire to do absolutely nothing at the end of most days.

I wish I could say my time away from this blog has been super exciting but sadly it hasn’t been.  I’ve been sort of underwhelmed with most things, cooking and blogging included.  But today I’ve decided to be my usual chipper self again.

I’m done being underwhelmed.

So a few days ago, I finally made something new today with fun ingredients.  Last week, I got a shipment of Goya products from Foodbuzz’s Tastemaker’s program.  It was perfect  because I didn’t feel like making something super complicated, but I’m not one to compromise on taste.  Consequently…

Stuffed Tomatoes

1 package Goya Yellow Rice, cooked according to instructions*
1 tbsp Goya olive oil
1 onion, diced
1 bell pepper
1 garlic clove
1 can of Goya Black Beans, or about 1.5 cups cooked beans
1 cup greens, chopped
A few large tomatoes
1 oz shredded cheese (optional)

Cook the rice according to the package instructions.  Actually don’t do that!  The package said to simmer the rice for 25 mins but mine was done after about 12!  It definitely would have burned if I had left it on for 25 mins.  Once rice is cooked, set aside.

In a pot, heat olive oil.  Add onions and peppers and cook for a few minutes until onions are translucent.  Add garlic, beans and greens.  Continue to cook for a few minutes, until the greens have wilted. Mix in the cooked rice.  Then you have a delicious tomato filling or just a tasty, versatile side dish on its own!

Should you have a ton of tomatoes from your garden or CSA like I did and actually want  stuffed tomatoes not just a delicious rice dish, core the tomatoes by cutting off the top and removing the center with a spoon.  Preheat your oven to 375F. Fill tomatoes with rice filling.  Sprinkle with cheese and bake for about 20 minutes. Allow to cool and enjoy!

Pretty delicious.  I’m definitely a fan of this yellow rice! Thanks for letting me try it out Goya!  I’m also excited to try out the Adobo Seasoning.  (P.S. You can get some Goya coupons on their website!)

Well off to do some reading and hit the gym!  Have a happy day!

Polenta Eggplant “Lasagna”

Saturday was a serious cooking day.

Every year my department puts on a pancake breakfast for incoming Master’s students (second years are invited as well).  Naturally when the Biscotti Queen asked me to help, I couldn’t say no.  As a result, we calculated that I made about 300 pancakes (maybe more?).  Starting to think I should quit planning and work in food service.  Ha!

Then later in the day there were vegetables that needed to be used.  So I tried to pack as many vegetables into one dish as possible.  The result:

Polenta Eggplant “Lasagna”

1 medium eggplant
1/4 cup salt
1 tbsp olive oil
3 small onions, chopped
1 bell pepper, diced
2 cloves of garlic, minced
2 large tomatoes
1/2 jar of your favorite pasta sauce
1 3/4 cup corn meal (polenta)
7 cups water
1 tbsp onion powder
1/2 tbsp garlic powder
1 tsp salt (or to taste)
10 oz ricotta cheese (I used fat free)
4 tbsp grated parmesan cheese

Cut eggplant into 1/2 inch cubes.  Place in a large bowl, coat with 1/4 cup salt, let stand 15-20 minutes. Don’t worry your eggplant won’t be salty.

In the meantime, chop onions, bell peppers and one tomato.  Heat oil in a large pot and add onions.  While those cook for a few minutes, thoroughly rinse the eggplant and lightly pat dry.  Once onions are translucent, add the eggplant, bell peppers and garlic.  Cook for 5 minutes on medium heat.  Add one roughly chopped tomato and cook for an additional 2 minutes.  Add pasta sauce and simmer on low heat for 25-30 minutes.

Once your sauce is ready, turn off the heat and start making the polenta.  Combine cornmeal, water, onion powder, garlic powder and salt in a pot.  Bring to a boil, stirring occasionally.  Once it starts to boil keep stirring for 5-10 minutes until your polenta thickens and starts to come off the pot.

Then preheat the oven to 375F and assemble your lasagna.  First spread 1/3 of the polenta into a deep baking dish (I didn’t have a really deep baking dish so I used a 9×13 baking dish and a souffle dish), next layer on half the sauce, then spread with half the ricotta cheese and repeat.  Lastly, top with the last third of polenta.   Top with a fresh sliced tomato and sprinkle with a few tablespoons of Parmesan cheese.  Bake for 30 minutes and place under the broiler for a few minutes to get a crispy top.  Let sit for 20 minutes before serving.

Enjoyed with

new apartment mate (one of two), Anna.

And a glass of wine

Normally, I’m not a fan of white wine, but this was pretty great.  Maybe not the best pairing with this dish, but fantastic on its own!  Definitely recommended!

Off to catch up on Mad Men! Have a great night!

Indian Feast!

I’m back!  I went to Florida for a few days to visit some friends, cousins and an aunt!  Fun all around!  Beach, lots of food and family!  It was a nice break from the internet and taking pictures of food, but I’m ready for more blog fun!

Before I left last week, the Biscotti Queen and her fella came over to help me eat some vegetables before my trip.  Here’s another little known fact about the Biscotti Queen: in India, the little boy she lived with called her the Chapati Queen.  I had to put that nickname to the test.

What is chapati?  Everytime you go to an Indian restaurant, you probably order naan or roti, right?  Chapati is a similar flatbread, cooked on a skillet.  Only a few simple ingredients: whole wheat flour, all purpose flour, salt and water.

Mix 1 cup whole wheat flour and 1 cup of all purpose with a 1/2 tsp salt.  Add 3/4 cup water, knead until smooth.  Divide into 10-12 balls and roll into thin circles.

Cook on an ungreased, hot skillet for about 30 seconds each side.  You can also toast it on the stove like such

Then brush with butter and sprinkle with salt.  Mmm sooo good!

Serve it with something tasty like Baingan Bharta and Fennel Rice for a quick and easy Indian inspired meal!

Baingan Bharta

from Manjula’s Kitchen

1 medium eggplant
2 tomatoes
1 jalapeno or green chili
1 bell pepper (I used a strange yellow variety)
1 tsp ground ginger (or 1/2 tbsp fresh chopped)
1-2 tbsp olive oil
1 tsp cumin
1 tsp coriander
1/2 tsp tumeric (I completely forgot to add this and it still tasted good)
1/2 tsp cayenne
salt to taste (or about a tsp)
1/4 tsp garam masala
1 tbsp fresh cilantro, chopped

Microwave the eggplant 8-10 minutes, until tender.  Allow to cool then peel and dice.  Set aside.

In a blender, blend together the tomatoes, jalapeno (or green chili) and ginger.  Set aside.

Heat oil in deep pan or pot.  Once oil is hot, add diced bell pepper and sautee for 2 minutes.  Remove from pan with a slotted spoon and set aside.  Next, add cumin and coriander to oil and stir.  Add in the blended tomato mixture, add tumeric and cayenne.  Add eggplant and bring to a boil.  Using a wooden spoon, mash the eggplant along the side of the pot for about 10 minutes.  By the end you should have a lumpy mash.  Lastly, stir in garam masala and cilantro.

Serve with Chapati and Fennel Rice with Raisins!

Eating with your hands is recommended!  After our delicious feast, Biscotti Queen and boy were pooped.  Aren’t they adorable?

BUT that didn’t stop us I from finishing up something we’d been wanting to make for a looong time!  Stay tuned for that!

Vegetable Black Bean Enchiladas

My CSA this week was one of the best!  I’m not sure if it’s that I missed it since I haven’t been able to pick it up for about 3 weeks or it was just outstanding.

Kale, Green Onions, Sweet Peppers, Jalapenos, Eggplant, Beets, Parsley, Basil, Lettuce, Cabbage, Tomatoes, Oh my!

Wayy too excited.  Another exciting thing was this

Maseca to make tortillas!  Just add water!

I’ve been going TORTILLA CRAZZYYYY!  Yesterday, all the talk of families made me miss my own.  Naturally, Guatemalan breakfast came to the rescue: Black Beans, Eggs, Sour Cream and Homemade Tortillas.

Today I decided to combine the two wonderful things: Handmade Tortillas + CSA Vegetables.  Result = Black Bean Vegetable Enchiladas


Vegetable Black Bean Enchiladas

1 tbsp olive oil
2 small summer squashes, chopped
1 medium onion, diced
1 bell pepper, diced
1 jalapeno, seeded and finely chopped*
2 cups greens (spinach, kale, beet greens, etc.)
2 cups black beans, cooked
1 1/2 tbsp cumin
1 1/2 tbsp chili powder
1/2 tbsp paprika
salt and pepper to taste
12 tortillas (handmade or store bought)
2 cans enchilada sauce
2 oz cheese (optional)

In a large pot or pan, heat oil.  Add onions and squash.  Cook until onions are translucent.  Add red pepper and jalapeno, cook for a few more minutes.  Add beans, spices and greens (I used beet greens), cook for a few minutes until the greens have wilted.  Now you have the delicious filling that is a wonderful side dish on its own as well!

Next, take a tortilla, spread some of the filling in the center and roll like a taquito/flauta.  Place on a 9 x 13 baking dish.  Repeat until all 12 tortillas are rolled or you run out of filling.  Pour enchilada sauce over the tortilla rolls.    Sprinkle with cheese (I used string cheese, because that’s how I roll but I bet chedder or monterey would be better).

Let the tortillas soak up the liquid for at least 30 minutes.  In the meantime, clean up and preheat the oven to 350.  Bake for 20 minutes.  Allow to cool and serve with a dollop of sour cream (or greek yogurt) and some chopped green onion!

*Please use gloves when chopping the jalapeno!  I had a terrible experience over 4th of July weekend where jalapeno got in my eye, saturated my contact and pain ensued!  Trust me take the precaution.  Use gloves!

Deeeeelicious!  Wayyyy better than a lot of the stuff at Mexican restaurants.  I generally don’t like Mexican restaurants because the food a lot of times isn’t that great.  Refried beans and sour cream covered in cheese is not my idea of a delicious Mexican meal. Maybe that’s the food snob in me 🙂

Are you a fan of Mexican food?

Brownies and the French

July 14th was Bastille Day.

I’m not French.

I know that, but I’d take any excuse for a party and baking.

Some friends had a party, Sara and I made Champagne Brownies

and I tried to look French because obviously a black dress with a sassy look and an odd hairdo screams Je suis française!

But really, Champagne, we can call that French, right?

I’m not sure we should call these brownies brownies though.  They should probably just be called fudge.  They’re dense and bittersweet and intense.

Champagne Almost Fudge Brownies

adapted from Couture Cupcakes

1 lb of unsweetened chocolate (i.e. baker’s squares or coco powder+oil)
12 tbsp butter
1/2 tsp salt
1/2 tsp vanilla extract
2 cup granulated sugar
1/2 cup powdered sugar (omit if you use sweetened chocolate)
4 eggs
3/4 cup flour
1 cup champagne

Preheat oven to 325F.

In a large pot on low heat, melt together the chocolate and butter.  Remove from heat.  Add the salt, sugar and vanilla.  Stir together to combine.  Stir in 1 egg at a time until just combined.  Add the flour stirring until just combined.  Add the champagne and stir until incorporated.  Transfer to a greased 9 x 13 baking pan.  Bake about 40 minutes.  Allow to cool completely (I would even say you can chill them), cut and serve (with ice cream or on its own).

So rich!

I kept up with the French theme this morning (two days later).

Omelets are French.

Zucchini Goat Cheese Omelet

1/2 tsp olive oil
3 tbsp diced onion
1 small zucchini, diced
1/2 cup chopped chard or kale
1/2 tbsp fresh chopped parsley or basil
salt and pepper to taste
3/4 cup egg substitute  (or 3 eggs, beaten)
1 oz goat cheese

In a small skillet, heat oil, add onions and zucchini cook for a few minutes until zucchini is almost tender.  Add chard and cook an additional minute or two.  Season with salt and pepper and set aside.  Spray a medium skillet with cooking spray and put on medium/low heat, add eggs, cover and cook until eggs are pretty much cooked through (no longer jiggle when shaken) about 4 minutes.  Carefully flip the egg using a spatula, sprinkle with goat cheese and vegetable filling, fold over and transfer to a plate.

Sprinkle with a little more parsley and serve with a slice of homemade oatmeal bread.

Very light and tasty.

This omelette only has 200 calories, must be why French women don’t get fat.

We’ll just forget about the brownies.

The Pros and Cons of a CSA Share

Hi friends!  Hope your day is starting out well.  This morning I went to a TERRIBLE spinning class, but we won’t talk about that.  Instead, let’s talk about vegetables.

I’ve had my CSA share for about a month now.

Overall I’d say it’s been great.  Here in Ithaca, having a CSA share is pretty common, but I know in other places it’s not.  So why not do some pros and cons. Feel free to chime in with some comments!

Cons:

1. My salad spinner is my new best friend.

With a CSA you don’t have the luxury of packaged/pre-washed vegetables.  Preparing things takes a bit longer as everything has to be washed, trimmed, chopped, etc.

2.  No more green monsters everyday.

I haven’t gotten any spinach in my share so I’ve been going through green monster withdrawal.  I actually went to the grocery store at one point this month ONLY to buy spinach so I could make a green monster.  I tried it with JUST kale, it was NOT good.

So sometimes you miss certain vegetables.  I also haven’t had a carrot since May even though I used to have one every day.  But I have plenty of other vegetable options.

3.  Eat cautiously.

Because the veggies are so fresh and haven’t traveled far, I’ve found my fair share of worms in my lettuce.  Some would see this as horrible, but I don’t think it’s that big a deal.  If anything, it’s a marker of freshness.

Added bonus: helps me slow down (as I tend to eat very quickly) when I have to inspect each bite 🙂

4.  Somewhat pricey?  I’m torn on this one.  My share ends up costing $19 per week.  For that amount, I have unlimited local organic vegetables.  For one person, that might be a lot but I think if I bought the same stuff (entirely local and organic) at the grocery store it would probably cost more.

Pros:

1.  Supporting local agriculture.  You can feel good about yourself… or something.

2.  Plenty of organic vegetables!

Having a CSA share has definitely made me increase my vegetable intake.  Since I don’t have the heart to throw anything away, I eat a huge bag of vegetables each week usually something to the effect of: 2-3 bunches of kale, 1 head of lettuce, a kohlrabi, some broccoli and a cucumber.  Kind of a lot.

3.  Forces you to get creative.  A lot of times, you’ve never heard of a vegetable that’s in your share (check out my first experience with kohlrabi).  But a lot of times you don’t want to eat the same vegetable prepared the exact same way for weeks on end.

So you try to get creative, like this:

Vegetable Polenta Bake for One (or Two)

1/2 tbsp olive oil
1 small onion, diced
1/2 tsp minced garlic
1 small zucchini, thinly sliced
1 small yellow squash, thinly sliced
1-2 cups greens (I used kale and chard)
1 cup pasta sauce (jarred or homemade)
1-2 tbsp fresh chopped parsley
1 oz mozzarella (I used 1 string cheese)
1-2 tbsp grated paremesan/pecorino romano/asiago cheese
1/4 cup cornmeal
1 cup water
1/2 tsp garlic powder
1/2 tsp onion powder
1/2 tsp salt

Heat oil in a pan, add onion and cook for a few minutes (until translucent), add garlic, zucchini and yellow squash and cook for a few minutes (it shouldn’t be cooked all the way).  Next add greens and stir around until they start to wilt.  Add pasta sauce and stir until greens have cooked down.  Turn off the heat and stir in the parsley.

In a small pot or sauce pan, combine cornmeal, water, garlic powder, onion powder and salt.  Bring to a boil, stirring occasionally.  Once cornmeal starts to thicken (aka polenta), keep stirring until the polenta starts to come off the sides.

Take a small baking dish,  spread half of the sauce/vegetable mixture in the baking dish, then on top of that spread half of the polenta.  Next top with half the string cheese/mozzarella and half of the parmesan.  Repeat.

Bake in the toaster oven for 20 minutes.

Allow to cool.  Either eat it straight from the dish for another single lady (or gent) meal or serve on a plate with a simple green salad.

Ingredients from CSA in this dish: zucchini, yellow squash, kale and chard, parsley. + side salad with lettuce and cucumbers from CSA as well.

4.  Less trips to the grocery store!   Since I pick up at the Farmer’s Market once or twice, I make less frequent trips to the grocery store.  As a result, I spend less on things I don’t really need.  Because let’s face it, who actually sticks to their shopping list when they go to the store?

5.  It’s fun!  If you’re like me, vegetables are probably one of the most exciting things ever!  You get fun new ones every week!

Do you have a CSA share?  Consider getting one?
Any Pros or Cons I missed?

Naturally Nutty Zucchini Muffins and a Wine Trick

A few nights ago, my roommate and I were talking about muffins.  Yesterday morning after my nap (at 10:30am!  Isn’t that nuts!??!  I’m ridiculously tired these days) I was inspired.

Naturally Nutty Zucchini Muffins

1/2 cup Naturally Nutty Cinnamon Vanilla Sunflower Butter
1/2 cup brown sugar
1/4 cup egg substitute (or 1 egg)
1/2 cup milk
1 cup whole wheat pastry flour
1/2 tsp baking powder
1/2 tsp baking soda
1 small zucchini, grated (about 1 cup)

Preheat oven to 350F.

Cream together the sugar, sunflower butter, egg and milk.  Add whole wheat pastry flour, baking soda, and baking powder  and mix together.  Fold in grated zucchini.  Place in greased muffin pan and bake for approximately 20-22 minutes.  Makes 10 muffins.

I have to confess the whole reason I made these up was because I wasn’t a fan of the Naturally Nutty Cinnamon Vanilla Sunflower Butter.  I got two jars a while back from one of Kath’s Open Sky deals.  While it tastes okay, I’m not a HUGE fan of it on its own.

However, baked into these, it tastes good!  If you don’t have Naturally Nutty Cinnamon Vanilla Sunflower Butter on hand you can use 1/2 cup of any nut butter + 1/2 tsp vanilla + 1/2 tsp cinnamon!

These aren’t the sweetest thing in the world but they’re tasty enough for a baked treat.  Definitely not bad for about 150 calories. But honestly, not what I was  expecting.   The batter tasted a million times better than the baked product.   Oh well.

A few days ago my friend sent out this video about opening a bottle of wine with a shoe. I can’t insert it here for some reason but watch it! It’s nuts!

So we tried it.  Here’s the recap.

We rewatched the video (tools ready).

Tapped the bottom.

Hit it against a wall and nothing.

Tried a door frame.

Hmmm maybe it has to be a real cork not a synthetic cork.  Good thing we have another bottle.  Start over.

Brick outside maybe?  Still looking for other hard surfaces.

Hmm maybe it’s the shoe.  Let’s try a cowboy boot (his, not mine, in case you were wondering).

Nothing. We’ll try again later.

We’re thinking maybe it has to do with the bottom of the show. We’re going to try with one of my hard bottom leather boots instead of a rubber soled shoe.

Isn’t that video nuts!?!?  Anyone speak French who can tell me if I’m missing something?