Basic Country Bread and My New Bread Baking Obsession

Last year, I bought the Tartine Bread book.  There was a special on Amazon.  It was $2.99 on Kindle.  I couldn’t turn it down.

I remember I started reading it while on the plane to Philadelphia.  The photos are so amazing and the recipes so detailed that I knew I had to try it as soon as possible.   Weeks went by and I didn’t bake any bread.  The thought of making a starter was intimidating to say the least.  Then, on December 2nd (funny how I remember these dates), my friend brought me some of her starter.

bernard

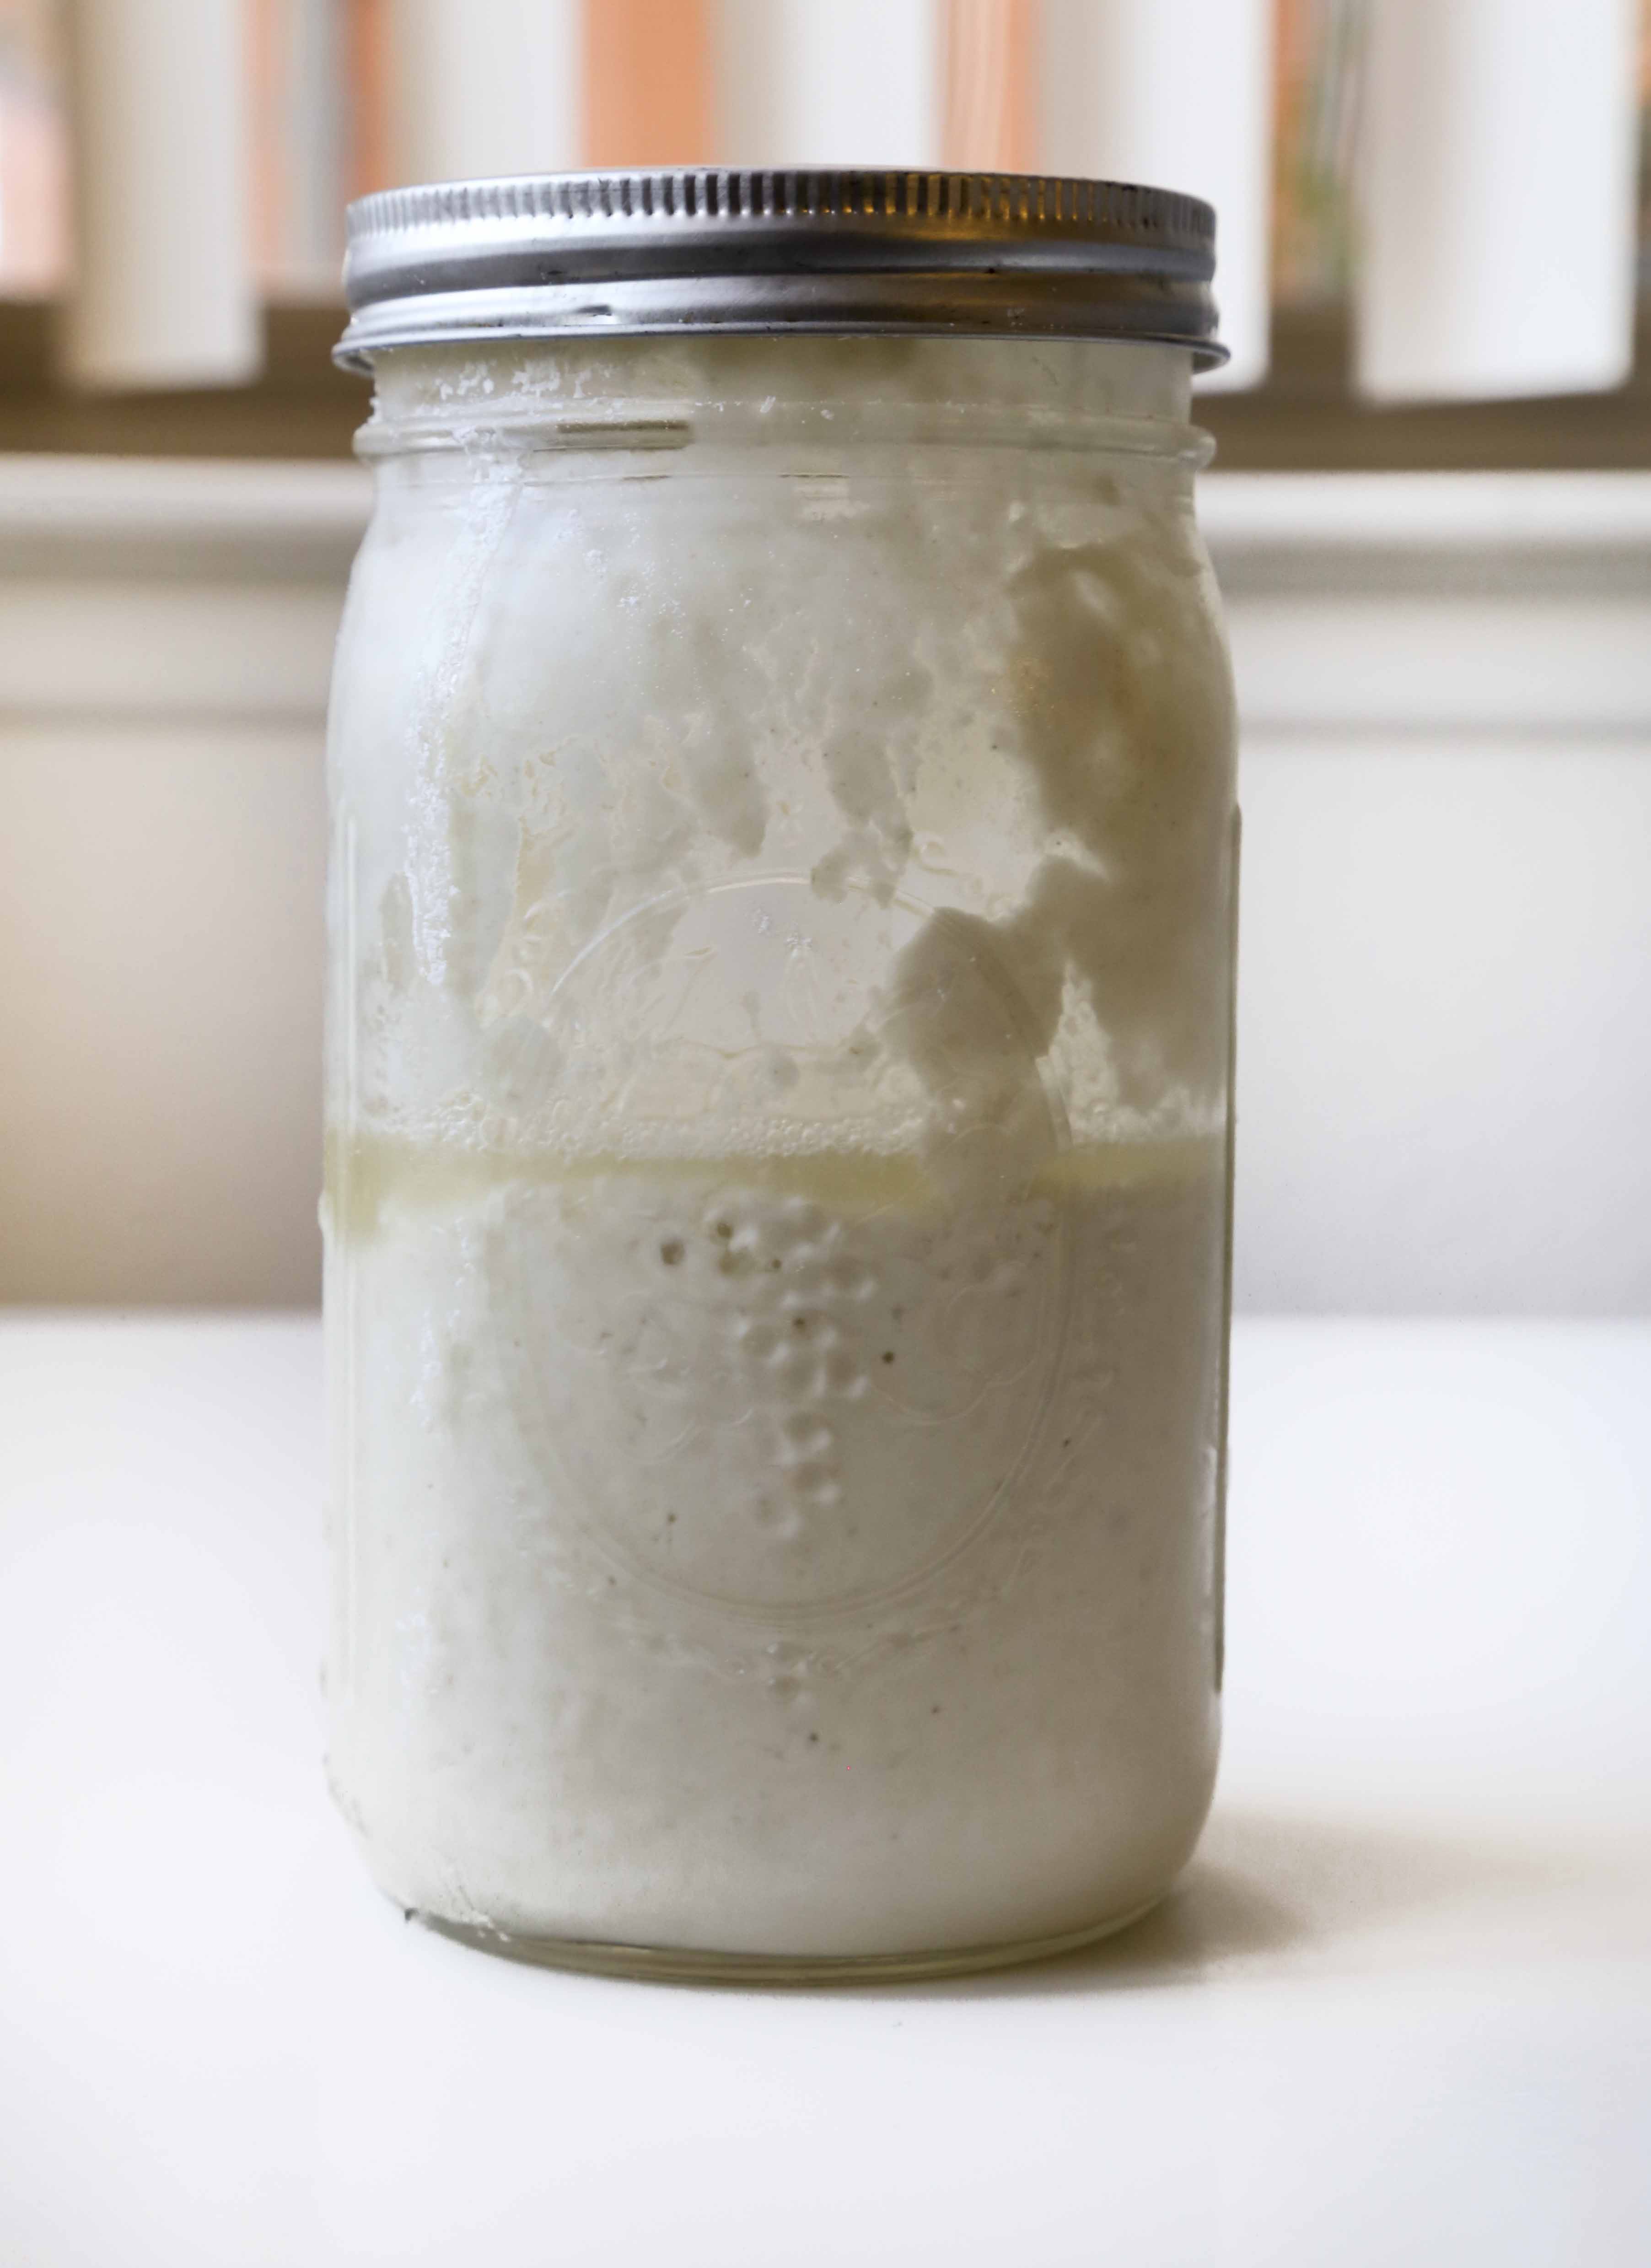
Blog friends, meet Bernard.   Bernard is about 5 years old and comes from a culinary school in Michigan.  Now a part of him is with me, and through Foodologie with you too.  Here’s here to help us make bread.

I love that my friend named the starter.  It makes the process so much more fun.  Because after all, he needs to be taken care of and fed.  I feed Bernard on Monday nights and leave him in the fridge until I’m ready to bake some bread.

bread2

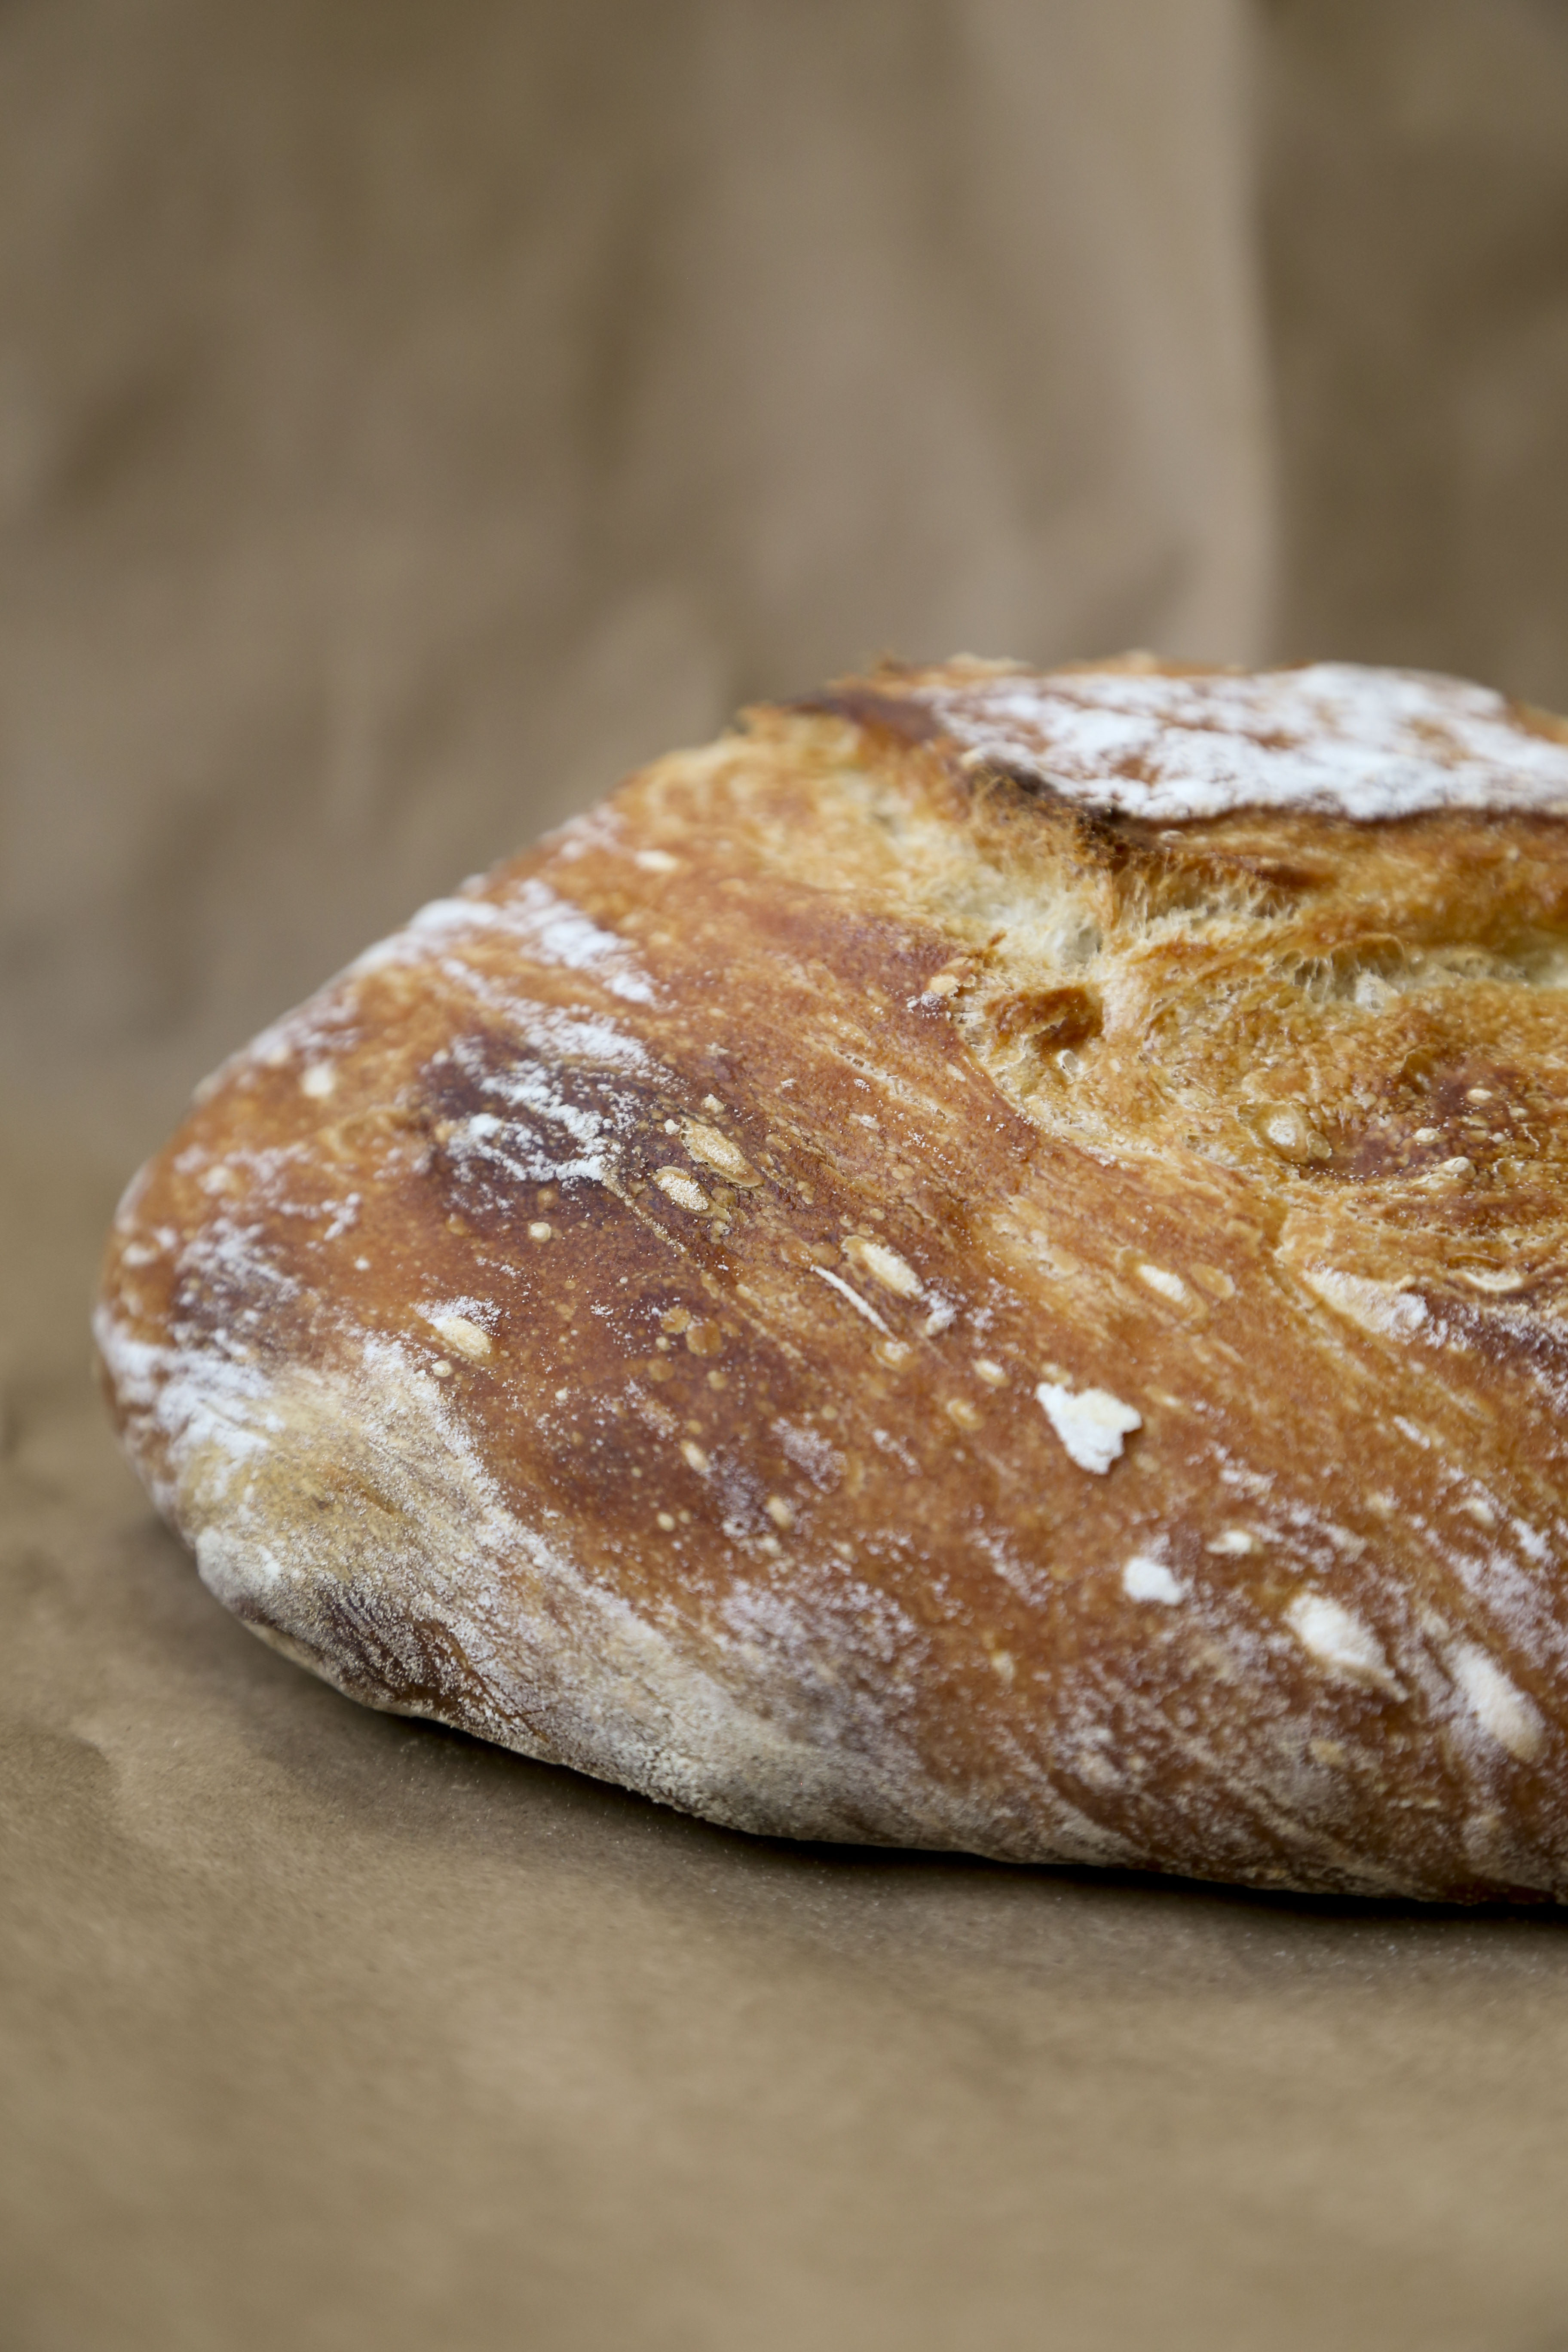
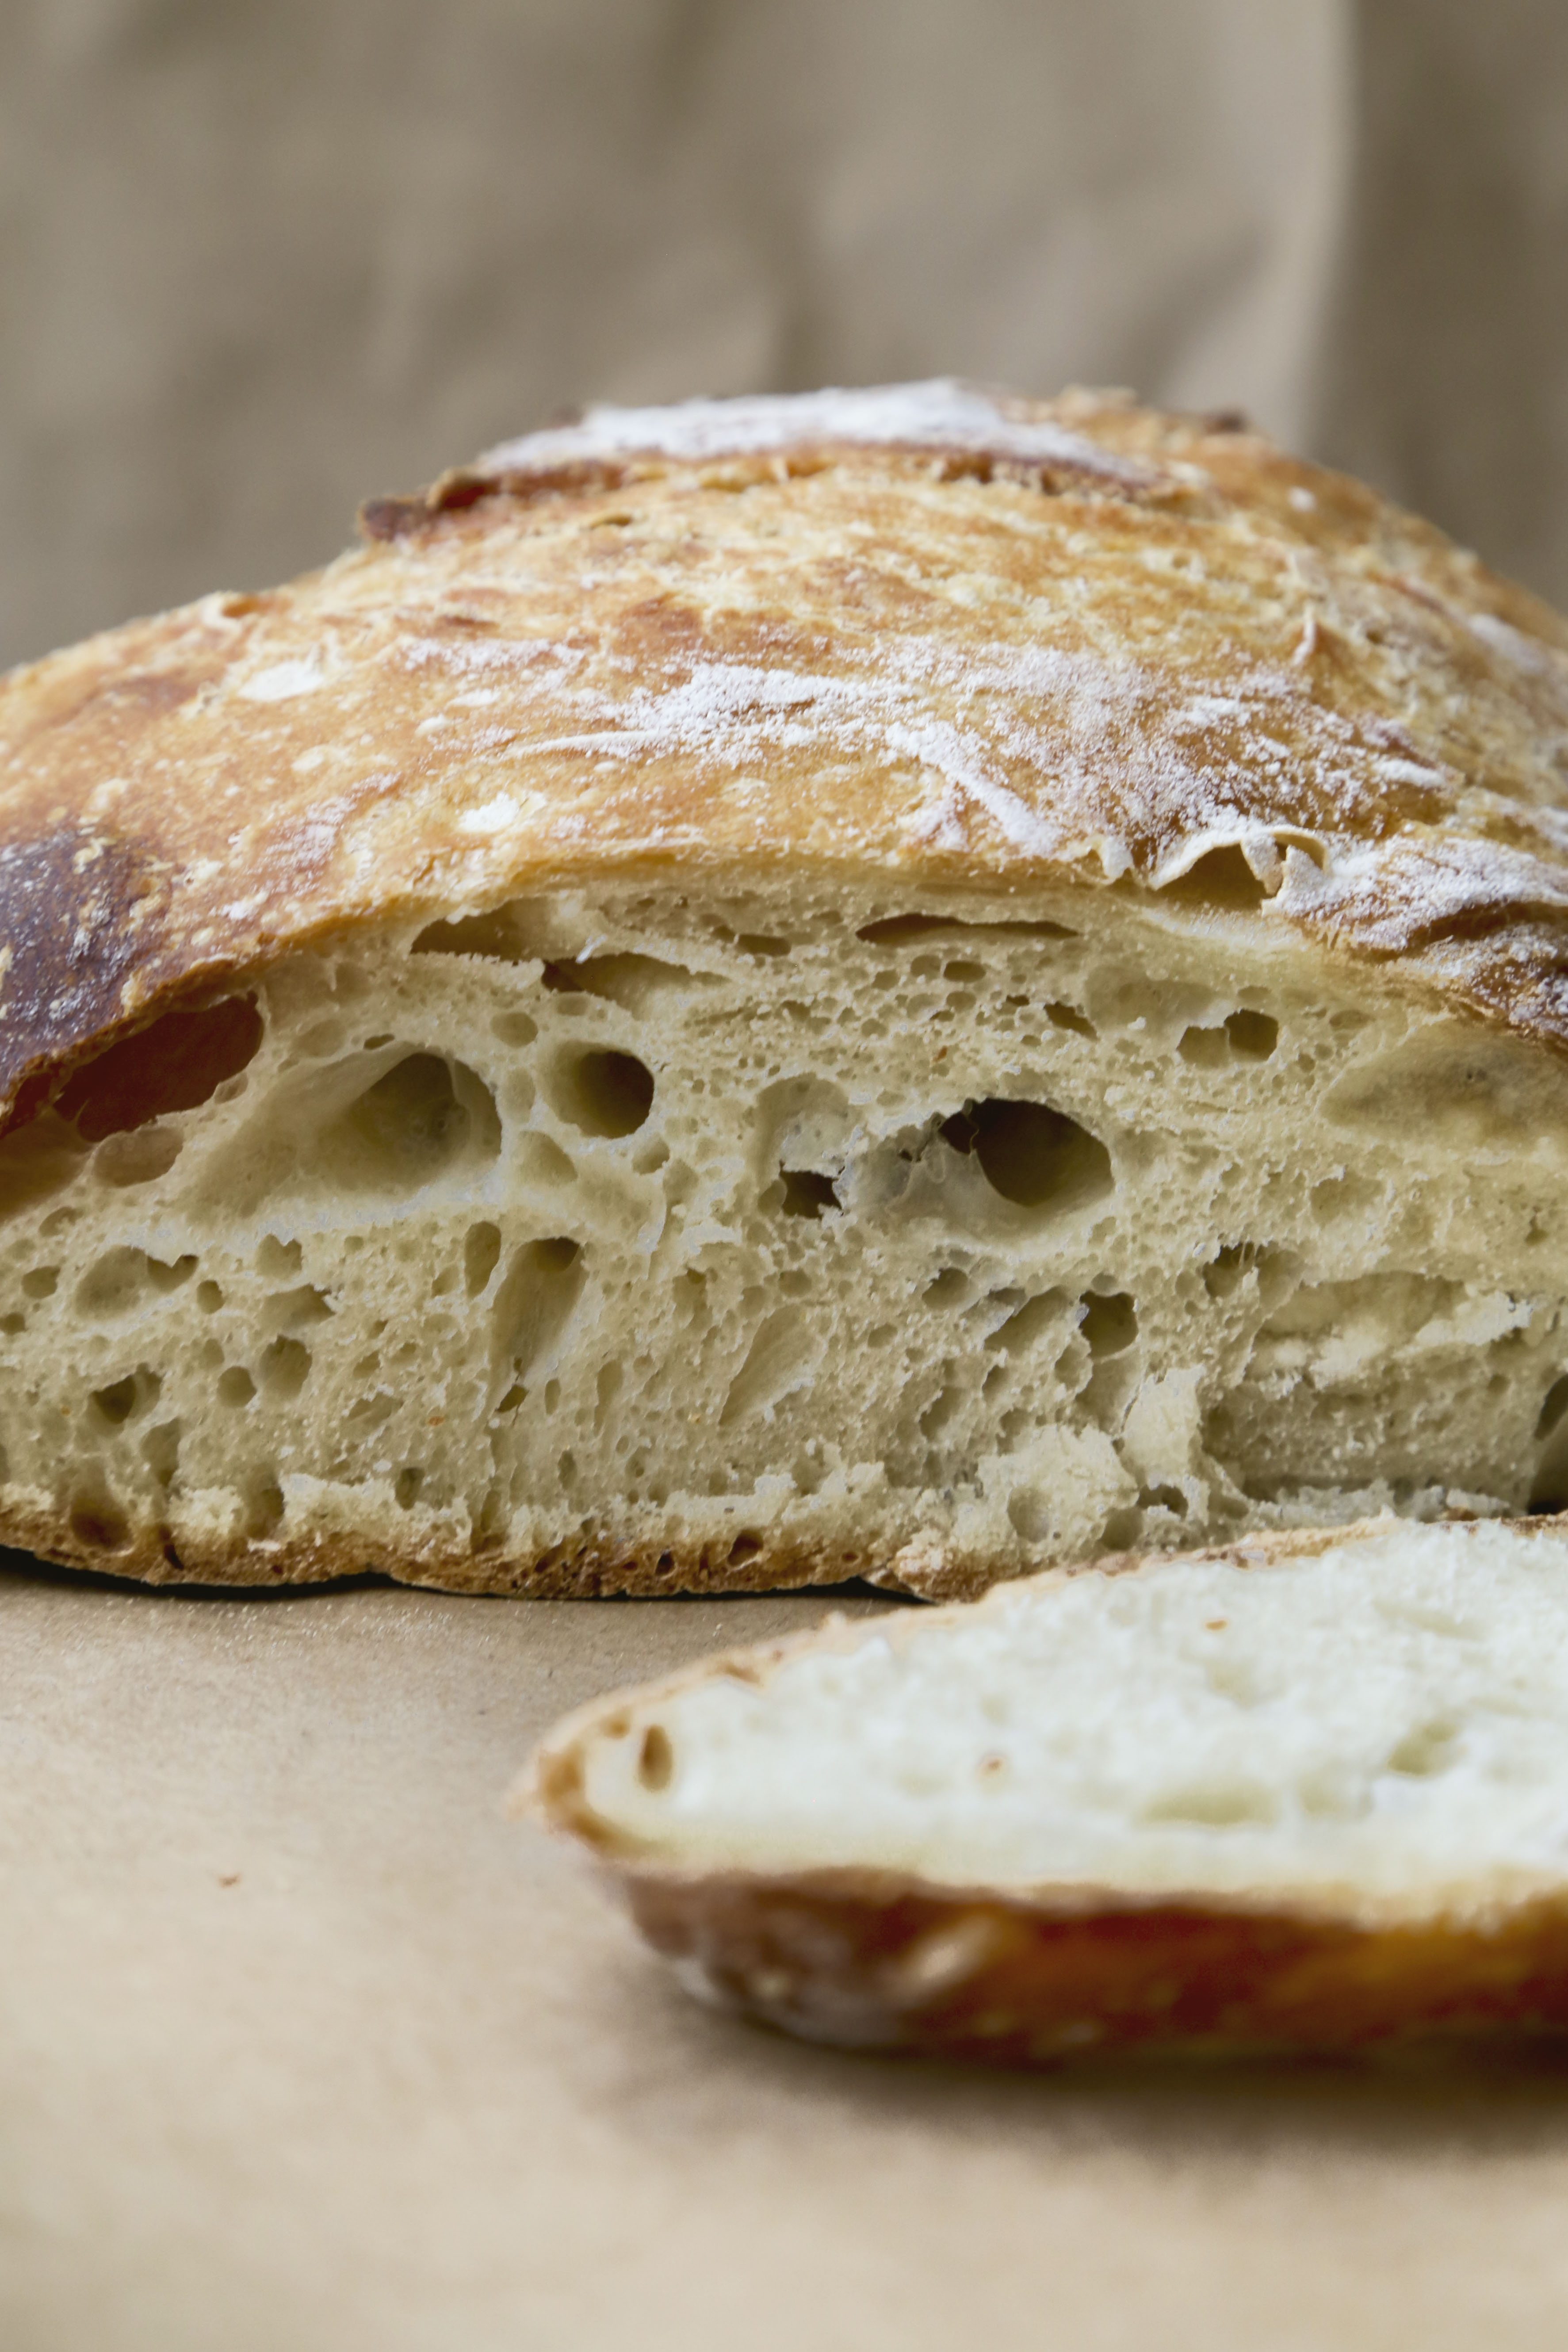
Some of this glorious bread.  It’s nothing short of amazing.  It might take days to make, but it’s worth it.  And it all starts with Bernard.

The night before I want to make bread, I take a big spoonful of starter and mix it with pretty much equal parts flour and water (if we want to be specific 3/4 cup water + 3/4 cup Flour and about 1/4 cup starter will give you enough leaven, or fed starter, to make 2 loaves of bread).

starter

So I let that sit on the counter.  It gets all bubbly and smelly in the most endearing way possible.  Once it’s bubbly and ready to go (you’ll know it’s ready when you drop a bit of it in some water and it floats), I mix it with flour and water.  Once it’s all incorporated, I let it sit for about half an hour.  After half an hour, I add a bit of salt and some more water.  Then the first “bulk rise” begins.  This takes 3-4 hours.  You don’t have to do much, just turn it every so often.  That means dip your hand in water, then dip your hand in the dough and turn it a bit.  Pretty simple right?

After a few hours (assuming it’s in a fairly warm temperature, sometimes I’m too cheap to put on the heater and so I turn the oven on for a few minutes, turn it off, then put the bread in there to keep it warm), I turn it onto a well-floured surface and divide it in two.

This part is tricky.  The dough is sticky.  It sticks to everything. Your hands. The towel. The surface. Your hair.  Everything.  My first time around was rough.  I think I was a little shy with the flour, but after the next few times, I leaved that a lot of flour is necessary.  So you divide the dough into and fold it into two rounds mounds.  Then it sits for hours.    I know right? There’s a lot of sitting involved.

So those mounds sit for another 3-4 hours on the counter covered with a towel (flour that towel too, because seriously the dough will stick to it).  I’ve also tried leaving it in the fridge overnight.  That worked too.

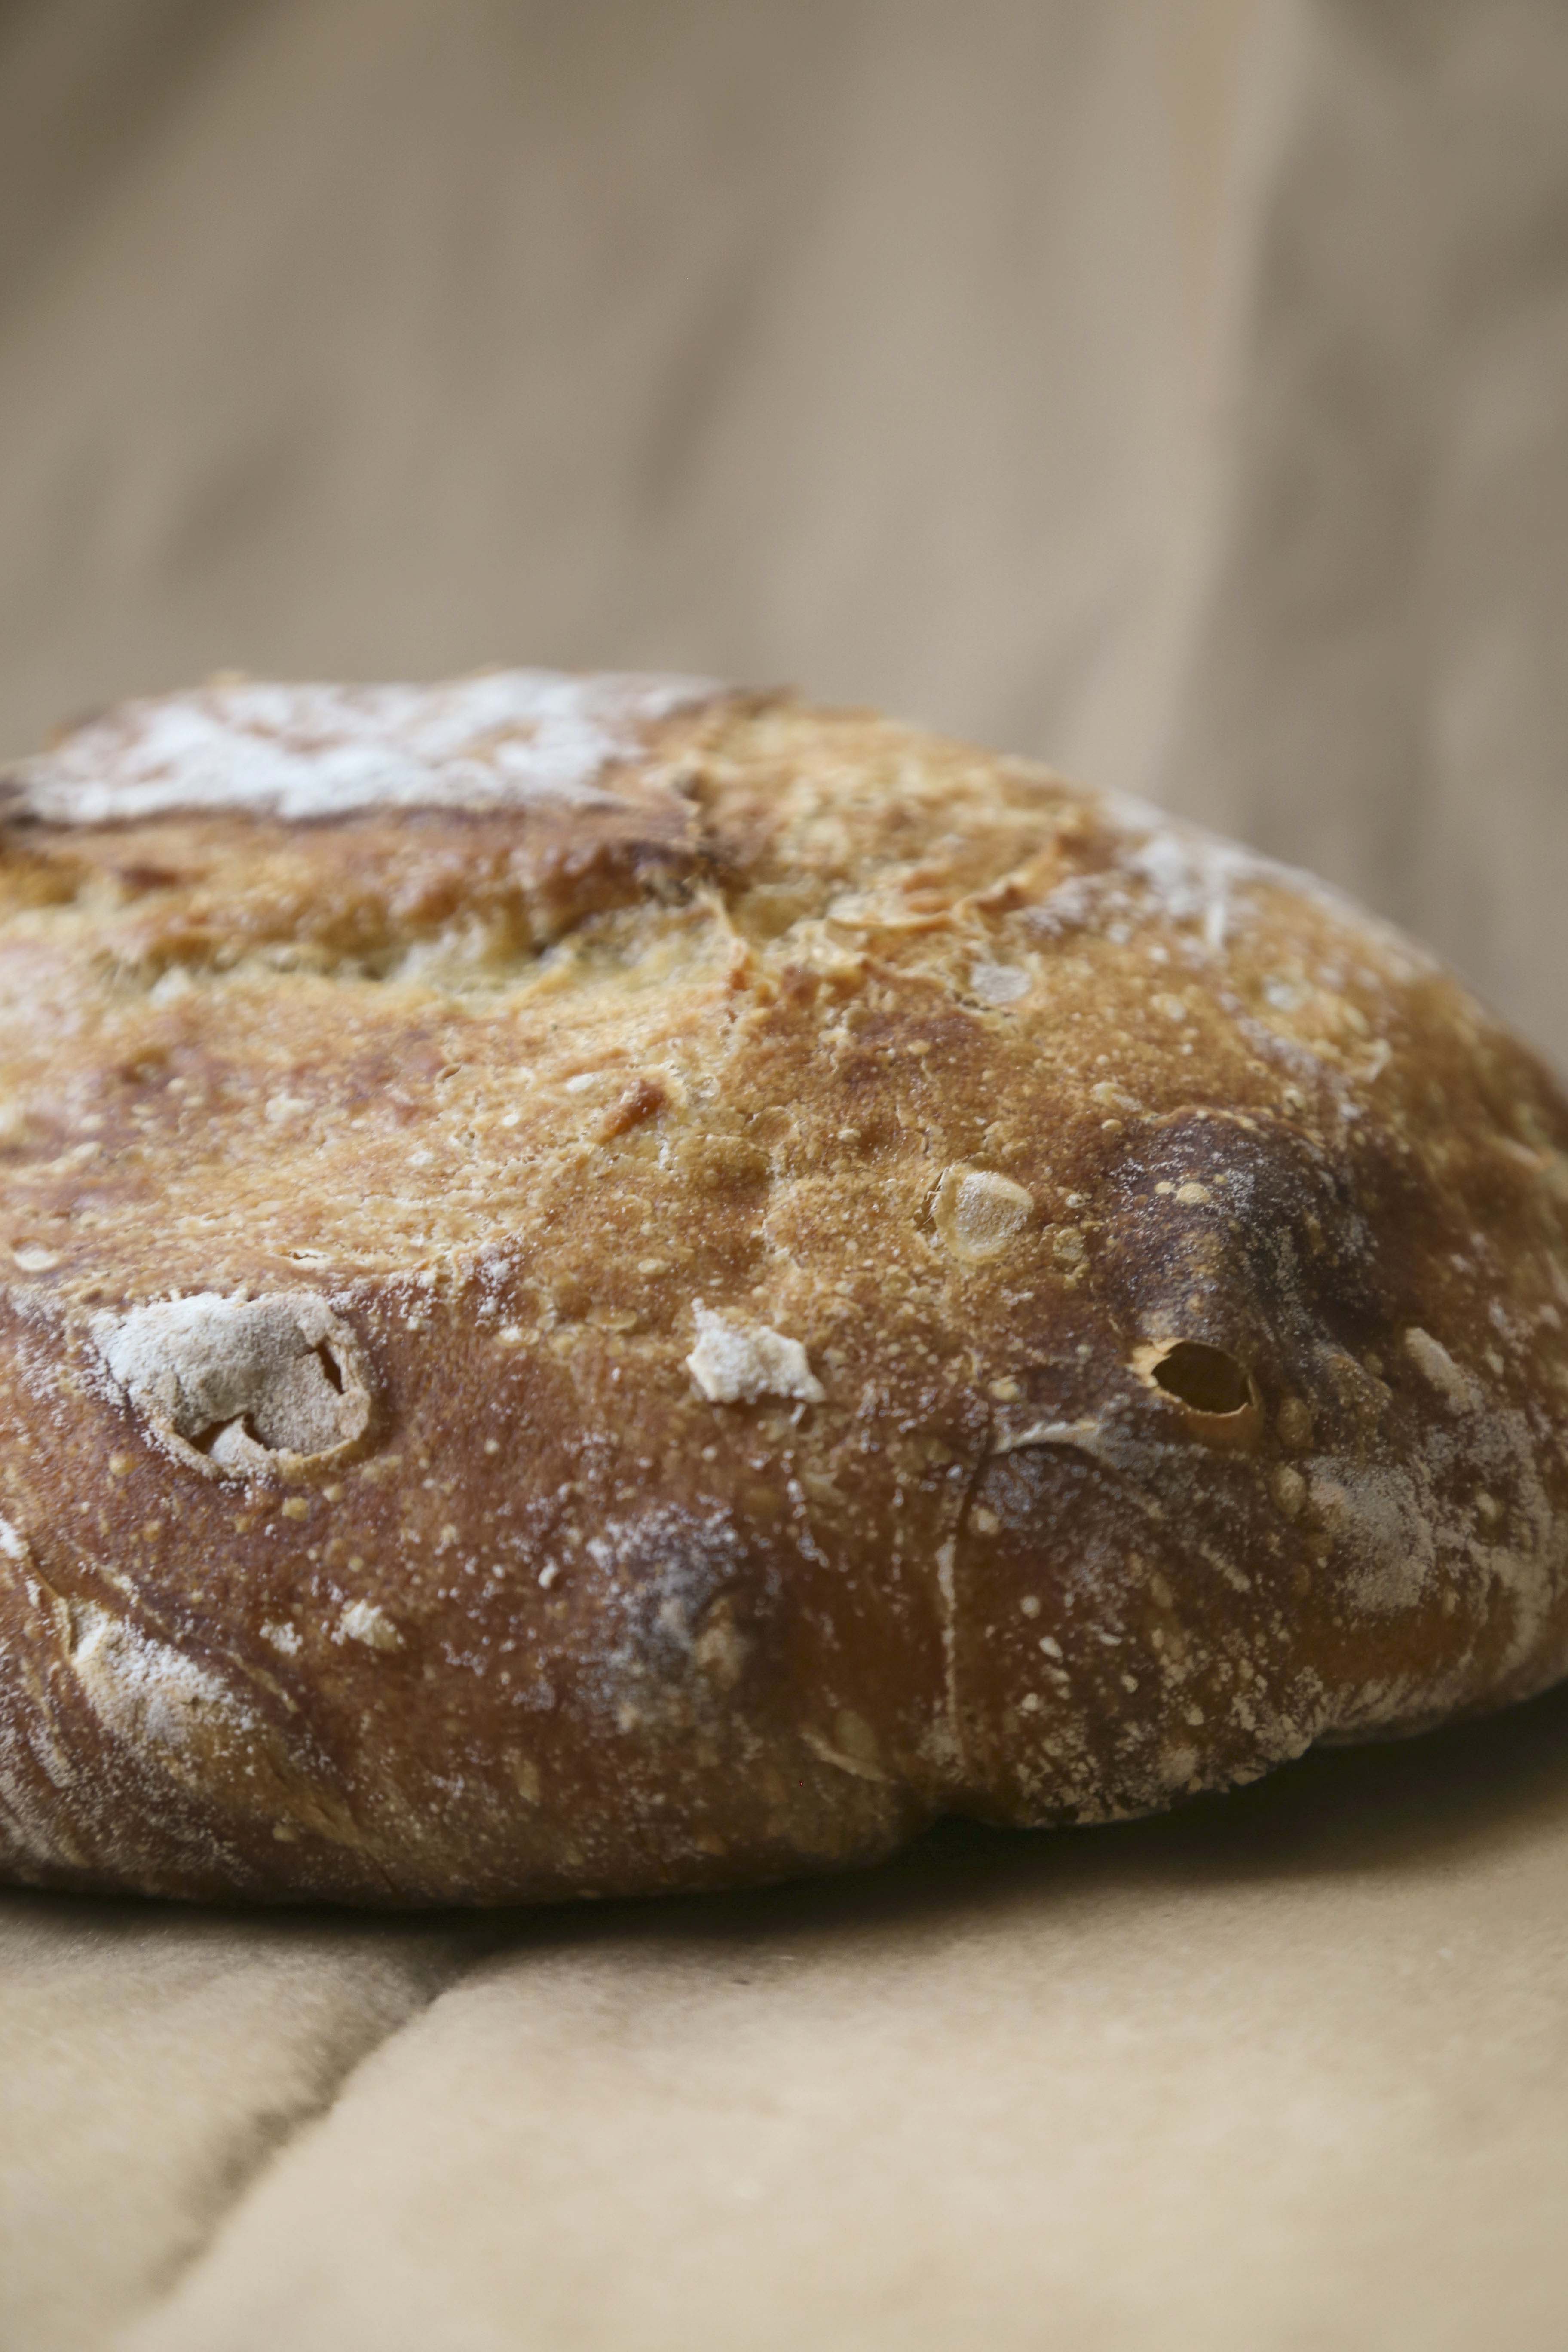
After the dough has sat for a good while (either 3-4 hours or overnight in the fridge), you can start getting everything ready to bake.  I bake this bread in a dutch oven.  I think the dutch oven is my saving grace, because I’m pretty sure my oven is a bit messed up.  The dutch oven ensures an even bake, so you can’t argue with that.

So I turn the oven to 500F and put the dutch oven in there (empty that is, with the lid on), for about 20-30 minutes.  You want it to get piping hot.  This also gives you bread a little more time to rise (or to get to room temperature if it was sitting in the fridge).

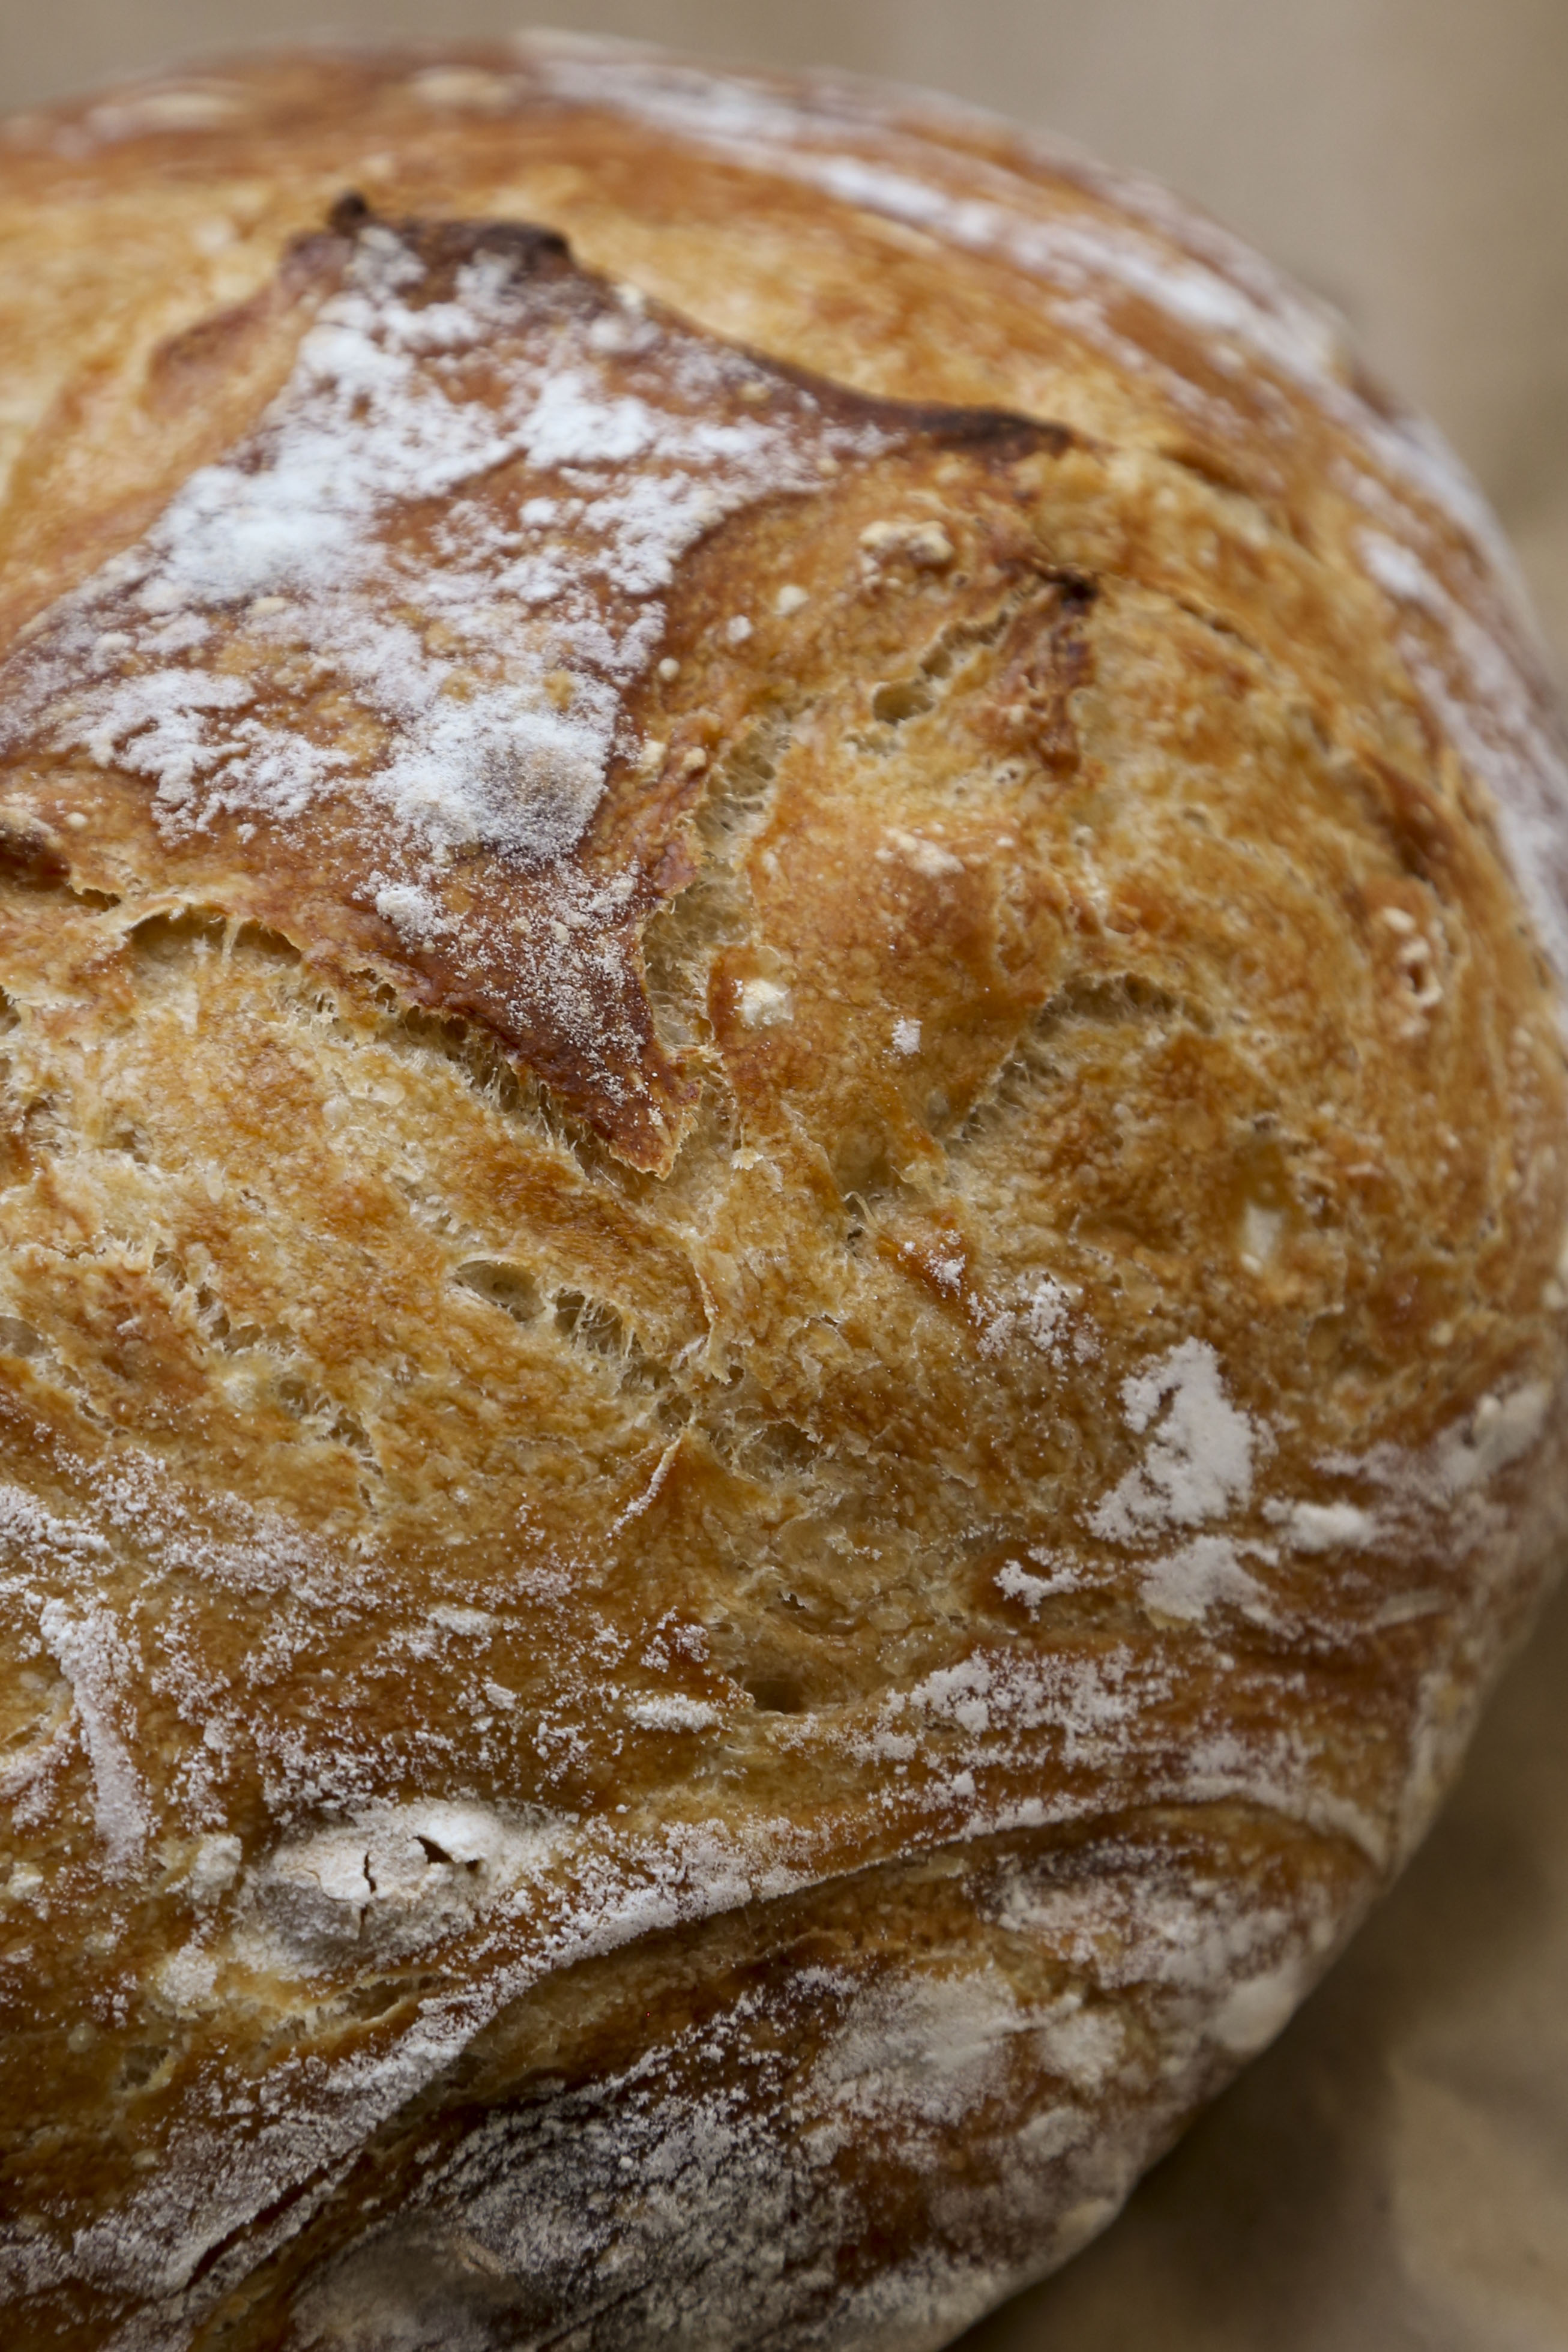
Again, I reform the loafs into a round loaf then score to top.  Scoring apparently is important because it allows the bread to rise to it’s full potential.  I have a really hard time with the scoring.  In Tartine Bread, they suggest using a razor; I use a knife.  We made due with what we have, right?

Then the next tricky part, putting the dough in the dutch oven without burning your hands.  The dough isn’t the sturdiest.  The water content is pretty high so it’s a very sticky dough.  But it’s easy enough.  Drop it in, re-score if necessary and put in the oven with the lid on, reduce the temperature to 450F and bake for 20 minutes.  After 20 minutes, remove the dutch oven lid and continue to bake for another 25-30 minutes or until it reaches the level of brownness you like.

bread1

Remove the bread from the dutch oven, allow to cool then serve.  You can repeat the baking process with your second loaf now.  The dutch oven doesn’t need to heat as long.  I usually just put it back in the oven for about 5-10 minutes then move on.

For the full recipe, check out this write up in the New York Times.  It has all the measurements and weights you need to get your bread making on.  I still can’t get mine to look exactly like their bread, but sooner or later, I’ll get there.  But even if it doesn’t look exactly like the Tartine loaves, it tastes amazing.

To say that I love this bread is underselling it.  I seriously love this bread.

bread4

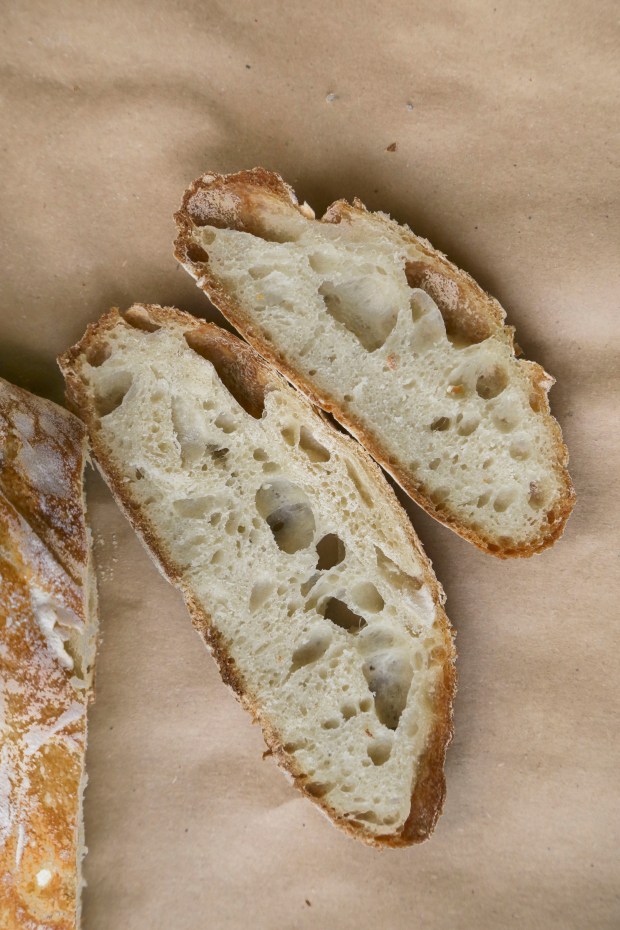
It’s great for sandwiches (ahem, grilled cheese anyone?).  Awesome toasted with butter.  Amazing if you spread it with jam.  The process might be time consuming.  Scratch that, it’s totally time consuming, but it’s worth it.

bread3 copy

So this is my newest obsession: bread.  I want to make it all the time and eat it all the time, but I probably shouldn’t, so gifting loaves of bread is becoming my new thing.

bread5

Now that I’ve mastered the basic country bread.  I’m ready to move on to new varieties.  Of course, croissants and brioche are on my bucket list for the year, but I also want to start experimenting with different flours: whole wheat, rye, etc.

Let’s get our carbs on!

Are you a home bread baker or just an equal opportunity bread lover?  What’s your favorite kind to bake or eat?

Advertisement

Ceviche de Jaiba

I’ve been agonizing over this post for about two weeks now.  I’ve had a million ideas about what to write and none of them seemed to work out.  Instead of agonizing any further, let’s talk about what led up to the amazing recipe I’m going to share with you… It all started with a hike… a 10 mile hike to a bridge where people were bungee jumping.  If you’re in the LA area and have never been to the Bridge to Nowhere, I recommend it.

10330272_10103153063966343_3890541291378493148_n

Given how NOT graceful I am when it comes to balance, I’m really impressed that I could cross streams on rocks and logs.  I think the hike is medium difficulty, and overall really fun.  It took us about five and a half hours.  On the way back, we were all ready to be done, because it was hot and we ran out of water.  Clearly a bad combo.  Next time, I’m bringing a water filter and a swim suit.  There were tons of little pools in the stream for swimming.  It would have been great to swim given the heat.

That particular day, my legs were sore.  The previous week, I had hurt my arm at crossfit.  While I let it heal, I modified all my workouts to involve only lower body movements.  Basically I just squatted and ran for a week.  Then on Saturday, Allison and I ran.  So by Sunday, my legs were toast.  This hike did them in.  By the end of the hike, all I wanted to do was drink a gallon of water and sit for a bit.  Being the dream boat that he is, Jesse made this:

Ceviche1

I’m going to go ahead and say that this is really his recipe, but I’m sharing it with you because it’s damn delicious.  Gentlemen, make this for your lady.  She will appreciate it.

Ceviche de Jaiba

1lbs imitation crab meat, shredded (or Real Crab meat)
2 tomatoes, diced
1/2 large onion, diced
1/2 cup cilantro, chopped
juice of 4 limes
salt to taste
Avocado and Chips/Tostadas, for serving  

Combine all ingredients in a bowl.  Serve with sliced avocado on a tostada or with chips and cover in hot sauce.  Jesse likes to put ketchup on his too.  That was tasty enough but I was a big fan of the hot sauce.  You can also add fresh sliced jalapeños or habanero peppers for some extra heat.

Ceviche2

This ceviche with a nice cold beer was the BEST post-hike meal.  It’s light and citrus-y, and if made by a nice fella… it’s pretty much everything a girl could ask for.  I can’t wait to go on another hike and eat this again.

What’s your favorite place to hike? How about post-hike meal?

Nectarine Tart with Pistachio Oat Crumble

Pies vs Tarts?

What’s the difference?  Great question.  There’s probably an official answer but honestly to me they’re the same thing.  The only difference is the type of pan you make it in.  But honestly, you can make any tart recipe into a pie and any pie recipe in to a tart.  So whether you want to call this a pie or a tart, I’m ok with either.

I took this to a potluck and I think I called it a pie.  But now that I think about it, I made it in a tart pan so it should be called a tart.  A tart sounds fancy, doesn’t it?

nectarine tart1

Pie sounds homey.  Tart sounds regal.  I’m ok with fancy business, but let’s be honest, I’m not a fan of expensive.  My tart pan was $2.50 at the Good Will.  I wanted to keep this dessert low budget too.  I went to the store and looked for the cheapest fruit available.  That’s my strategy because generally the cheapest fruit is in season.

Nectarines were $0.50/lb.  So awesome.  It took about $1.50 worth of fruit to make this tart.   Beautiful and frugal.  I’m into it.

nectarine tart3

Nectarine Tart with Pistachio Oat Crumble

For Crust:

175g All Purpose Flour (about 1 1/4 cup)
1 tbsp Sugar
pinch of Salt
1 stick of Butter, cold
2 tbsp (maybe more) Ice Water

For Filling:

8 Nectarines, diced
1 1/4 cup Sugar
1/4 cup + 2 tbsp Flour
1/2 tsp Cinnamon (optional)
2 tbsp Rum (Optional)

For Topping:

1/2 cup Flour
1/3 cup Oats
1/4 cup Brown Sugar
2 tbsp White Sugar
1/4 Pistachios, chopped
pinch of Salt
4 tbsp Butter (plus extra for placing on top)
1 tbsp Rum (optional)

Prepare pie crust by combing flour, sugar and salt.  Using your fingers, break the butter into the flour mixture until it resembles very coarse crumbs (even pea sized is fine).  Add ice water and bring it all together into a ball using your hands.  Wrap in plastic wrap and refrigerate a few hours.  You can make this up to two days in advance (or much longer and freeze it).

Once the dough has rested enough (a few hours or days), roll out and place into a 9 inch fluted tart pan (this will also work in a pie dish).  Place in freezer while you make the filling and topping.

nectarine tart4

Pre-heat oven to 350F.

Dice nectarines (leave the skin on) and combine with sugar, flour, cinnamon and rum.  Set aside and make the topping.  In a bowl, combine ingredients for filling.  Using your fingers, work ingredients together (feel free to add more pistachios if you’d like) until the texture of coarse crumbs.

Now assemble tart.  Place nectarine filling into prepared tart pan.  Top with crumble topping.  Lay a few thin pats of butter over the top.  Bake for about an hour and a half, or until filling is bubbling and top is golden.

Allow to cool completely.  Serve and enjoy!

nectarine tart2

This was a big hit.  I was a fan.  I loved the crumble topping with pistachios in it, and let’s be honest… nectarines > peaches, but we never see nectarines in a pie/tart.  I’m not sure why, but I’m glad I changed that.  Also, everyone should leave the skin on the fruit.  Just saying…

For some reason I’m thinking plum pie needs to happen sometime soon, because I never see plums in a pie.

What’s your favorite fruit pie?  If you have an awesome recipe, share it in the comments!

Cóctel de Camarón: Shrimp! Yes, Please!

So today, was a crazy day.  Ok it totally wasn’t crazy.  I was just exhausted.  I somehow had the bright idea of going to crossfit twice in a 12 hour time span…  I hurt real bad right now. I don’t recommend it.  Give yourself at least 24 hours between workouts.  It’s a good idea.

But work outs aside, today was a bizarre day for me in terms of personal realizations.  Way back when, I used to use SparkPeople to track calories, but I hadn’t logged in for almost a year.  So this morning, I randomly did…

I saw my last log in was after I got back from Italy where I ate my weight (and then some) in Nutella, Pasta and Gelato for nearly 6 months.  Since then, I’ve lost 18 pounds.  That’s kind of a lot on someone who is only 5’3″

I guess getting back home, eating normal meals and exercising a few times a week served me well (even if Paleo didn’t…).

So in honor of the fact that my butt (among other things) shrank, let me tell you about an actual meal (as much as I love cake, it’s not a meal) that is more or less balanced, light and delicious too.

cocteldecamaron2

I would consider this to be moderately healthy.  Depending on what you serve with it that is…

cocteldecamaron3

It involves shrimp, tomatoes, onions and a few splashes of (unhealthy) secret ingredients:

ingredients

Cóctel de Camarón

3 cloves of garlic
1/2 onion, diced
1 lb Shrimp, peel on
2 cups clamato
1-2 tbsp ketchup
2 tbsp orange soda
2-3 limes
2 tomatoes, diced
1/2 cup fresh cilantro, chopped
Salt
1 Avocado, sliced
Tostadas, for serving

In a blender (I used my magic bullet), blend together 1/4 of an onion  (reserve remaining diced onion) and 3 garlic cloves with some water.  Once it’s smooth, add to a sauce pan.  Fill with water until about 2-3 inches from the top.  Add some salt (or a pinch of bouillon) and bring to a boil.  In the meantime, rinse your shrimp and place in a metal mesh strainer.

Cook shrimp in the broth by dipping the strainer into the broth, like this…

shrimpbroth

Once the shrimp is cooked (pink all over, be careful to not overcook), place in a bowl over some ice.  You might have to do this in batches.

Next take about 2 cups of the cooking broth and place in a large bowl.

ingredients2

Add about 2 cups of clamato, ketchup, lime juice and orange soda.   Be careful, it’s a science.  Taste it along the way to see how it is.

mixingingredients

Stir it all together and set aside.  Next peel your shrimp (alternatively you could peel your shrimp before cooking then put the skins in the broth to help give it more flavor).  Now you’re ready to assemble.

shrimp

Start by putting a good amount of diced tomato (1/2 cup?), onions, cilantro and Serrano chili in your bowl.  Then add the shrimp and avocado.  Last pour the broth/clamato mixture over your shrimp.  You want a good amount in there because it gives it great flavor.

cocteldecamaron

From there, you’re pretty much ready to go.  But don’t forget one important thing…

pacifico

A beer.  Because life is all about balance and a cold beer tastes great with this dish.

Serve with tostadas, extra lime, salt and hot sauce (optional).  This will serve 2-3 people.

cocteldecamaron1

Whoever said that the way to a man’s heart is through his stomach as probably right, but they forgot that the way to a woman’s heart is the same direction.  I wish I could take credit for this, but I can’t.  It was made entirely by an awesome boyfriend who makes ridiculously tasty things.

He makes me generally healthy meals, while I make him cookies and pies.

Clearly, a little bit of both is necessary.  Eat some shrimp and vegetables, as well as some cookies and wine.

What was the last healthy meal you had?