Prosciutto Wrapped Dates Stuffed with Smokey Cheese

There are two people in the world who I think appreciate wine and cheese as much as I do: my sister and my friend Sara.

This past week, I was visiting my sister before I start a new job tomorrow (wish me luck!).  We did wedding things and of course there was wine and cheese.  One night, while enjoying some wine with cheese and prosciutto, we had a great idea.

Let’s put it all together with dates, because dates are always a good idea (and Jesse’s mom loves to give us boxes of dates and we love it).

prosciutto wrapped dates2

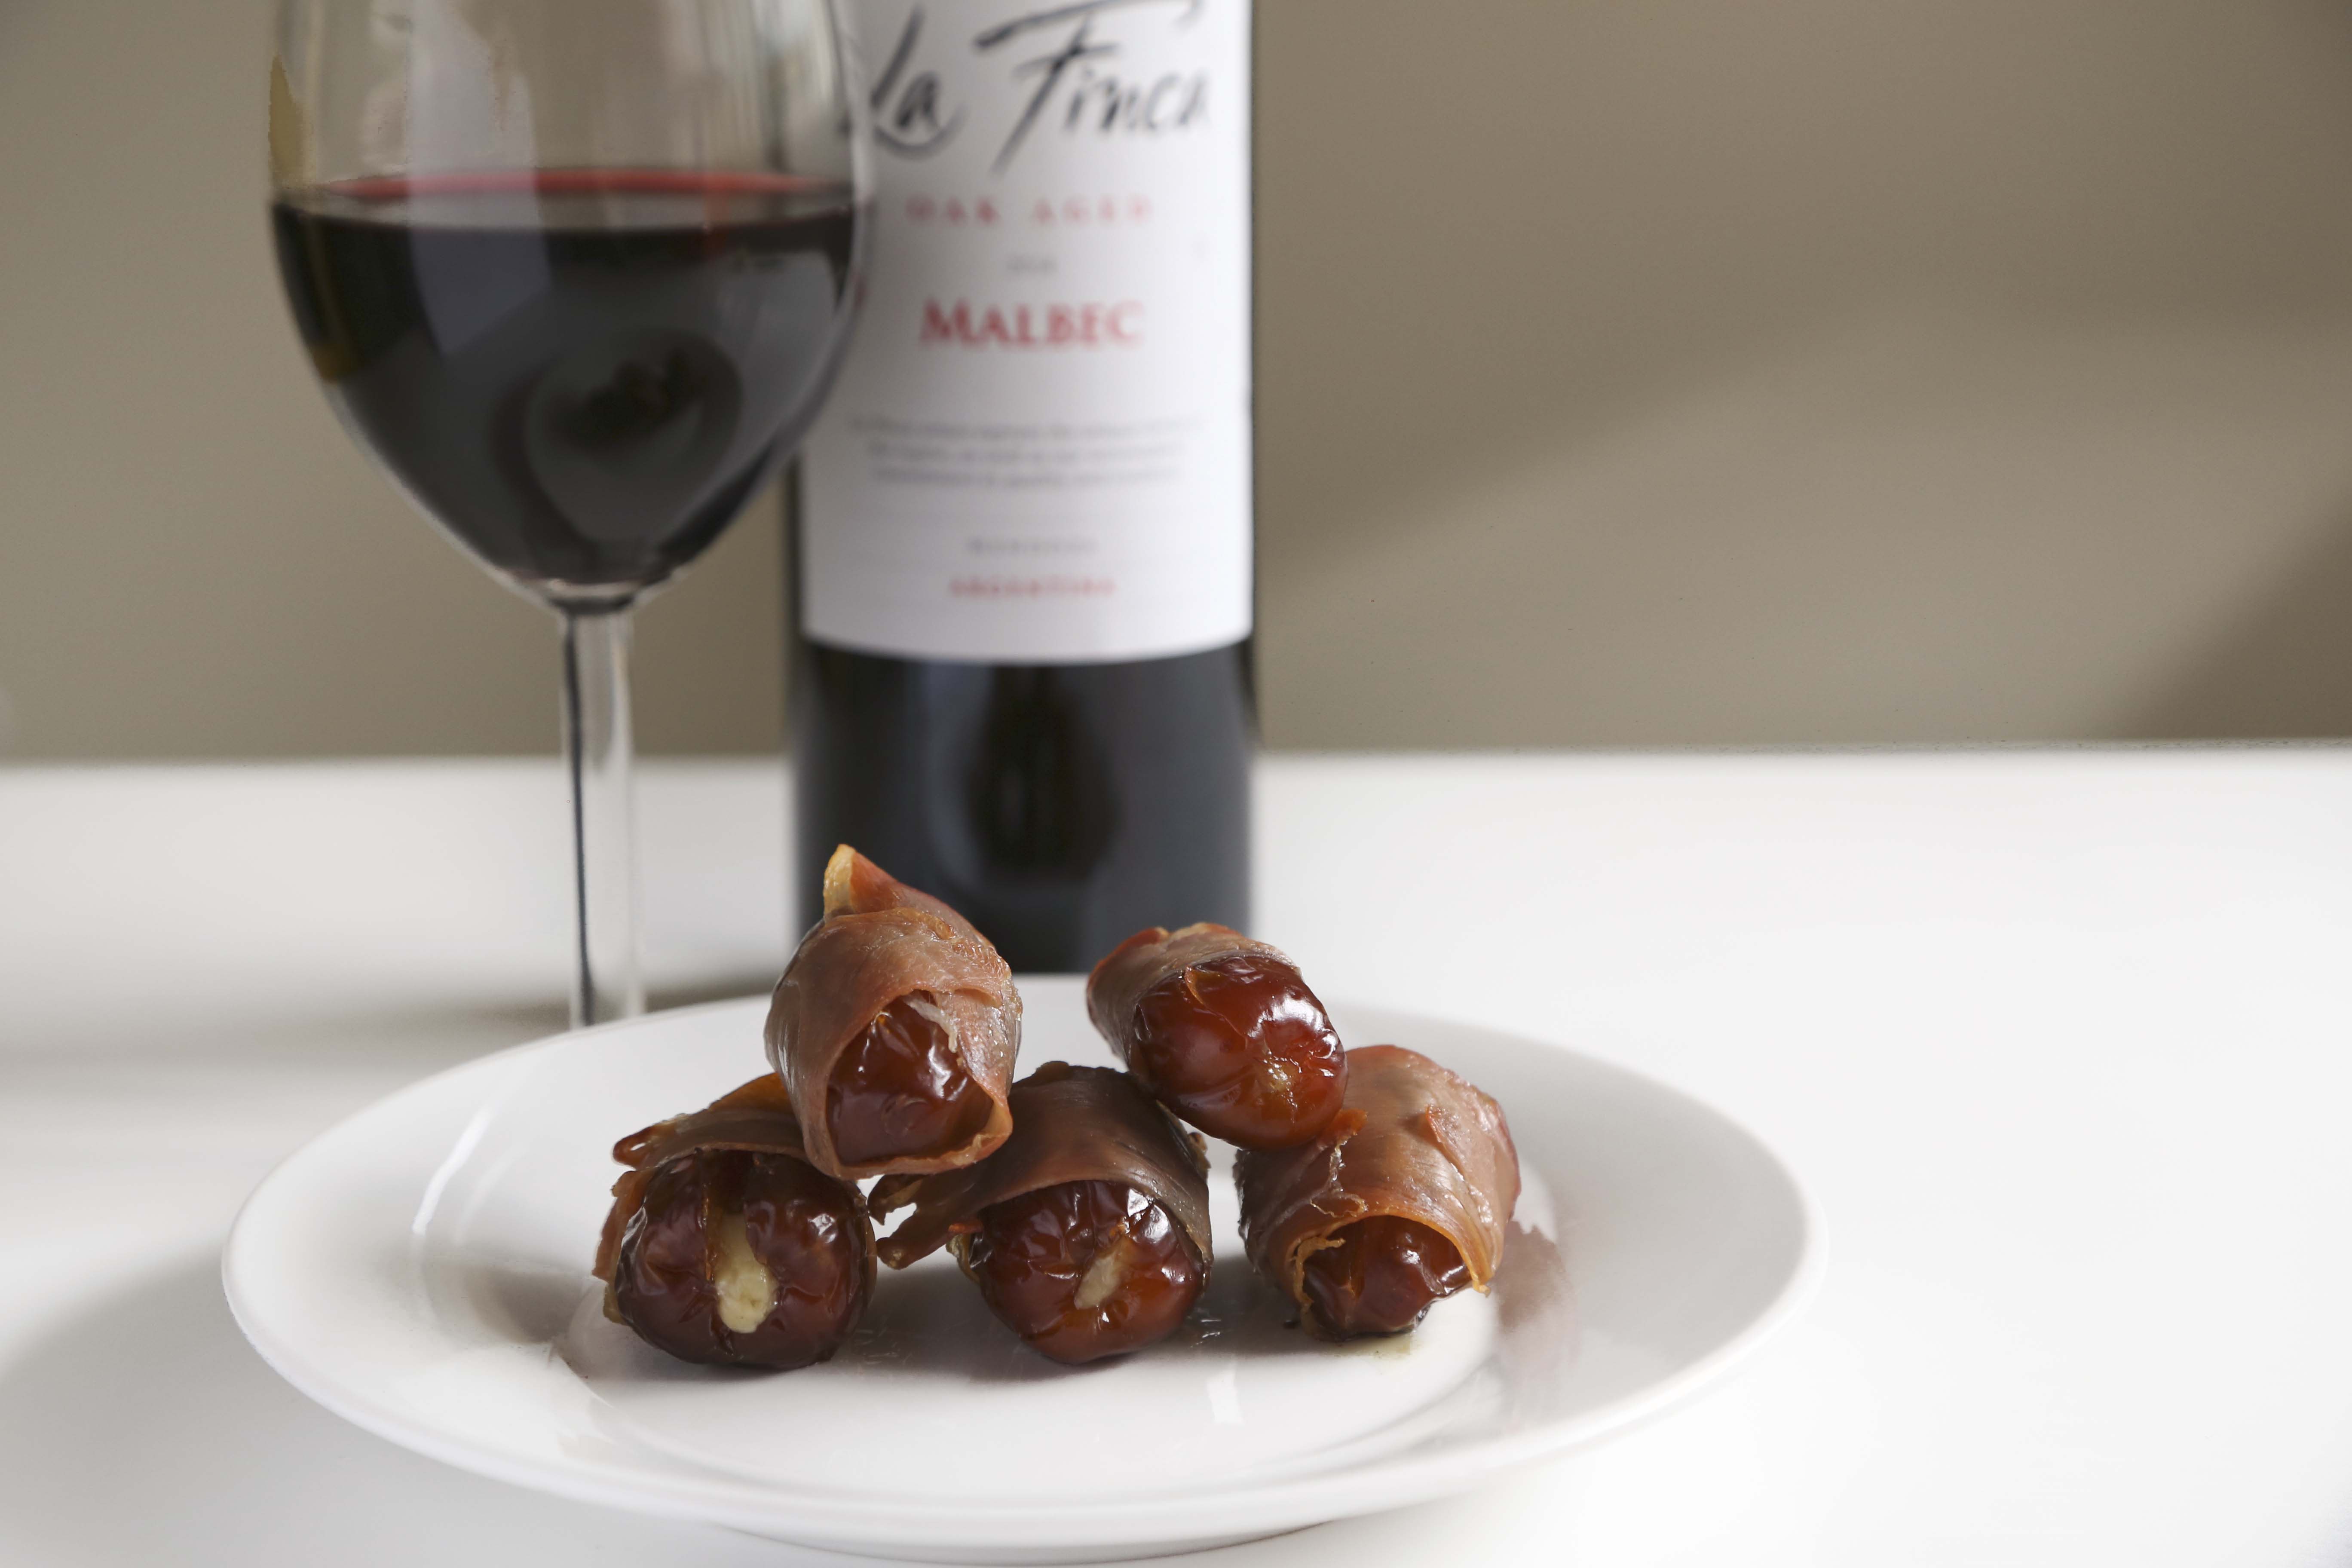
Smoked cheddar. Dates. Prosciutto. 

Awesome flavor combos.

Normally, I’m all for bacon wrapped dates, but I think I actually prefer prosciutto for a few reason:

  1. It’s thinner.  Someones I feel like the bacon can be so thick that you have to bake it forever and your risk the date getting charred.  Sometimes the bacon also overpowers the dates and filling.  This is the perfect balance.
  2. Less baking time.  Prosciutto doesn’t need to be cooked.  So you put it in the oven long enough for the cheese to melt and the prosciutto to get a little bit crispy (about 10 minutes).

This is really a non-recipe.  I can’t tell you exactly how much cheese I put in each date, because each date is different but here’s roughly what you’ll need.

Trust me, you’ll want to make these for your next wine and cheese party.

Prosciutto Wrapped Dates Stuffed with Smokey Cheese

Medjool dates, washed and pitted
Smoked Cheese (such as smoked cheddar, smoked gouda, this time I used smoked cheddar with caramelized onion from Trader Joe’s)
Prosciutto or Jamon Serrano (I tried with both and both were great)

Pre-heat oven to 400F.  Pit your dates by cutting a small slit down the side, then pulling out the pit.  Where the pit was, slide in little chunks of cheese then pinch the date back together.  Next take some prosciutto and wrap it around each date.  I used about half a slice for each date.

Lay on a parchment lined baking sheet and bake 10-15 minutes or until cheese is melted and prosciutto is crispy.

prosciutto wrapped dates1

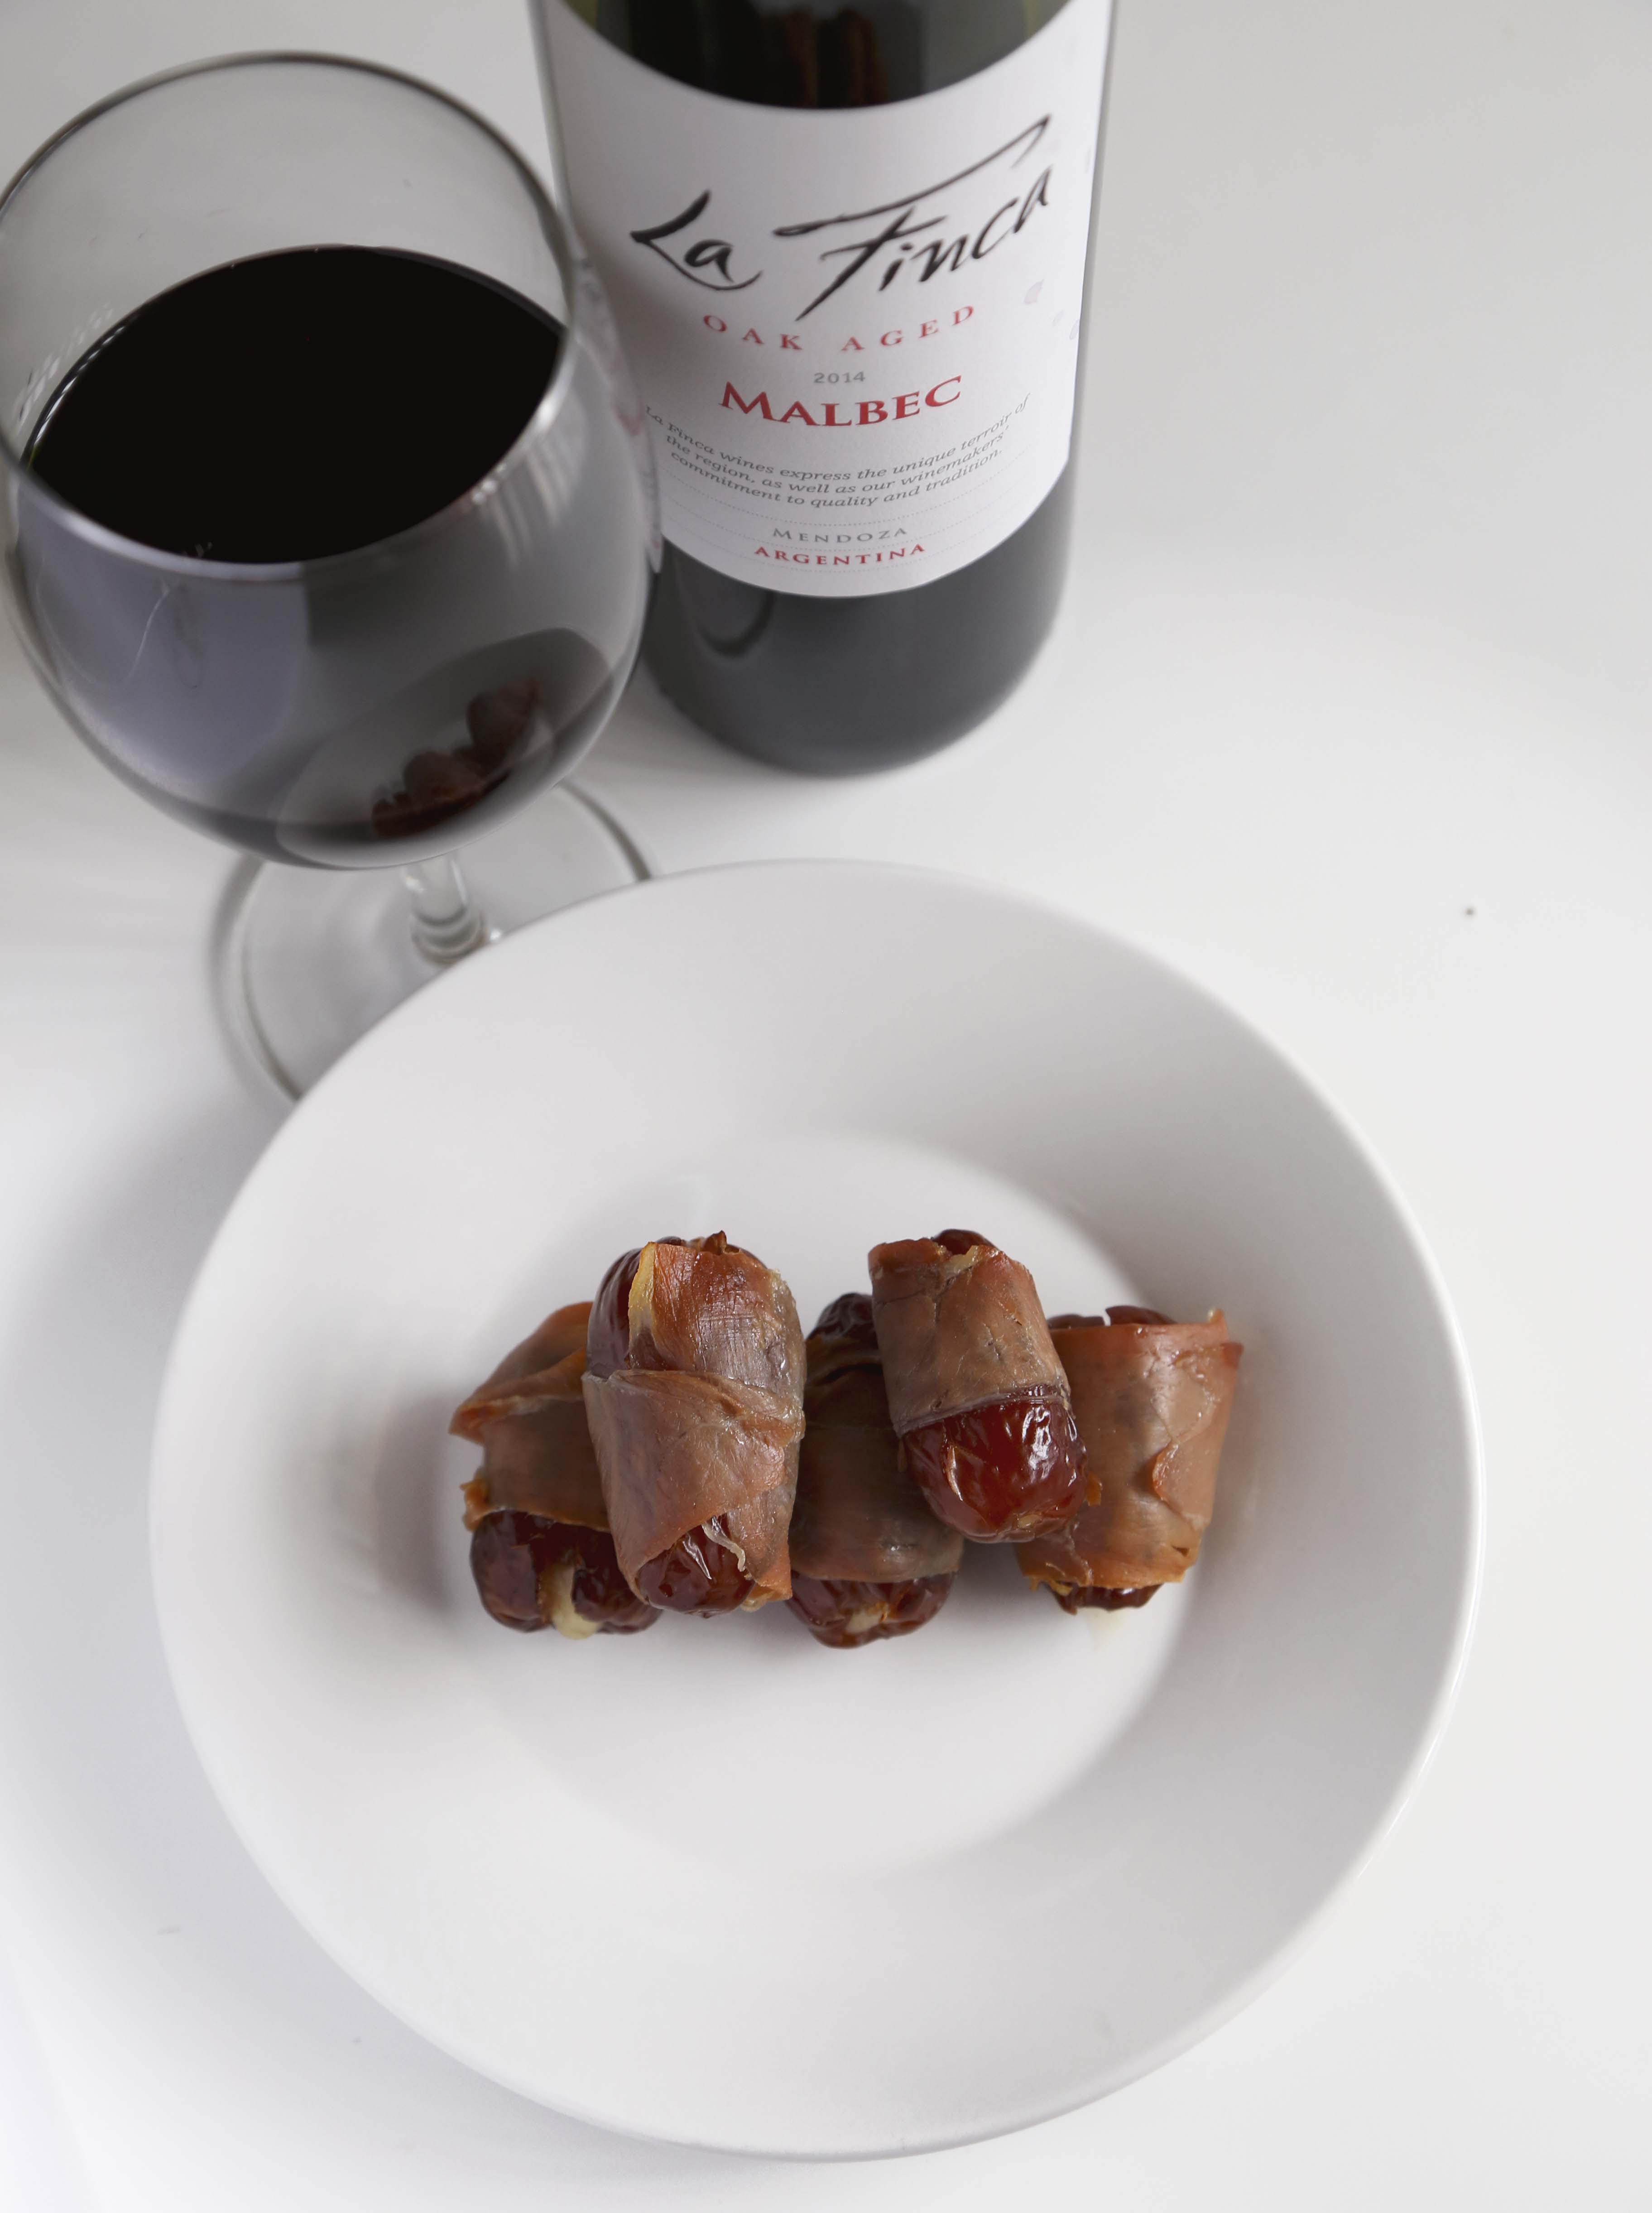
Serve with wine and enjoy!

Advertisement

Breakfast Sliders

One of my favorite things to do is  recreate things I tried in restaurants.  A few weeks ago, I met up with a friend for brunch in Long Beach.  We shared an appetizer and an entree and sipped bellinis.  For our appetizers,  we shared some breakfast sliders.

After one bite, I was in love.  I mean… biscuits, eggs, bacon, sausage gravy.

Everything you want in breakfast in one delicious bite.  I knew I had to recreate them, and so I did.

breakfast slider2

Breakfast Sliders

1 Recipe for Crazy Good Biscuits
1/2 lb breakfast sausage
1/3 cup flour 3 cups milk (I used low fat)
garlic salt
12 slices of bacon
8 eggs (I used Eggland’s Best)

First make your sausage gravy.  Crumble and cook your breakfast sausage in a large skillet or pot.  Make sure you buy the kind in the tube, not the links.  Once the sausage is almost cooked through, add flour and toss.  Cook a few minutes.  Stream in milk, slowly, stirring constantly to break up lumps.  Add garlic salt to taste. Remember the breakfast sausage is pretty salty on its own so you won’t need too much.  Set aside, leave on simmer to keep warm.

Next make your biscuits and cook your bacon until crispy and set aside.

The last step is to cook the egg.  Scramble the eggs in a bowl.  Pour eggs into a greased, heated skillet.  Cover and allow to cook a few minutes until almost cooked through.  You’re basically making a big egg pancake that you can slice and fold. Once the eggs have almost set, flip over and cook another few seconds.  Remove from heat and slice in half, then slice each half into 1 1/2 – 2 inch thick strips.  You should have 10-12 pieces.

Now assemble your sliders. Slice the biscuits in half.  On the bottom half, lay some sausage gravy, then take an egg strip and fold in half and place on top of sausage gravy, lay on some bacon and top off with top of biscuit.  Repeat until all your sliders are ready.  This recipe will make about 10-12 sliders.

breakfast slider1

These coincided with the fact that Eggland’s Best send me some egg coupons to throw a Brinner Party.  These were the perfect appetizer.

So if you’re having a Brinner party or if you just want to have an awesome breakfast-inspired treat, this is it.

breakfast sliders

ALSO, this is my entry for the Eggland’s Best “Your Best Recipe” contest.  Cross your fingers for me, then submit your own recipe!

Here are the contest details:

2014 Eggland’s Best “Your Best Recipe” Recipe Contest:

  • Visit the Eggland’s Best website to learn about their 2014 Eggland’s Best “Your Best Recipe” Contest
  • Eggland’s Best will be accepting original recipes through their website until July 31st
  • One Grand Prize Winner will receive a $10,000 cash prize and a year supply of EB eggs
  • Category winners will receive a cash prize of $1,000 and a six-month supply of EB eggs

Pretty awesome, right?  Who doesn’t want to win eggs and money?

Speaking of which, one more day to enter the Eggland’s Best giveaway to win some Eggland’s Best Eggs and a $25 Visa gift card!  Click here to enter!


What’s your favorite brunch/brinner appetizer??

Tomato and Ricotta Salad

I’m currently having a love affair with full fat ricotta cheese.

It has to be a full fat thing, because I’ve had ricotta before, but none as delicious as this.  It’s just the regular whole milk ricotta from Trader Joe’s. Nothing fancy.  Usually, I buy part-skim, but this time all I could find was full fat.

That was the best thing that could have happened.

Now I’m obsessed with ricotta.  I want to put it on everything.  In fact, I have been putting it on everything lately, but this is my favorite combination:

TomatoRicottaSaladtext

  It makes for the perfect appetizer or light meal.  It goes great with wine and doesn’t weigh you down.  You can probably go dancing after eating this and feel great. TomatoRicottaSalad1

Tomato and Ricotta Salad

2 tomatoes, sliced
2 tbsp (or more) ricotta cheese
2 tsp Chipotle Olive Oil*
1 wedge lemon
salt/pepper to taste

Slice tomatoes, top with ricotta, then sprinkle with salt and pepper.  Drizzle with chipotle olive oil and finish with a squirt of lemon juice.

Serve and enjoy!

*I got my olive oil from Antica Olive Oil.  If you don’t have Chipotle Olive oil on hand, I would recommend extra virgin olive oil with some crushed red pepper flakes or chipotle powder.  If you’re not a fan of heat, your favorite olive oil will work.

I loved everything about this.  I had it for dinner this past Friday (before a fun flamenco show), then again on Saturday night and then for lunch on Sunday.  What can I say? I know what I like!

TomatoRicottaSalad3

I’m definitely making this for my next gathering.  It’s easy, fresh, delicious and super easy to scale up or down depending on how many guests you have. It also goes great on bread if you’re looking for finger foods!


What’s your favorite way to eat ricotta?  After this Lemon Ricotta Cake, this tomato/ricotta combo might my favorite!

Beef Empanadas

I’m starting to worry that I’m going to be on an empanada kick.  I had never made empanadas but I’ve eaten my fair share of empanadas in my day.  In Guatemala, there aren’t too many empanadas.  They exist, but I’m not sure I’ve eaten them.  We’re more tortilla folks, but Argentina… that’s the land of empanadas.  After my freshman year of college, I went to Argentina for 2 months and volunteered at a school and wandered around Buenos Aires.

300x300(5)

Oh hey, I drink mate from a gourd sometimes…

It was an experience I’d never trade.  I learned how to be on my own. I learned to love red wine.  I learned to love cities.  And I ate a ton of empanadas.

My favorite are the spinach and cheese kind, but the traditional kind are beef ones.  Because on top of being the land of empanadas, Argentina is also the land of beef.  So I decided to give it a try.

beefempanadas

The pastry part of these tastes different that the traditional Argentinean kind, but it was still pretty darn tasty.  I think they traditionally use lard, which is why mine taste different.  Also I added bouillion to try to mask some of the butteriness.  Next time, I’ll definitely try lard.  But I’m definitely happy with these creations. beefempanadas3

Beef Empanadas

For Dough:

3 cups flour
1 1/2 sticks butter (12 tbsp), cold
1/2 tsp chicken bouillion
1 egg
4-5 tbsp water


For Filling:

1 tbsp olive oil
1/2 medium onion, diced
1 clove of garlic, minced
1/2 lb ground beef
1/2 tbsp paprika
1/2 tbsp cumin
1/4 cup sliced green olives
2 hard boiled eggs, chopped
1 egg (for brushing)


In a bowl, combine flour and butter.  Using your fingers, break up the butter until it turns to coarse crumbs.  Add egg and incorporate.  Add water and form into a ball.  Knead a few times til it all comes together.  Wrap in plastic and refrigerate while you make the filling or until ready to use.

Heat a skillet with olive oil.  Add onion and cook for a few minutes until onions are tender.  Add garlic and cook for 1 minute.  Add beef and cook until browned.  Add paprika, cumin, olives and hard boiled eggs.  Stir to combine.  Set aside.

Now it’s time to assemble the empanadas. Pre-heat oven to 400F.

Roll out dough as thin as you can (1/4 cm if you can).  Using a circle cutter or a bowl, cut out circles.  The size of the circles will determine the size of your empanadas.  I used a bowl about 3 inches in diameter.

Place some of the meat filling in the center of each circle.  Fold in half and pinch edges together.  Flute edges (folded over) and place on a parchment paper lined baking sheet.  Repeat until all dough is used up.

beefempanadas2

Mix one egg with a tbsp of water. Brush empanadas with egg mixture and bake for about 20 minutes or until golden.  The bake time will vary depending on the size of your empanadas.  Start checking them after 15 minutes. Serve warm and enjoy with a glass of wine. beefempanadas5

I have so many ideas for empanadas.  Like I said, I fear this might be the start of a new trend for me.  I already bought some ricotta to make some ricotta, kale and leek empanadas.  Doesn’t that sound amazing?

beefempanadas4

In the meantime, I’m going to enjoy these leftovers (because they stay good for a few days in the fridge) and brainstorm future empanada-making.


Are you a fan of empanadas?  What kind do you like? 

Soft Pretzels

I’m more sore than I can possibly explain.  Like so sore I can’t sleep.

Don’t worry, I’m not going crazy with resolutions.  I’ve been going to crossfit 3-4 times per week for the past few months.  This week I’ve gone twice, and my shoulders and back are killing me.  But enough about soreness, because aside from my aching shoulders something else is bothering me this time of year: diet-palooza.

I love all the salad recipes floating around, and I’m all for people getting healthy.  I wish it would happen year round, not just the first 3 weeks of January.

But can we call agree to stop calling lighter versions of fatty foods “skinny”?  You know what I’m talking about.

Skinny Vanilla Latte=  Latte with Low-Fat Milk and Sugar Free Syrup
Skinny Nacho Dip= Some sort of cheesy dip probably made with non-fat greek yogurt
Skinny Onion Rings= No, they’re not just cut thin. They’re probably FAT pieces of onion rolled in whole wheat bread crumbs and baked.

I absolutely hate the word “skinny” when it comes to people and food.  I’m going to avoid “skinny” and talk about something that will get you nowhere toward achieving the goal of “skinny”… Soft Pretzels

Carb-y. Delicious.  Thigh-gap’s worst nightmare.

softpretzels1

Soft Pretzel

from Chow

1 cup warm water (105°F to 115°F)    
1 (1/4-ounce) packet active dry yeast (2 1/4 teaspoons)    
Canola oil spray (like Pam or whatever)    
2 3/4 cups bread flour    
1 tablespoon sugar    
1 teaspoon sea salt, plus more for sprinkling    
6 cups water    
1/4 cup baking soda

Place warm water in the bowl of a stand mixer.  I don’t measure the temperature, I just turn the water on hot from the sink and that’s usually the right temperature.  Add yeast and allow to sit for 5 minutes, until foamy.  If your yeast/water combo isn’t bubbley, throw it out.  It’s no good!

In another bowl, whisk together bread flour, sugar and salt.  Attach the dough hook to your stand mixer.  Add flour to yeast mixture and turn your mixer on low.  Mix for 10 minutes.   Transfer dough to a greased bowl.  Cover with a towel and place in a warm spot to rise for half an hour.

Prep your baking sheets by lining two baking sheets with parchment paper and spraying with cooking spray.  Once your dough has risen, punch down and knead by hand for another minute.  Divide dough into 16 small balls.  Take each ball and roll into a long string, then twist into pretzel shape.  For photos on how to do this, check out Chow.

Place prepared pretzels on baking sheet and cover with plastic wrap.  Allow to rise for 10 minutes.  In the meantime, preheat your oven to 425F and boil 6 cups of water.  Once water has boiled, add baking soda.  Add pretzels (depending on the size of your pot, you might be able to fit 4-5 pretzels at a time).  Boil one minute per side.  Then transfer to baking sheet and sprinkle with sea salt.

Once you’ve boiled them all.  Bake for 10-12 minutes or until dark brown.  Allow to cool and serve!

softpretzels2

If you’re still feeling the resolutions, feel free to have this with some skinny cheese-beer dip.  I’m sure you can find that recipe somewhere on Pinterest.  Just kidding.

But for real.  These pretzels are awesome and surprisingly easier to make than I would have expected!

How are your New Year’s Resolutions coming along?

I’m slowly on my way to being able to do a pullup.  I did one with the thinnest red band this week! Woo!

Arugula Salad with Mozzarella, Prosciutto and Lemon-Caper Vinaigrette

I have to tell you, I’m really itching to bake something.  I don’t know if you’ve noticed, but I’ve kept it healthy as of recent…

Buffalo Chicken Spaghetti Squash = Local carb, quick and easy.

Black Bean Enchiladas= Delicious, quick, vegetarian and good for you.

Eggplant Rolls with Goat Cheese = light and divine.

The last thing I made was an epic chocolate raspberry truffle cake and a bluberry-rhubarb crisp (to die for! Must remake!) for my friend Sara’s wedding rehearsal

IMG_3828The wedding and the rehearsal were in this barn… on a flower farm.  Isn’t that the cutest?!  Ok back to food…

I love making healthy things to eat, but let’s be honest.  Making pie is just plain fun.  I’m starting to miss it.  Fourth of July is next week, you bet your buns I’ll be making a pie (Remember when I made Strawberry Rhubarb Pie with a touch of bourbon last year?).

But before we get all patriotic and start playing with butter, let’s do a little more green and talk about a super tasty salad.  This salad is guaranteed to satisfy.  It’s light but has enough fat in it to keep you satisfied.  We all hate the word fat, but when was the last time you were hungry after eating a few spoonfuls of peanut butter?

Fat keeps you full.  Enjoy it.  In moderation.

But really, prosciutto is probably not the kind of fat that’s good for you, but luckily it’s so intense that a little bit goes a long way.

ArugulaProsciuttoMozzarella2

Arugula Salad with Mozzarella, Prosciutto and Lemon-Caper Vinaigrette

2 cups Arugula
1-2 oz prosciutto (I used 1)
2 oz fresh mozzarella
1 tbsp olive oil
1 tbsp lemon juice
1/2 tbsp capers
2 tsp fresh chopped oregano
pinch of black pepper

Lay arugula on a plate.  Top with prosciutto and mozzarella.  In a bowl, whisk together olive oil, lemon juice, capers, oregano and pepper.  Drizzle dressing over salad and serve.

ArugulaProsciuttoMozzarella3I am completely in love with this salad.  It’s pretty much perfect for one person or two.  I’ve made it at least 4 times (probably because I bought a 4 oz pack of prosciutto), shared it twice and it’s delicious.    You know what else I’m in love with? Showing you pictures of this wedding.

IMG_4289_1

It was also pretty much perfect.   Ok ok, you’re probably over it right?  I’ll keep my wedding obsession on my pinterest board and try to stick to food.

ArugulaProsciuttoMozzarella1

4th of July and Pie is coming up.  What are you excited about?

Oven Not-Fried Pickles

A few weeks ago, I moved.  I think I told you about this but in case I didn’t… I moved.  Not far.  Just to the unit downstairs.  You’re probably thinking why go through all the trouble to move all your stuff down stairs?

Answer: For a patio.

You know what patios mean in Southern California? Outdoor space for dinner parties pretty much year round.  When you live in a studio, having people over is awkward.  Oh hey friend, why don’t you sit on my bed while I make you a cocktail and serve you a cheese platter?  Borderline creepy.

Now I have outdoor space where I can have people sit without being a creeper.  My most recent dinner venture was Southern themed.   I’ve never been to the South (well I don’t count Florida as the South.  Do you?) but here’s my south-inspired menu: Pulled Pork Sandwiches, Homemade Coleslaw, Baked Beans and Peanut Butter Cream Pie.

But what’s a dinner party without appetizers?

So in keeping with my Southern theme and the fact that my last impulse buy at the grocery store was a huge jar of pickles, I thought fried pickles might be the right choice.  The only issue is I hate frying things.  So crisis averted…

Oven Not-Fried Pickles

adapted from Skinny Taste

1 jar of pickles (I used dill oval cut chips)
1/2 cup bread crumbs
1/4 cup cornmeal
1/4 whole wheat flour
1 tsp cajun spice
pinch of salt
1 egg
2 tbsp milk

In a bowl combine breadcrumbs, cornmeal, flour, cajun spice and salt.

In another bowl beat together egg and milk.  Set aside.

Preheat oven to 450F.  Pat dry the pickles using a towel/paper towel.  Dip one into the egg mixture then toss in the breadcrumb mixture.  Place on a parchment paper lined baking sheet.  Repeat until all pickles are breaded (or you’re tired of doing this).

Bake 8-10 minutes, flip and bake another 5 minutes or until golden.

Serve hot with ketchup for dipping.

These were winners, but trust me on this.  They taste better when they’re hot… and with a cold beer… and preferably on a patio (not your bed… unless you’re into that kind of thing, in which case I’m not judging).

Is your mouth watering yet?  Mine is.

Pear-Onion Brie Bruschetta

Happy New Year!

With the start of 2012, I’m sure everyone’s thinking about resolutions.  Most people’s are probably to exercise more or travel somewhere exotic.  For me, it’s to cook more savory dishes.  So I’m starting 2012 with a bang! (I actually made these on January 1st!)

Ok I’ll be honest.  This is only sort of savory, but it’s also a little sweet.  Caramelized onions and pears.  Naturally sweet, but perfectly balanced with salty brie.

Baby steps.

I’ll get to fully savory soon enough.  After all, I have all year.

Pear-Onion Brie Bruschetta

1 tbsp olive oil
1 tbsp butter
1 large onion, diced
2-3 pears, diced
2-3 tsp fresh thyme
1 baguette
few ounces of Brie

Heat oil and butter together on medium.  Once oil and butter is hot, add onions and pears.  Cook until caramelized (about 30-40 minutes).  Basically you can put it in there, stir it around, leave it alone for 10 minutes, stir it, leave alone for 10 minutes, stir again, etc.

Once it’s a nice caramel color, stir in the thyme, cook for another minute and turn off the heat.  At this point you can either serve it or put it in a container to transport.  That’s really the beauty of this appetizer/snack.  You can take it anywhere.  It can be eaten hot or cold and it’s easy to assemble.

So for the assembly, cut a baguette into thin slices (about 1-2 centimeters thick? I’m bad with measurements, use your best judgement), spoon some of the onions and pears onto the bread, and top with a small slice of brie.

Serve and enjoy!  Just to note, I tried putting the brie under the pear-onion mixture but I found that it slides off more for some reason.  But if you want to put the brie under the pears and onions, go for it.

Like I said, this is perfect for any occasion.  I took it for a picnic.

You should try it too.  Feel free to make it a resolution, and by that I mean your resolution should be to eat more delicious things.