Almond Joy Chocolate Chip Cookies and the Second #C2CCS

Hi friends! I’ve been on the DL the past few weeks.  I’m in a sort of blogging/life rut, so I had been taking a bit of a break.  Luckily, I have some blogger friends to help get me out of the rut.

One of my favorite parts of blogging is getting to know people.  I know it sounds silly and cliche, but I’ve made a few real life friends as a result of blogging.  Real life friends are amazing (looking at you Allison and Samantha), but it’s also great to make friends online, especially when they motivate you to bake treats and send you some.

You might remember last year, I made some Molasses Ginger Apricot Cookies?  Then I sent those cookies to some ladies and they sent me some cookies back and we called it the Coast to Coast Cookie Swap.  Well here is the second installment of that! Because isn’t sending your friends cookies a good idea?  It is!

Planning what kinds of cookies to send to other foodie/cookie lovers is hard.  I brainstormed for a while and these cookies turned up by mistake.  I wanted to make some cookies for a coworker who was doing an awesome job.  I liked them so much I decided they needed to happen again.  I’ve actually made these cookies three times in the past two weeks.

Almond Coconut Choc Chip Cookies1

Trust me.  They’re worth it.

Almond Coconut Choc Chip Cookies2

In exchange for these cookies, I received a few goodies in the mail:

c2ccs

White Chip Cranberry Cookies from Natalie

Delicious Spiced Cookies from Coco

Take 5 Cookies from Jazzy

Additionally, Allison made some Grain Free Pumpkin Chocolate Chip Cookies that I wish I got to try!

Let’s be honest, exchanging cookies (or all baked goods in general) is an amazing idea.  You should try it.  Start by making these and sharing them with your friends.

Almond Joy Chocolate Chip Cookies

1 stick of butter
1 cup + 2 tbsp all purpose flour
1/2 tsp salt
1/2 tsp baking soda
1/2 cup brown sugar
1/4 cup white sugar
1 egg
2 tsp vanilla extract
1/2 cup dark chocolate chips
1/4-1/2 cup roasted coconut chips
1/4-1/2 cup honey roasted sliced almonds

Cream together butter and sugar until fluffy.  Add 1 egg, then vanilla and continue to be beat for about a minute.  Add in flour mixture.  Mix until almost combined. Fold in chocolate chips, coconut and almonds until dough is just combined.  Be careful not to overmix the dough, if not you’ll get flat cookies!

Place dough in the freezer while oven preheats to 350F.

Once oven has pre-heated, form dough into walnut sized balls.  Place on parchment paper-lined pan and bake for 8-12 minutes, or until golden around the edges.

After a few minutes, transfer to a cooling rack and allow to cool completely then share with a friend and enjoy!

Almond Coconut Choc Chip Cookies3


What’s your favorite cookie to share with a friend?


P.S. Sharing cookies is awesome, but baking with a friend is even more fun!  Check out these Salted Caramel Eclairs I made with Sam at the Little Ferraro Kitchen!

Hatch Chile Spaghetti Squash and Cheese

You know how everyone has certain staples that they keep in their pantries?  I feel like for most people that’s things like canned tomatoes, pasta sauce, pasta. Basics that you can use to throw together a meal pretty quickly.

For me, it’s canned beans and tuna.  Classy. I know.

I rarely ever buy pasta.  It’s one of those things I just don’t even think to buy.  But I’m human and I love mac and cheese.  Sometimes I want that cheesy goodness, but I don’t feel like going to the store to buy pasta.

So I’ll be honest.  This is one of those things I threw together because I haven’t been to the grocery store in almost two weeks (I know, how am I surviving right?).  Spaghetti squash will last a good while on the counter, and I roasted some hatch chiles that Melissa’s Produce sent me a week ago, so we’re good to go.  But don’t worry, just because I threw this together with ingredients on hand, doesn’t mean it’s not delicious.  I’ve been eager to use those hatch chiles and this was seriously delicious.

I think you’ll love it!

hatchspaghettisquashandcheesetextHatch Chile Spaghetti Squash and Cheese

1 spaghetti squash
1 tbsp olive oil
2 fully cooked sausages, diced (optional)
2 tbsp flour
2 cups milk
2 cups cheese
2 hatch chiles, roasted, peeled, seeded and chopped
salt and pepper to taste

Poke holes in your spaghetti squash with a sharp knife and microwave for 5-10 minutes.  The cook time will vary depending on the size of your spaghetti squash.  You’ll know it’s ready when you can run your knife through it fairly easily.

While your spaghetti squash is cooking, heat oil in a large pot.  Once oil is hot, add sausage and brown until crispy on medium/high heat.  Once the sausage is browned, turn the heat down to low and add flour.  Toss with sausage and let it brown a minute or two.  Slowly stream in milk while whisking, breaking up any clumps in the process.  Once the milk is incoporated, add cheese and hatch chiles.  Stir until cheese is melted, taste and season with salt and pepper to your desired amount (I only added a few pinches because I don’t like things too salty).  Turn off heat and set aside.

Now go back to your spaghetti squash.  By now it should be cooked and cool enough to handle.  Slice in half, then spoon out the seeds.  Using a fork, fluff and pull out the strands of the squash.  Add the spaghetti squash to cheese sauce and stir until well combined.  Garnish with extra cheese and hatch chiles if you’d like then serve and enjoy!

hatchspaghettisquashandcheese2

The spaghetti squash I used was enormous.  I’ll be eating this for a few days, but no complaints there.  This has an awesome kick from the hatch chiles, but it’s cooled by the creamy, cheesy sauce.  You can also easily make this vegetarian by omitting the sausage (or using vegetarian sausage).

What I also love about spaghetti squash dishes (oh hey, remember the Buffalo Chicken Spaghetti Squash I made a while back?), is that it doesn’t feel too heavy. While I’m not claiming that this is healthy, I feel a little bit better about eating it than a full plate of pasta.  I think you could make this a bit healthier by reducing the amount of cheese and adding some greens in there.  We all need a little more kale in our life.  I’ll try throwing some in there next time.

hatchspaghettisquashandcheese1

I’ll definitely make this again!

What are some of your pantry staples?

Peanut Butter and Jelly Smores… and other PB&J Creations

I feel like everyone I talk to had PB&J for lunch as a kid.  I had ham with cream cheese.  PB&J was not a staple in my household growing up.  I’m not even sure my mom kept peanut butter in the house, because she hates it.  Peanut butter is one of those super American things that my mom never got on board with.

But regardless, growing up here, I developed a love of Peanut Butter and Jelly.

To share in the love of Peanut Butter and Jelly, Peanut Butter and Co. sent me and some other bloggers some jars of Peanut Butter and preserves to make some awesome peanut butter and jelly creations.   My jars arrived…

pbandco

and I was excited to start!  I had such high hopes.  I started by taking a stab at Peanut Butter and Jelly Sticky Buns.

pb&jstickybun1

Doesn’t that sound awesome?  It was! But the recipe turned out a bit dry (my first time ever making some sort of sticky bun/cinnamon type roll!).  So tweaks are needed.  And sadly, I used so much PB and Seriously Strawberry Jam (it’s seriously delicious), that I had none left to retry the recipe.

Instead of retrying (maybe I will in the future), I decided to try another idea that piqued by interest: Peanut Butter and Jelly Smores.

The ingredients are pretty simple, but this is really the perfect end of summer (early fall) recipe.

PBJ smores2

Peanut Butter and Jelly Smores

2 graham crackers

2 large marshmallows

2 heaping tsps Old Fashioned Crunchy Peanut Butter

2 heaping tsp Awesome Apricot Preserves (or other jam of choice) 

PBJ smores1

Cut graham crackers in half (so you have 4 pieces total).  Spread 1 tsp of peanut butter on each of two of the graham cracker pieces and 1 tsp of apricot preserves on the remaining two cracker pieces.  Place marshmallow in the peanut butter.  Put under the broiler for a few minutes (about 3 or 4) or until the marshmallow is toasted to the right consistency.  Put the pieces together and enjoy the oozey, gooey deliciousness!

PBJ smores3

I wasn’t sure that the PB + Apricot combo would work out well, but it was delicious!   I definitely recommend it!

Let’s be honest, you can’t go wrong with PB&J.  There are so many delicious ways to eat it, like in Pie form!

pbandjpie2


What’s your favorite way to eat Peanut Butter and Jelly?  Are you a strict strawberry jam eater or do you branch out to other preserves?

Gluten Free Carrot Cake

I have a hard time with this whole gluten-free movement that’s been happening the past few years.  I get that some people have genuine intolerances, but for the most part I’m a non-believer.  When someone tells me they don’t eat gluten, I roll my eyes.  Yes. I am that person.  I am a jerk.

Karma is a thing.  Let me tell you why…

You might have noticed that I fell off the face of the Earth a while (err 2 weeks).  Really it’s because I’ve been having major stomach issues and the last thing I want to do is cook and eat food.  Don’t worry.  This isn’t a blog post to tell you that I suddenly am going gluten-free.  No no.  But this post is about exploring new ways of eating, because I’ve come to the realization that having stomach issues sucks.  Right now, I would eat (or not eat) anything to make the discomfort go away.

Because now I understand how much it sucks, I have a little more sympathy for those with food sensitivities.  I have no idea if I have food sensitivities.  I’m currently trying to figure out what the heck is causing my stomach to implode on me.  I’m starting by avoiding dairy for a while.  Jury is still out.  We’ll see.

But in the meantime, let me tell you about my first experience with a gluten-free cake.

glutenfreecarrotcake1

Isn’t it beautiful?  By the looks of it, you wouldn’t even know it’s gluten-free, but it is.  And it came about because my good friend Allison (check our her blog Sweet Potato Bites) has a lot of food allergies.  I wanted to make a cake that would fit her allergy needs for a surprise birthday gathering.  Her husband sent me a list of Allison-approved cake recipes.  After a few days of back and forth, we decided he would make a gluten free cake and I would make a cake that everyone else could have.  Nice compromise for guests not into the gluten-free thing. So I went ahead and made a chocolate cake with raspberry whipped cream filling and frosting.  

But after that night, I still had a curiosity for how a gluten-free taste would be like.  I’ve never really eaten one, other than flourless chocolate cake.   So I went with it and made a cake anyway, because there’s never a wrong time to make a cake. I used a recipe for Carrot Cake from Elana’s Pantry, because having never made a gluten free cake, I couldn’t really wing it on my first try.  

But that said, I made a few adjustments to make 1 smaller (6-inch) cake.  Here’s my attempt:

glutenfreecarrotcake2

Gluten Free Carrot Cake

adapted from Elana’s Pantry

1 1/2 cups almond flour
1/2 tsp salt
1/2 tsp baking soda
2 tsp cinnamon
pinch of mace
2 eggs + 1 egg white
1/4 cup maple syrup
2 tbsp canola oil
1 1/2 cups grated carrot
1/2 cup whipping cream
2-3 tbsp maple syrup

Preheat the oven to 325F.  Grease and line 2 (6-inch) cake pans with parchment paper

I used my vitamix to chop up the carrots instead of grating, but you can grate them if you’d like .  Then I throw all the ingredients into the blender and blended until combine.  It’s really that easy.  Pour batter into 2 prepared cake pans.

Bake about 20 mins or until a toothpick comes out clean.  While your cake is baking, make your frosting.  It’s easy.  Whip the cream.  Once the cream starts forming peaks, stream in maple syrup.  Taste it.  If you want it sweeter, add more maple syrup.  If it’s too sweet, oops!  (JK, add a bit at a time, and try to get your desired sweetness.  I didn’t want mine too sweet I only added about 2 tbsp).

Allow to cool completely.  Then lather with maple whipped cream and serve.  Store leftovers in the fridge.

glutenfreecarrotcake3

Confession: I actually think it tastes better cold.

2nd Confession: I meant to take Allison a piece of this cake but Jesse dug into.  Fail.  But really I can’t complain if he liked it.  That means it was tasty.


Overall: I thought this was tasty.

Does it taste like cake? Not really.

Does it have the texture of a cake? Not really.

Is it worth trying? Absolutely.


While I don’t have any food allergies or sensitivities that I know of, the point of all this is that I will stop being a hater, because stomach issues suck.

Are you a fan of gluten-free foods?  

Lettuce Wrapped Turkey Burgers and Eating More Vegetables

We’re all adults here. We all know we’re supposed to eat vegetables, because they’re good for you.  But the reality is life happens.   We get caught up in things; we forget to eat vegetables…  Not cool, guys.  Eat your vegetables.

I’m a big proponent of vegetables and exercise being the cure for most things.  I’m not a nutrionist or a doctor but I’ve realized that when I eat more vegetables and exercise regularly, I tend to feel better.

Last week, Melissa’s Produce reached out to me asking if I’d like to review one of their boxes and maybe come up with a few recipes from the content.  I said Yes, because 1. I love vegetables and 2. it seemed like a great opportunity to blog about things.

So let me tell your a little bit about the produce box I got.  I got the “Organic Mixed Vegetable Box – Southern California Delivery.” I chose this one because I didn’t want a box with fruit.  I would rather just have vegetables.  It arrived while I was at work.  Since I live in a housing complex, it was delivered to the apartment office, so the box didn’t sit outside all day.  Luckily, I was able to make it home a few minutes before the apartment office closed at 5pm.  If not, I would have had to wait til the next day, which would have sucked.

I got the box and it was jam packed with deliciousness.  I definitely give them props for their packing skillzz.  Everything was in there, the lettuce wasn’t smashed or wilted.  Thumbs up for that! There was also an ice pack in the box  that kept everything cool.

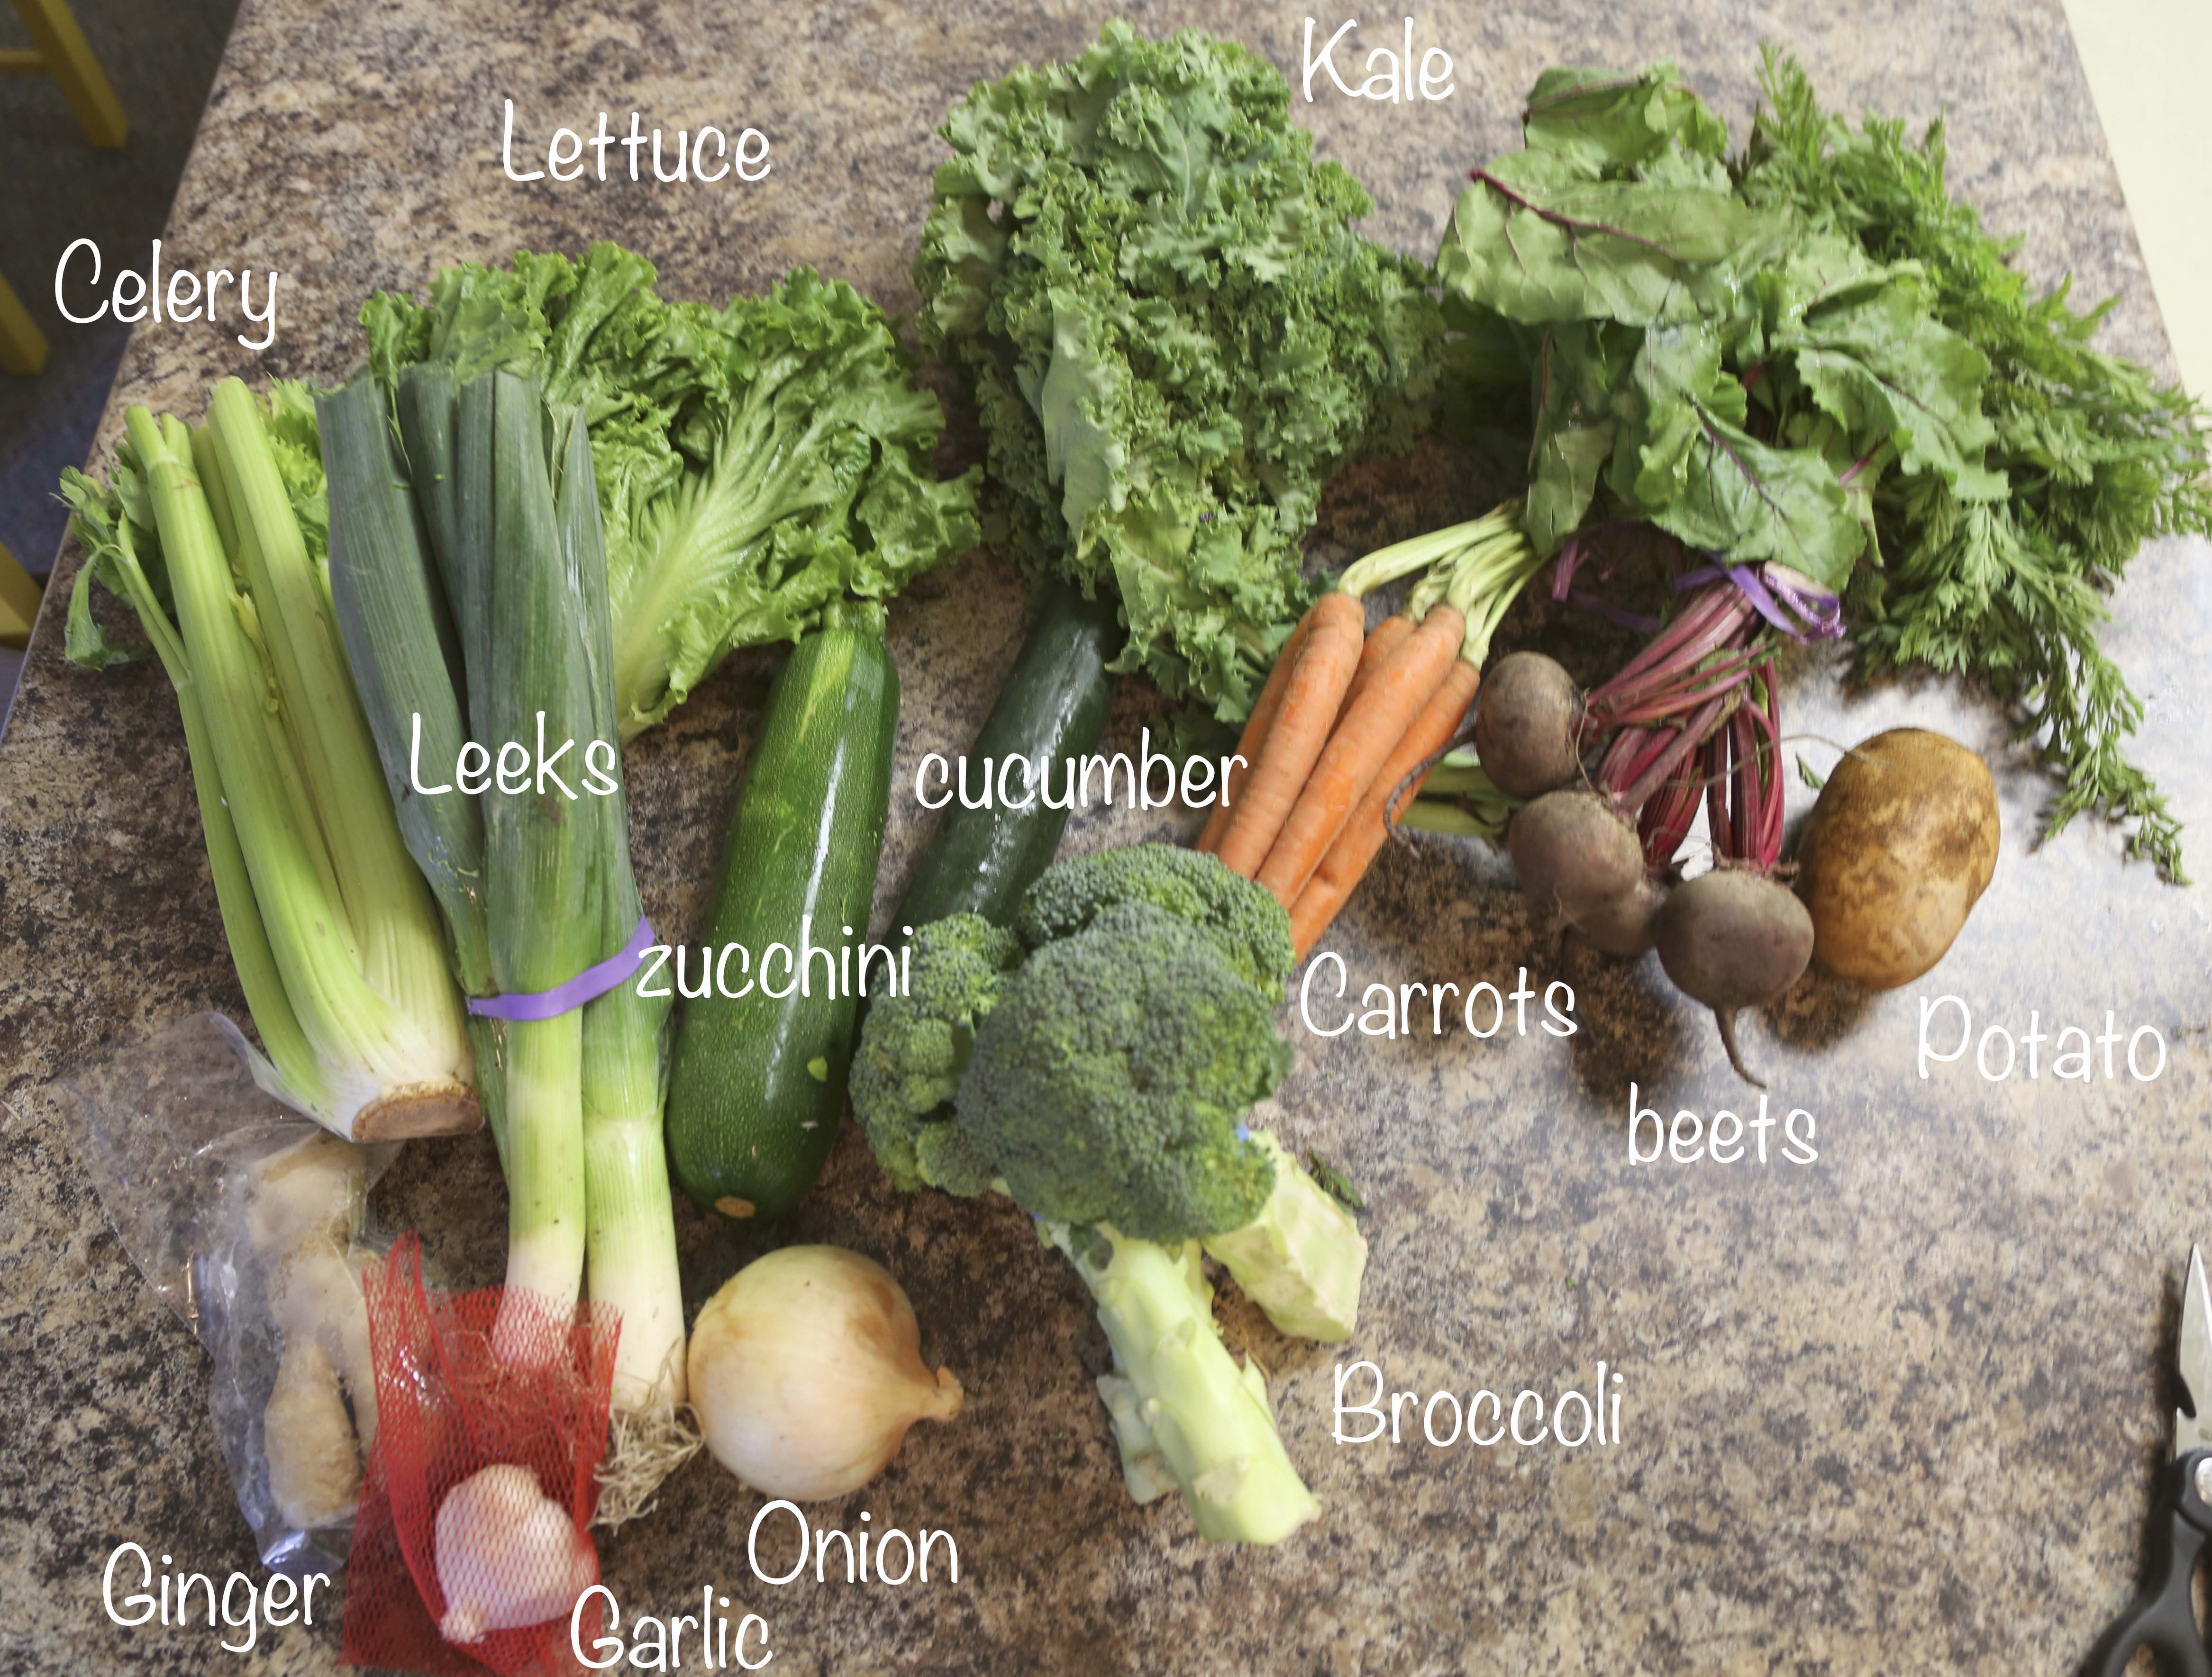
Here is everything my box included:

produce

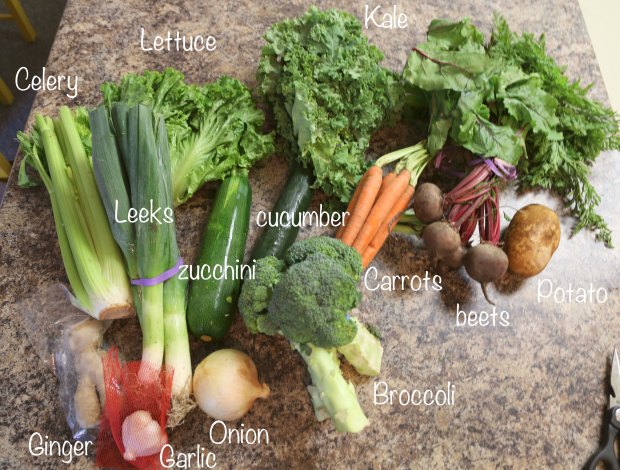
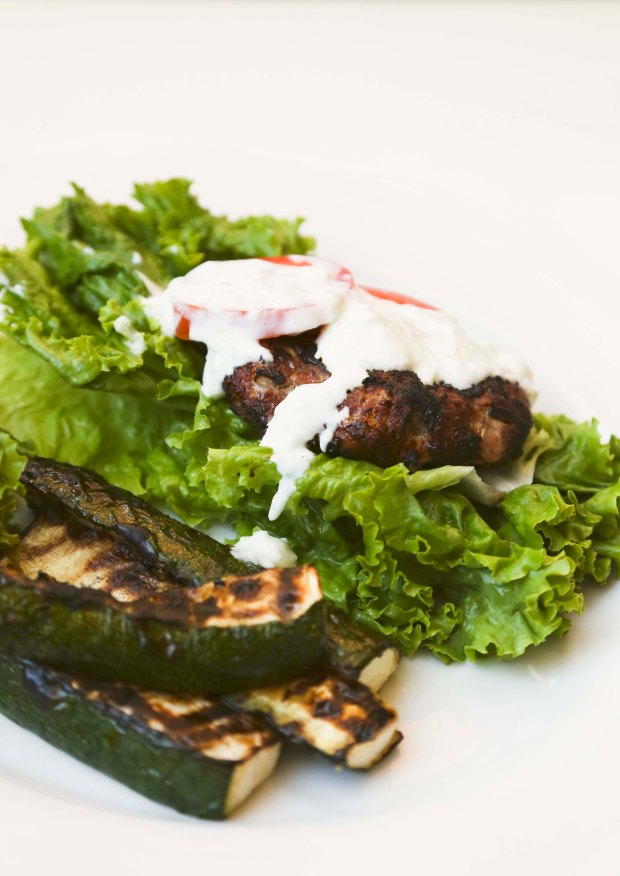
This is a good amount of produce for two people.  But Jesse and I eat a good amount of vegetables so we’re good to go.   One of the biggest complaints I’ve heard about produce delivery services and CSA shares (aside from cost), is that it’s simply too much produce. I agree, it is a good amount, but not really too much.  When I first saw the enormous pile of vegetables, I got concerned and thought, oh goodness how are we going to eat all this?  But really, having this box forces us to eat more vegetables, it’s just about prioritizing and planning. Using this produce, I’ve planned a variety of meals to use up almost all the vegetables, and today I’ll share one of these recipes: Lettuce Wrapped Turkey Burgers with Creamy Yogurt Sauce, served with Grilled Zucchini. Sounds delish right?  I think it looks pretty great too! turkeylettuceburger2

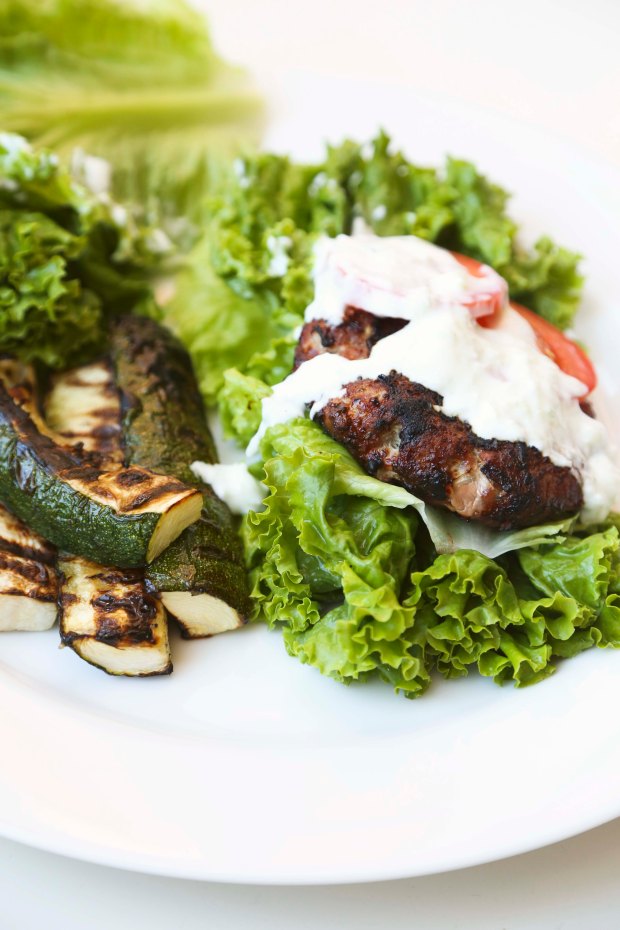
The most important thing to remember with CSAs and produce delivery is that certain things go bad faster than others.  Lettuce and kale are the most perishable, so they should probably be eaten first.  Then Zucchini, Broccoli, Cucumber and Celery.  Beets, Carrots, Potato, Garlic, Onion, Leeks and Ginger, will all last a pretty long time.

Keeping that in mind, I’ve been having green smoothies with kale for breakfast everyday to make sure to use the kale.  To consume the lettuce as quickly as possible, I decided lettuce wrapped burgers were the way to go.

turkeylettuceburger4

Lettuce Wrapped Turkey Burgers with Creamy Yogurt Sauce

For Turkey Burgers: 

1 package lean ground turkey (a little more than a pound)
1 leek, white part only, finely chopped
1/4 cup onion finely chopped
2 tbsp fresh rosemary, finely chopped
garlic salt to taste

For Creamy Yogurt Sauce:

1 cup non-fat greek yogurt
1/2 cucumber, grated
1 lime
Garlic salt to taste

Extra:

Lettuce
Tomato  

Combine all ingredients for turkey burger.  Work together and form into patties (4-6 depending on how big you want them, I did 6).  Grill on a hot grill, or on a skillet or you can even bake them.  If you’re grilling on a grill or in a pan, it’ll be about 5 mins per side (depending on how thick your patties are).

In the meantime, prep your yogurt sauce by combining yogurt, grated cucumber and lime juice.  Mix together and add garlic salt.  Taste until you get the right saltiness.  Then refrigerate until ready to use. (Note: You can make this sauce is advance.  As long as it’s refrigerated, it’ll be good for a few days)

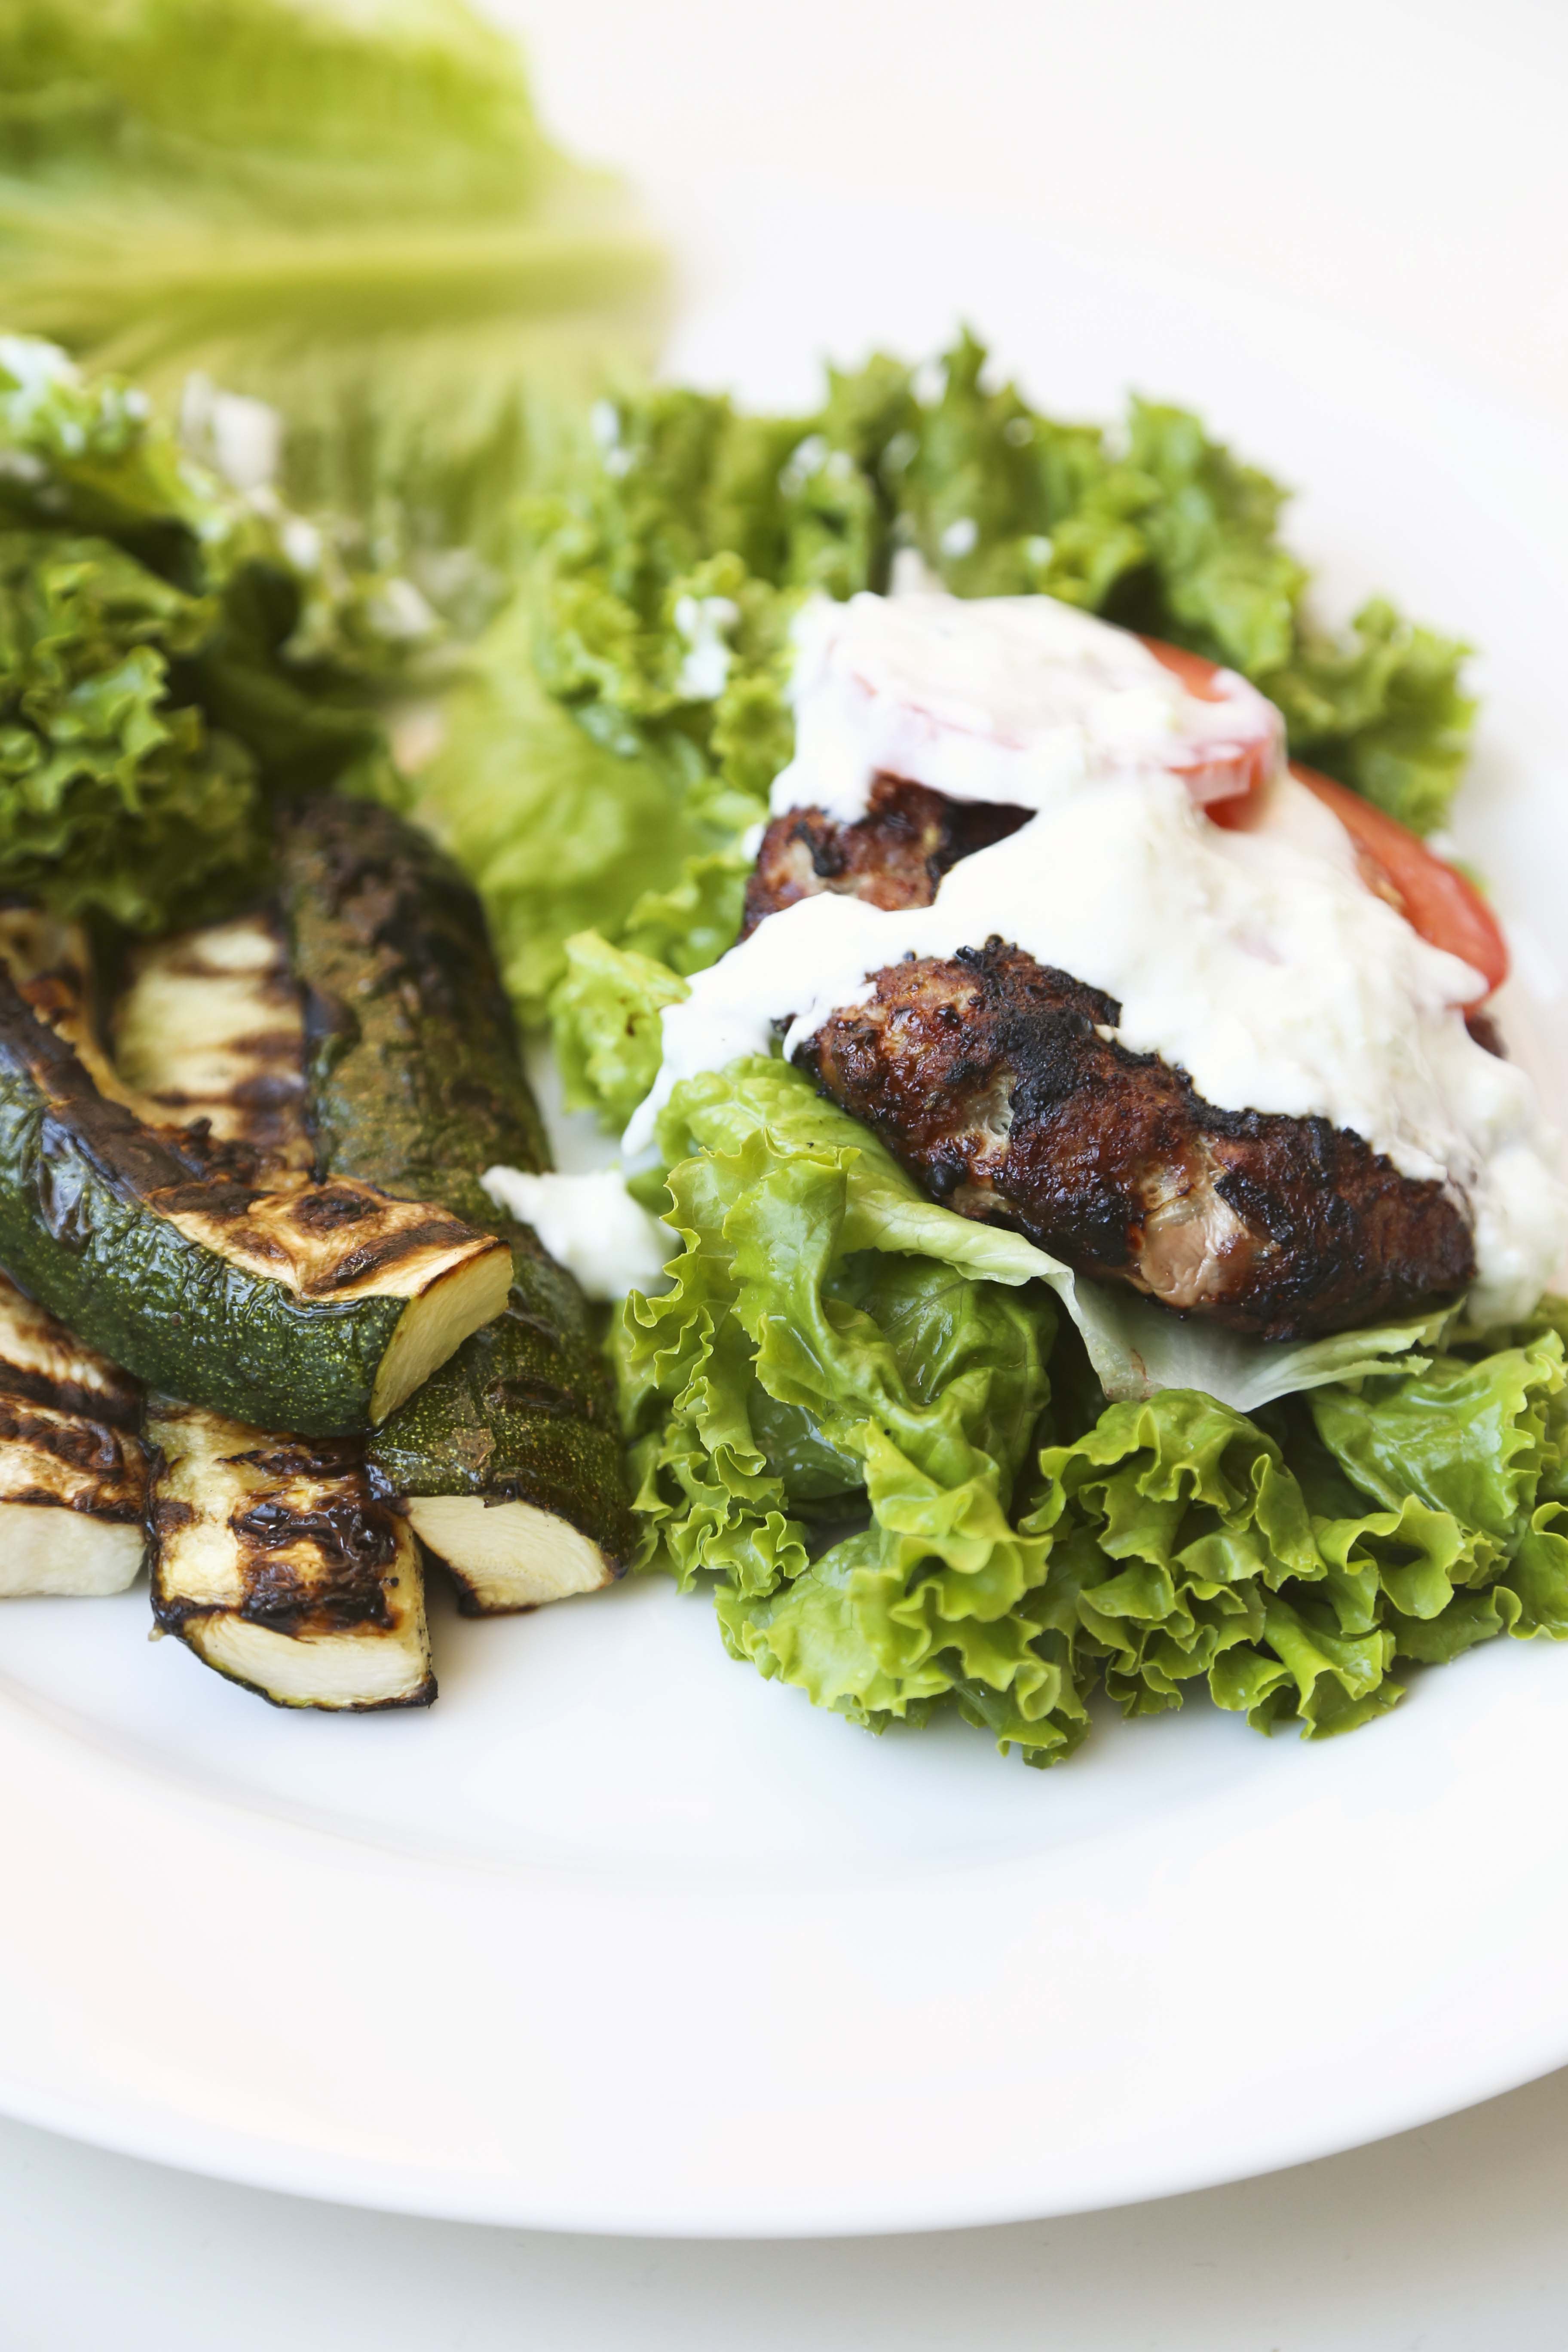
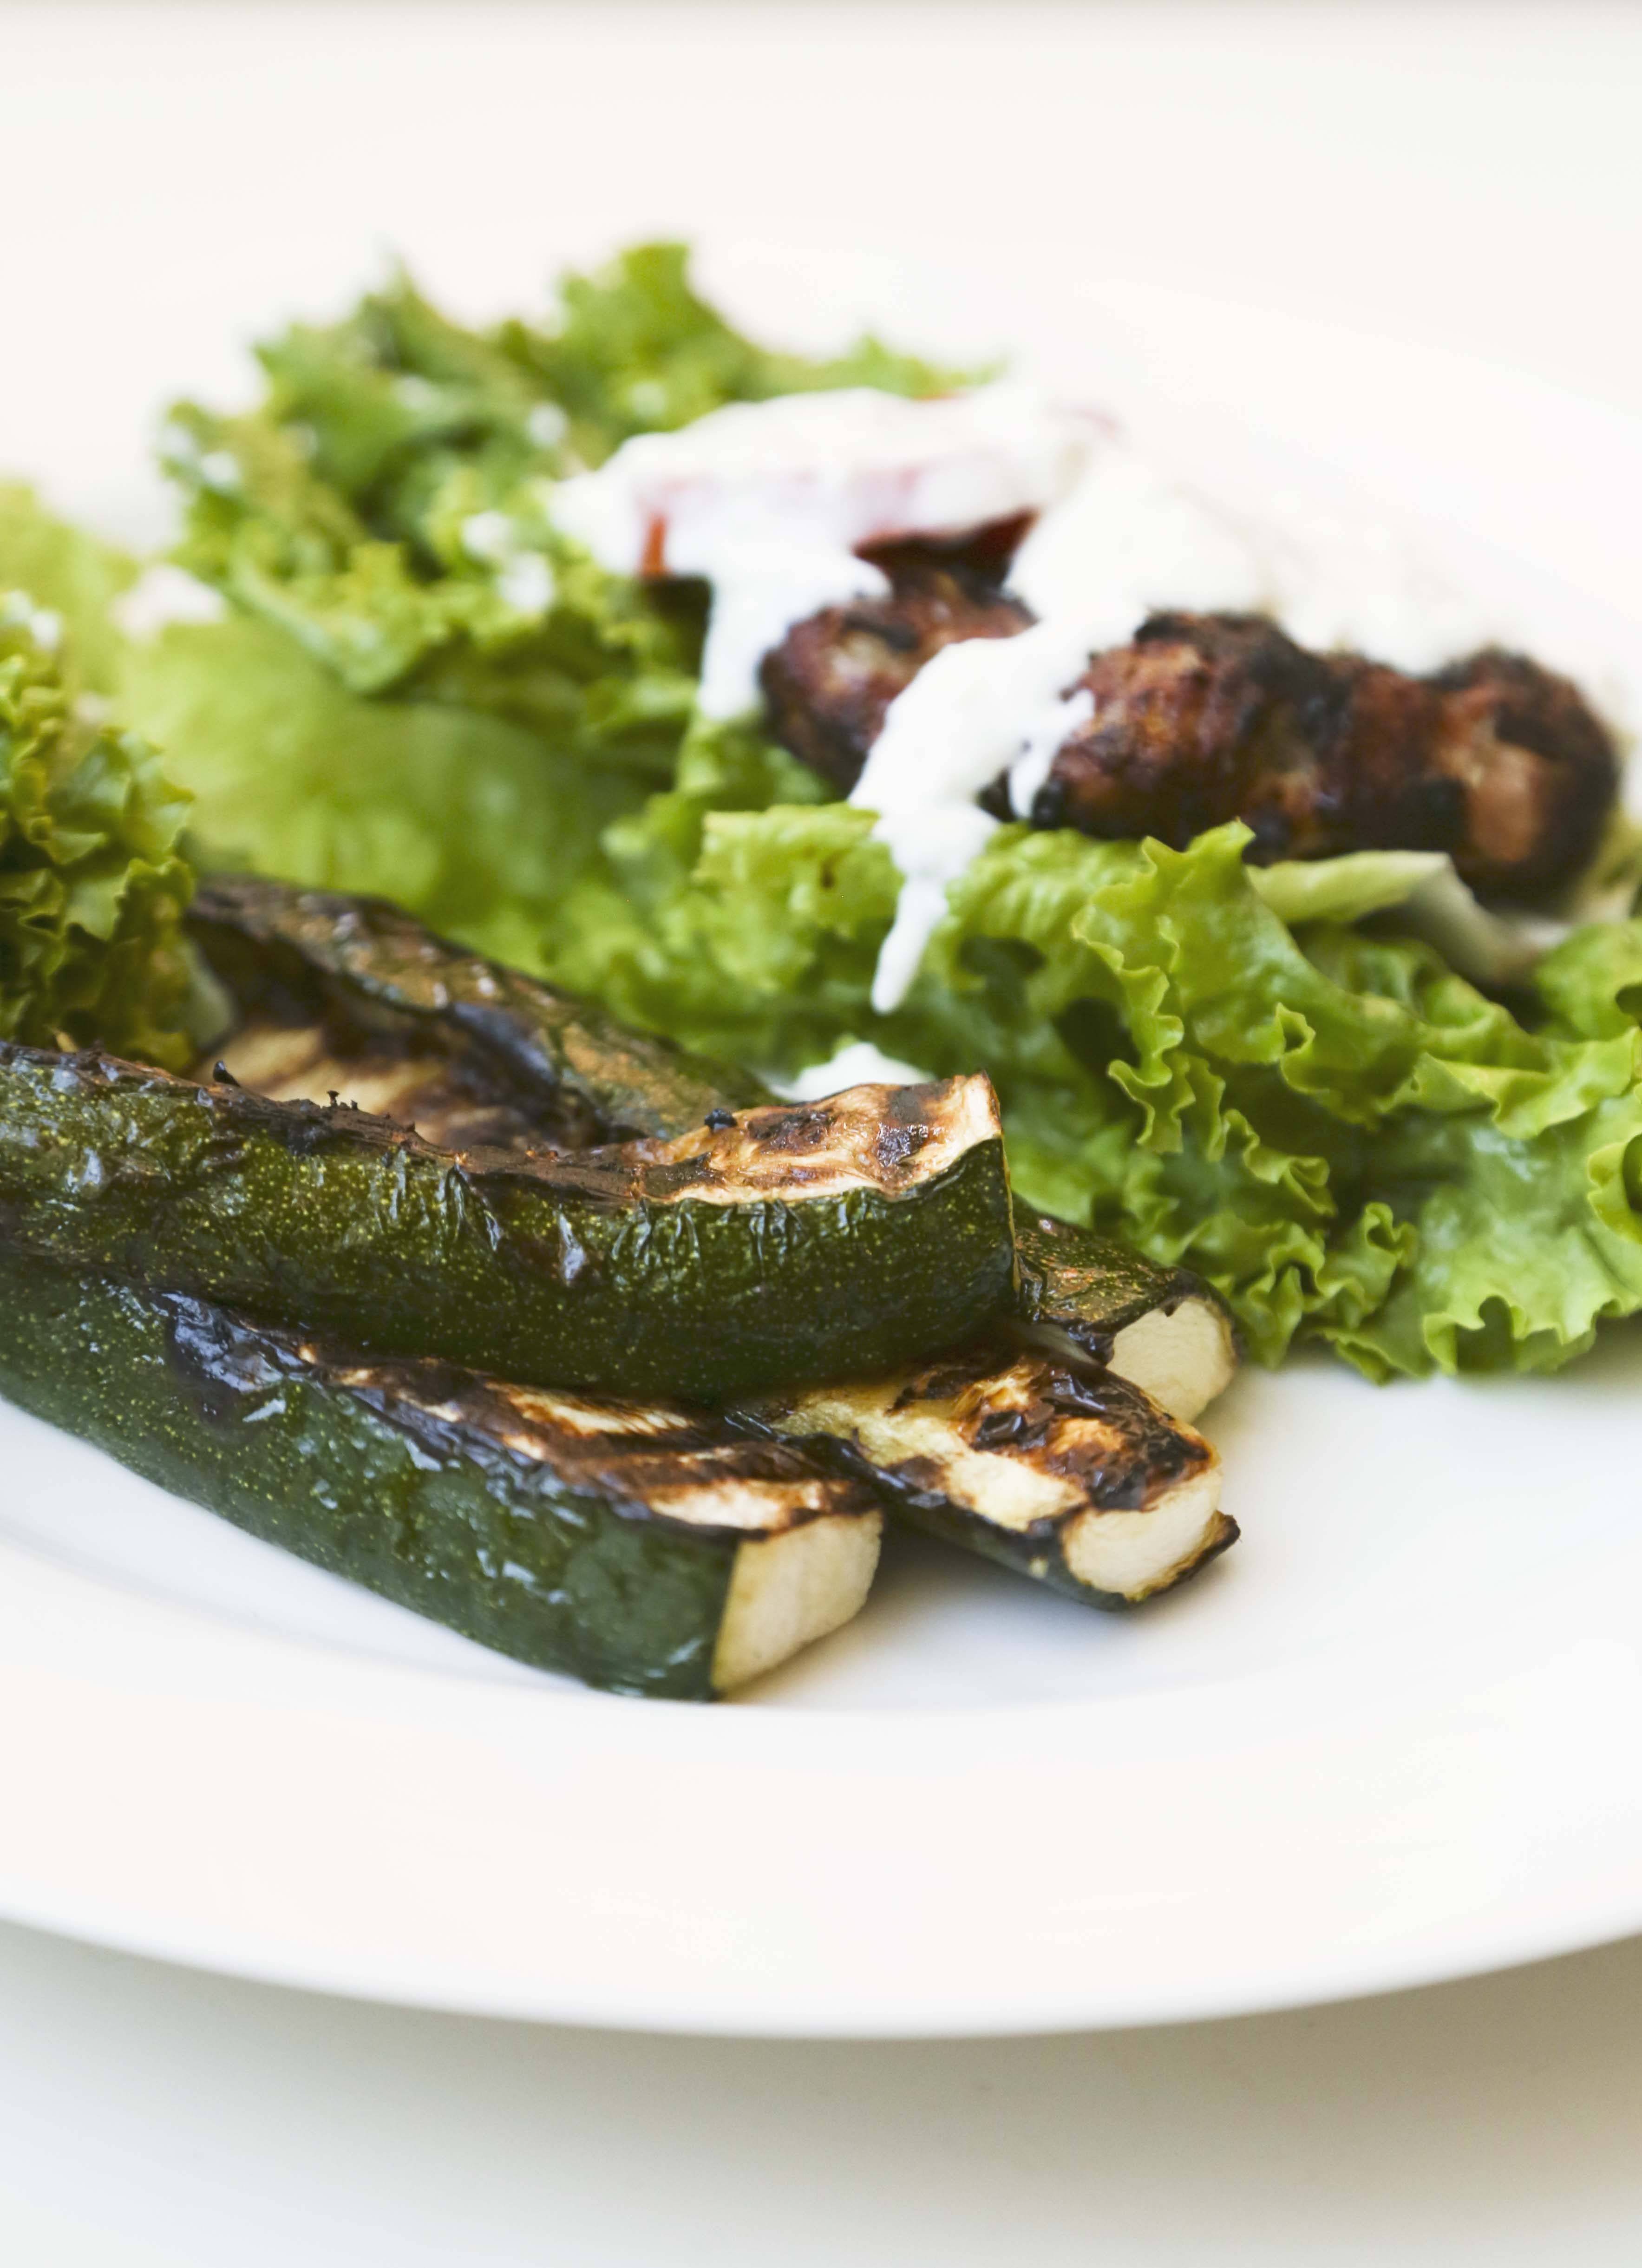
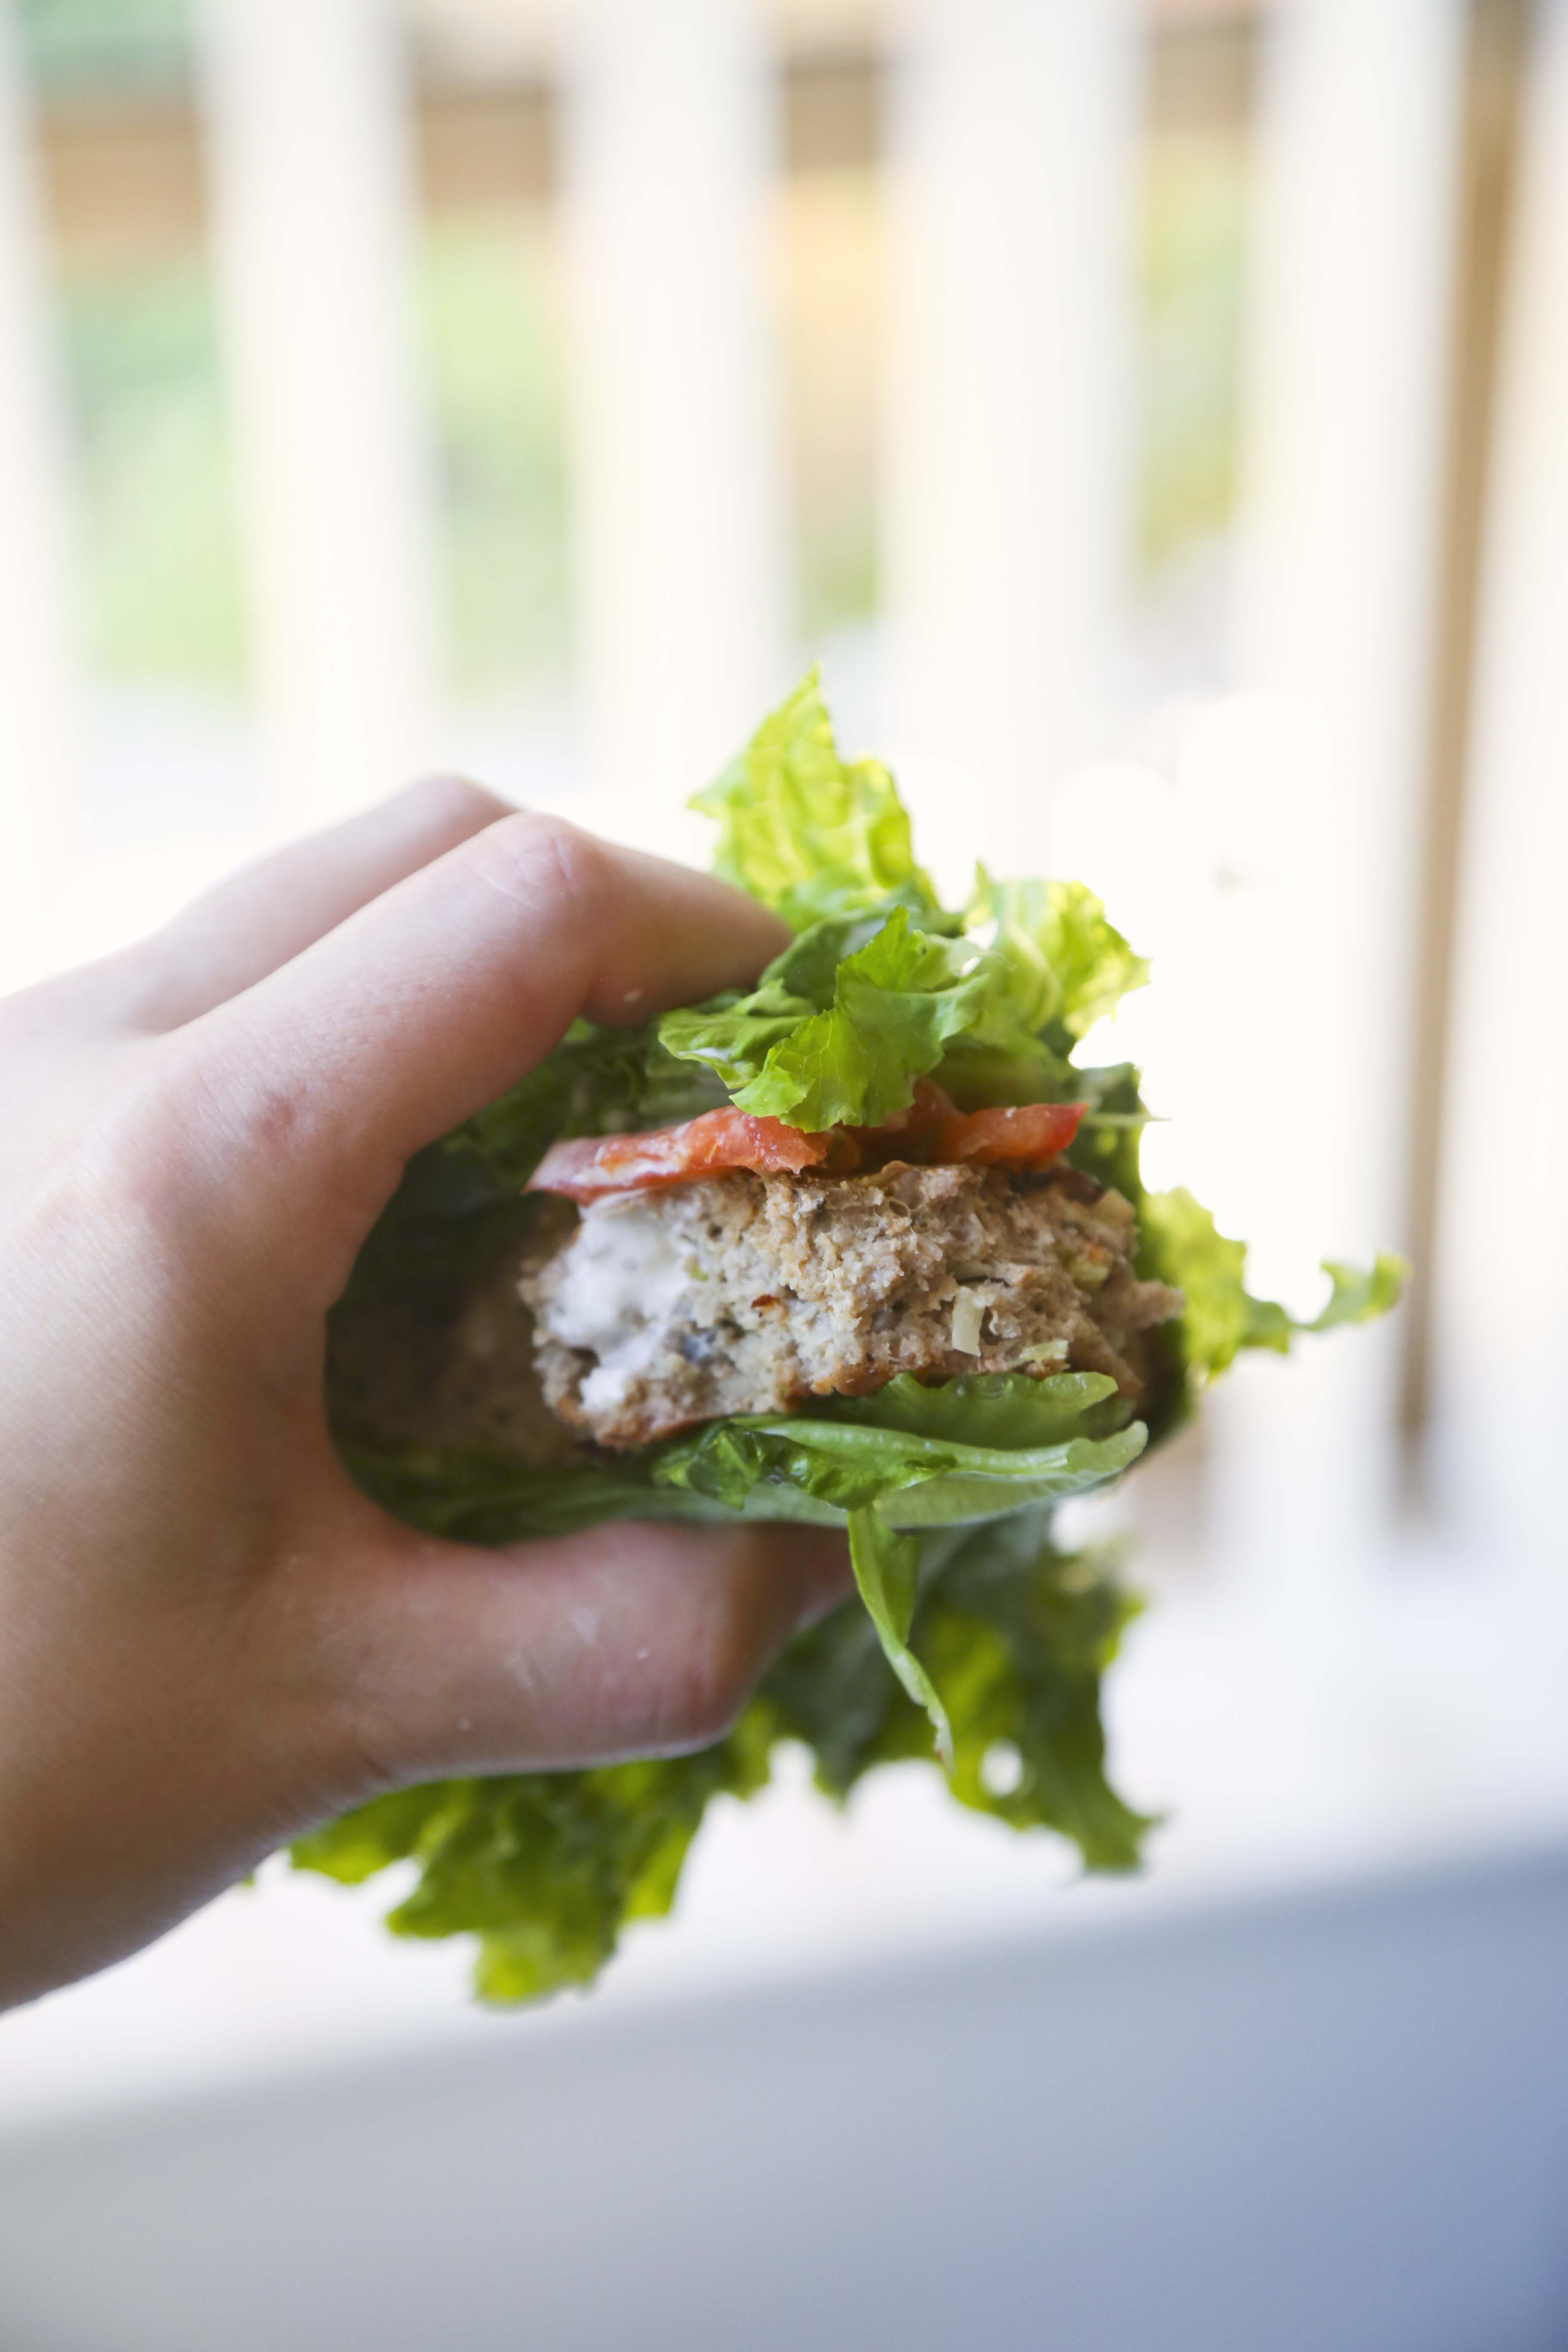
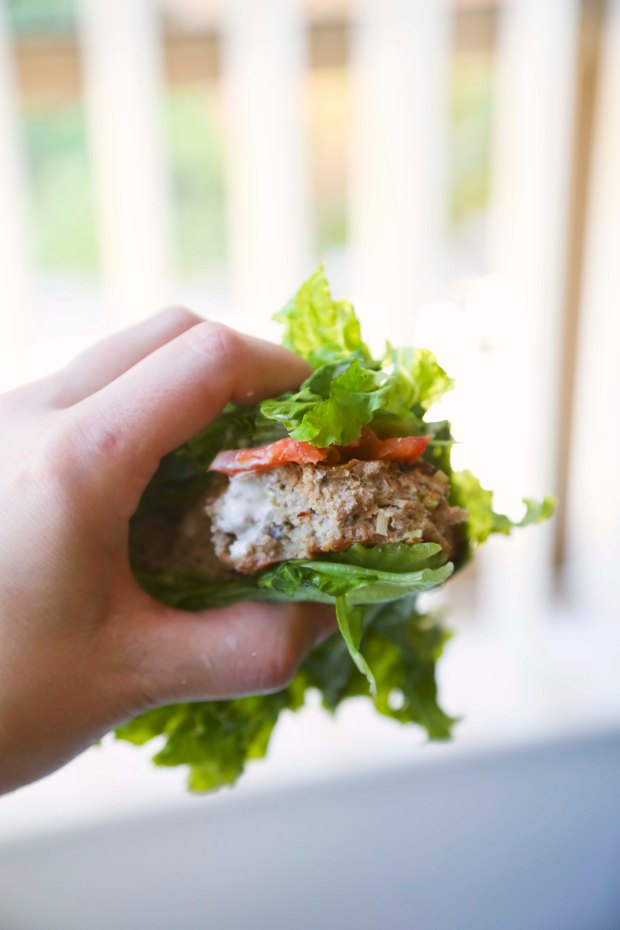
Next assemble your burger.  I doubled up and used two lettuce leaves per side of the burger “bun” (so 4 lettuce leaves total per burger. Remember, we’re packing in those vegetables!).  Put down two pieces of lettuce, top with burger and tomato, drizzle with yogurt sauce and top with more  lettuce.  Serve with some grilled zucchini and enjoy!  

This recipe will make 4-6 lettuce wrap burgers (I made 6). I was really happy with this recipe.  Confession: I ate 2!  I don’t feel guilty.

If you’re curious about how I grilled the zucchini, I just sliced it into 1/2 inch thick strips then drizzled with olive oil and tossed with some garlic salt.  That’s it.  And seriously delicious. turkeylettuceburger3

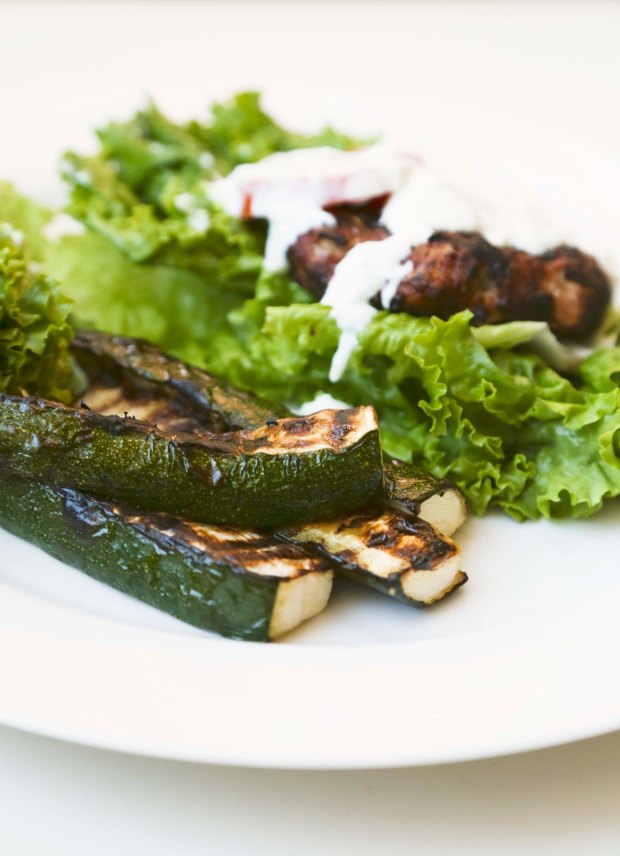
This meal was chock full of vegetables, which is always awesome, but also super tasty and satisfying.

turkeylettuceburger1

I can’t wait to make use of the other vegetables.  Here are some of my ideas to make the most of each ingredient…

  • Use Ginger to make awesome peanut sauce to go on zucchini noodles.  Or just drink with hot water, because ginger is great for your immune system!
  • Roast beets to make an amazing kale salad with onion, almonds, goat cheese and balsamic vinaigrette.  Doesn’t that sound amazing? I also intend to saute those beet greens and add those to the salad as well.
  • I cut up the rest of the cucumber that I didn’t use in the yogurt sauce just for snacking.  Because don’t we all need some extra veggies as an afternoon snack?  I think yes.
  • Carrots: Gluten free carrot cake.  Yup. I made it happen.  Recipe soon!
  • Celery: I love filling celery with tuna salad for an awesome and light lunch.  I can seriously go through 10 celery ribs in one sitting with a bowl of tuna salad.
  • Leeks + Potato… Do I even need to say it?  Potato-Leek Soup!

Overall, I’m pretty pleased with Melissa’s Produce delivery service.  It’s the most reasonably priced delivery service I’ve seen.  I used to pay about $19/week for my CSA share in Ithaca.  The box I got through Melissa’s Produce costs $25 (although I got it free this time, thanks to Melissa’s Produce!).  For $25 you get 7lbs of organic produce.  Not bad.

Are you a fan of lettuce wrapped burgers or are you a bun purist?

Disclaimer: Melissa’s Produce provided me with a free produce box in exchange for this blog post.  Opinions and recipes are my own.

Healthier Pancake Toppings and Options

With my series of overindulgent posts as of recent, I feel the need to balance out the calories and cholesterol with something a little bit healthier: Pancakes.

pancakebreakfast

That’s not a joke.  I totally think pancakes can be healthy.  You just have to know how to do them. As a kid, I hated pancakes.  I always thought they tasted funny.  Then something magical happened, I tried IHOP’s pancakes and I loved them.   That’s when I realized what I hated was Bisquick pancakes.  That’s all my mom ever made.  Sorry mom, but bisquick is just gross. When I discovered my love of pancakes, I wanted to eat them all the time.   While we all know pancakes aren’t always the healthiest breakfast, there are ways to lighted up your pancakes and especially the toppings so they’re still fun and delicious but won’t undo your workout. Here are a few ways to keep your pancakes a little on the healthier side so you can enjoy them guilt-free. peachpureepancakes2text

Choose a Better Pancake Base

Pancakes can basically be a carb fest (nothing wrong with that), but if you’re looking to balance your meal, adding protein powder is a great start.  I’m a big fan of protein pancakes because the extra protein helps keep you full.

Some of my favorites are:

protein pancakes1

Vanilla Coconut Protein Pancakes
Pumpkin Protein Pancakes
Banana Protein Pancakes

The fun part of protein pancakes is you can play with different flours and protein powders and find a mix that you love.

If making your own pancakes from scratch isn’t your thing or you’re really not looking to add some extra protein, there are some pancake mixes that are pretty natural and overall healthy.  I love Kodiak Cakes, because they’re super easy to make (just add water) and the ingredients are all natural.

You could also go the Paleo Pancake route.  It’s not exactly a pancake but still pretty darn tasty.

Lighten Up Your Toppings

When I was younger, I ate the regular old pancake syrup you get at the grocery store.  Nowadays, I try to stick with toppings that don’t have any chemicals or artificial sweeteners.  Straight up maple syrup is a little too intense for me, so generally I like to mix it up to create different types of syrups and sauces and toppings.

My latest obsession is fruit purees mixed with maple syrup.

I like to puree some fresh peaches and mixed it with maple syrup… about 2 tbsp peach puree + 1 tbsp of maple syrup for one person.  You can also just puree the fruit and skip the maple syrup.  I tried that with banana (simmered them in water first, but raw works) and it was awesome:

pancakesbananasyrupMy other favorite combo is plain greek yogurt with maple syrup.

vanillacoconutproteinpancakes2


But in general, fruit is a great topping.  It helps bulk up the volume without adding as many calories as eating extra pancakes.  Berries are always a great addition…

peachpureepancakes1

But you can also get creative, like topping your pancakes with persimmon!

Pancakes with Persimmon2

 Portion Control

I love a big stack of pancakes.  Mostly because it looks pretty, but also because it’s fun to eat.  But eating 4 or 5 full sized pancakes is a lot.  So what I do is I made them smaller!  That way I feel like I’m eating a lot but really I’m not.

pancakes2
I generally use a tbsp measurer to prepare my pancakes.  Each pancake is composed of 2 tbsp of batter, instead of about 1/4 cup (4 tbsp) which is normal.

In the photo above, the banana slices show how the pancakes are actually pretty small.  Despite the fact that the portion size is smaller, I still feel like I’m getting a good amount of pancakes.


I’m all for eating a full stack of pancakes with butter and maple syrup every once a while.  But on a normal day basis, I like to keep it a bit lighter.  Pancakes can still be enjoyed if you’re trying to stay healthy.  It’s just about making sure you make the right choices.

What’s your favorite way to slim down your pancakes?

Breakfast Sliders

One of my favorite things to do is  recreate things I tried in restaurants.  A few weeks ago, I met up with a friend for brunch in Long Beach.  We shared an appetizer and an entree and sipped bellinis.  For our appetizers,  we shared some breakfast sliders.

After one bite, I was in love.  I mean… biscuits, eggs, bacon, sausage gravy.

Everything you want in breakfast in one delicious bite.  I knew I had to recreate them, and so I did.

breakfast slider2

Breakfast Sliders

1 Recipe for Crazy Good Biscuits
1/2 lb breakfast sausage
1/3 cup flour 3 cups milk (I used low fat)
garlic salt
12 slices of bacon
8 eggs (I used Eggland’s Best)

First make your sausage gravy.  Crumble and cook your breakfast sausage in a large skillet or pot.  Make sure you buy the kind in the tube, not the links.  Once the sausage is almost cooked through, add flour and toss.  Cook a few minutes.  Stream in milk, slowly, stirring constantly to break up lumps.  Add garlic salt to taste. Remember the breakfast sausage is pretty salty on its own so you won’t need too much.  Set aside, leave on simmer to keep warm.

Next make your biscuits and cook your bacon until crispy and set aside.

The last step is to cook the egg.  Scramble the eggs in a bowl.  Pour eggs into a greased, heated skillet.  Cover and allow to cook a few minutes until almost cooked through.  You’re basically making a big egg pancake that you can slice and fold. Once the eggs have almost set, flip over and cook another few seconds.  Remove from heat and slice in half, then slice each half into 1 1/2 – 2 inch thick strips.  You should have 10-12 pieces.

Now assemble your sliders. Slice the biscuits in half.  On the bottom half, lay some sausage gravy, then take an egg strip and fold in half and place on top of sausage gravy, lay on some bacon and top off with top of biscuit.  Repeat until all your sliders are ready.  This recipe will make about 10-12 sliders.

breakfast slider1

These coincided with the fact that Eggland’s Best send me some egg coupons to throw a Brinner Party.  These were the perfect appetizer.

So if you’re having a Brinner party or if you just want to have an awesome breakfast-inspired treat, this is it.

breakfast sliders

ALSO, this is my entry for the Eggland’s Best “Your Best Recipe” contest.  Cross your fingers for me, then submit your own recipe!

Here are the contest details:

2014 Eggland’s Best “Your Best Recipe” Recipe Contest:

  • Visit the Eggland’s Best website to learn about their 2014 Eggland’s Best “Your Best Recipe” Contest
  • Eggland’s Best will be accepting original recipes through their website until July 31st
  • One Grand Prize Winner will receive a $10,000 cash prize and a year supply of EB eggs
  • Category winners will receive a cash prize of $1,000 and a six-month supply of EB eggs

Pretty awesome, right?  Who doesn’t want to win eggs and money?

Speaking of which, one more day to enter the Eggland’s Best giveaway to win some Eggland’s Best Eggs and a $25 Visa gift card!  Click here to enter!


What’s your favorite brunch/brinner appetizer??

Brinner Party: Build Your Own Breakfast Burrito

Disclaimer: The Eggland’s Best coupons, promo items, information, and two gift cards have been provided by Eggland’s Best.

I’m a huge fan of breakfast for dinner.   I probably have breakfast for dinner at least twice per week.  The beauty of breakfast is that it’s flexible.  While usually my breakfast for dinner (aka Brinner) is usually pretty simple (i.e. eggs and beans), you can get full on fancy with brinner.  I’m glad to know other people share my affinity for Brinner, especially Eggland’s Best.

egglandsbest

Eggland’s Best is an egg company.  You might have seen them around the grocery store or on Twitter or Facebook.  I had never tried their eggs before but when they offered some up to throw a “Brinner Party,” I was all over it.

I mean who can say no to eggs? They’re a little bit great (don’t forget how awesome Egg Salad on a Hot Dog is!)

Given my love of Eggs, Brinner and Food Parties (Hi, remember Peanut Butter Party and Chicken & Waffles?), a Brinner party was a natural next step.

We all know any good dinner party needs:

  • A drink
  • An Appetizer
  • An Entree
  • Dessert

I hit 3 out of 4 with this party.  You won’t believe this but I actually skipped dessert! (Who am I?!?!)

I had high hopes for dessert, but didn’t follow through because everyone was too full from the menu.  Must have been all those eggs! (PROTEIN! It keeps you full!) <— This is NOT me making a health claim… not that I ever do.

This brinner party also coincided with the World Cup Final.  So of course, any sporting event (and brinner party) needs a good cocktail.  I went with peach bellinis with fresh homemade peach puree:

PeachBellini

Super simple.  Peel some peaches, throw them in the food processor (or vitamix) and mix with your champagne of choice.  Then ta-da! Serve up! No added sugar just peach and alcohol.

With cocktails served, first up were the appetizers.  Since the world cup was going on, I decided to keep it sports friendly.  I don’t know about you, but sliders are one of my favorite sports-watching-foods.  So how about some breakfast sliders?

breakfast slider2

These are all sorts of awesome.  Biscuits. Eggs. Bacon. Sausage Gravy.

jesseappetizer

You’re welcome.  I’ll do a full recipe post on these soon!

After the game and some chatting and hanging around, it was time for dinner.

When it comes to dinner parties, I’m a big fan of interactive meals.  I think my friends are starting to get tired of it, but I love having make-your-own-____ meals.  It takes the pressure off of the host to have everything timed perfectly and it also lets guests pick and choose what they like (in the event your guests are picky or have food allergies).

When I was brainstorming the perfect Brinner party meal that would be tasty, fun and hearty, I couldn’t stop thinking of burritos.  So that’s what she wrote… Build Your Own Breakfast Burrito Brinner Party!

BreakfastBurrito


As everyone made their burritos, I snapped a few photos.  I love seeing what everyone decided to add to theirs.

Included in the breakfast burrito bar:

  • Burrito Sized Tortillas (seriously enormous)
  • Scrambled Eggs
  • Tater Tots
  • Breakfast Sausage
  • Bacon
  • Chorizo
  • Avocado
  • Sour Cream
  • Cheddar Cheese
  • Salsa
  • Cotija Cheese

I had an awesome time with this Build Your Own Breakfast Burrito Brinner Party.  I hope my guests did too!

In addition to being awesome and providing me with plenty of eggs for this Brinner party, Eggland’s Best is also giving one lucky Foodologie reader an Eggland’s Best Prize Pack!


To Enter, Head over to Facebook and Click the Giveaway tab on my page

You can get a new entry every day by tweeting about the giveaway.  You can also enter by liking me on Facebook, following me on Twitter or commenting on this post.  No matter what you do, don’t forget to go to the Giveaway Tab on Facebook and use the little module to enter there.  If you don’t use that, your entry won’t count!

So spread the word and tell the world about this Brinner Party!

The Giveaway ends July 24th at 12am and is open to US residents only (sorry, no P.O. Boxes).  Winner will be announced that day.


What’s your favorite way to have Breakfast for Dinner (BRINNER!)?

Blueberry Lemon Thyme Pie in a Bourbon Crust

Before this week, I hadn’t made a pie in a really long time.  I had almost forgotten how fun it is to make a pie.

blueberrylemonpie1

There’s something really special about making a pie.  I think it has to do with all the steps.  It’s a process, but almost always, it’s worth it.

With this pie, it’s totally worth it. I can honestly say, I thoroughly enjoy making pies.  I love making the dough and using my fingers to break up the butter.  I love rolling out the dough to fit the pie pan.   I should also tell you that I’m a little bit in love with the crust.  I decided bourbon was a good idea, so I used bourbon instead of water.  Then I decided thyme goes great with blueberries and lemon. So why not?  I won’t lie, the thyme gives the pie a really earthy flavor.  I’m not sure it will be to everyone’s liking.  If you aren’t into earthiness, omit the thyme and you will have one rockin’ pie.

The only part of pie-making that I’m not crazy about is chopping fruit.  With this pie, this is a non-issue. pieingredients

This is pretty much the pie for those who don’t like to chop things.  There’s really zero chopping involved.  Just rinse your blueberries, grate your lemon and pluck some thyme off the stem, then throw it all together with some sugar and flour.  It all is pretty simple. blueberrylemonpie2

Of course with any pie, you can always get fancy.  Lattice tops are always fancy.  I tried to get even fancier by using a spoon to crimp the edge.  Oh and the little heart adds a nice touch, right?  All sorts of cute! blueberrylemonpie3

  I’m a fan.  If you’re in the mood for a fancy pants pie that is comforting and earthy (is earthy a bad thing?), this is the jam:

Blueberry Lemon Thyme Pie in a Bourbon Crust

For Crust:

350g all purpose flour
2 tbsp sugar
1/2 tsp salt
2 sticks butter, cold
1/4 cup bourbon

For Filling:

1.5lbs fresh blueberries (5 cups)
3/4-1 cup sugar
1/4 cup flour
1/2 tsp salt zest and juice of 1 lemon
1 tbsp fresh thyme  

First make your crust.  Mix together dry ingredients.  Cut your butter into cubes, using your fingers work into your flour mixture until you get coarse crumbs.  Add bourbon and work into a ball.  Wrap in plastic and refrigerate 4 hours or overnight.  Resting is a critical part of pie dough  making.  If your pie dough is shrinking, it’s because it hasn’t rested enough. So let it chill in the fridge a few hours. Pour yourself a glass of bourbon while you wait.

When you’re ready to make your pie, make your filling.  In a bowl, combine all ingredients Roll out the crust, half for the bottom and half for the top.  Place one half in the bottom of the pan.  Fill with fruit filling.  Then make a lattice top (or just roll it out and cut a few slits in the top), crimp as desired.

 If you want some cool pie crimping ideas, check this out. Put your pie in the freezer while you preheat your oven to 350F.  Once heated, bake for about an hour or until the blueberries are bubbling all around. Allow to cool completely and serve. eatingblueberrypie

Blueberry pie always looks like a mess when served.  But that’s part of the fun of pies.  Unlike layer cakes, pie aren’t perfect.  They’re messy and chunky, but overall pretty great.


I’m really interested to try more herbs in pies.  I’m thinking maybe strawberry basil might be a good combo.

Any other ideas?  How do you feel about pies? Fan? Not so much?

Roasted Cauliflower and Lentil Salad

I’m currently having a bout of I-don’t-want-to-cook.

It’s a chronic syndrome.  I haven’t quite found the cure, but I have a remedy.

The situation is this:  I want to eat healthy meals, but I’m just not in the mood to prepare them.

An unfortunate result of I-don’t-want-to-cook is a desire to eat bad things.  And thus, I also want to eat fatty sandwiches and burgers (because those are cheap and easy to pick up… but really I should mention Del Taco Bean and Cheese burritos because they’re my weakness).  Today, I almost gave in to a fatty sandwich for lunch, because I was too lazy to pack a lunch.  I got a salad at a local spot.  And while it was healthier than the fatty Reuben I also wanted, nothing beats the healthiness of a home-cooked meal.

So the solution to the chronic I-don’t-want-to-cook (or really I-don’t-want-to-do-dishes) is to get a boyfriend who cooks having lots of healthy leftovers.  I’m a fan of cooking in bulk for the week because I always know there will be a day when I don’t feel like cooking so I might as well be prepared.  My most recent creation is perfect for these days.  You can make it on Sunday and it’ll still be good for Thursday, since there’s no meat involved.

RoastedCauliflowerLentilSalad2

Don’t worry, I didn’t go crazy with photoshop.  I used yellow cauliflower.  That’s why it’s so bright.  I’m currently making this again with purple cauliflower.  I’m going to bet that will look awesome as well.

RoastedCauliflowerLentilSalad3


So if you’re like me and you’re having an I-don’t-want-to-cook (or do dishes) moment, this is your solution.  Very little work and lots of deliciousness and nutrients.  So get your cauliflower/lentil on…


Roasted Cauliflower and Lentil Salad

3/4 cup lentils, dry
1 head cauliflower, chopped
2 tbsp olive oil, divided
1 tsp cumin
1 tsp paprika
1/4 tsp cayenne
garlic salt, to taste (I used about 1/2 tsp)

1/2 tbsp dijon mustard
2 tbsp red wine vinegar
salt and pepper to taste
1/4 cup chopped cilantro
3 oz goat cheese (optional)

Cook lentils for 20 minutes (or until tender) in boiling water.  While the lentils cook, pre-heat your oven to 400F.  Chop cauliflower, toss with 1 tbsp olive oil, cumin, paprika, cayenne, garlic salt and pepper.  Roast for about 20 minutes, turning occasionally, or until golden and crispy.

Next make dressing.  Whisk together 1 tbsp olive oil, mustard, vinegar and some salt and pepper.  Now combine all ingredients.  Toss together lentils, cauliflower, cilantro, and dressing.  Top with goat cheese and serve!  This recipe will serve 4.

RoastedCauliflowerLentilSalad1

  Like I said, this recipe is super easy.  It only takes about 5 minutes of prep work.  The rest is pretty much just the oven and stove doing the work.  That means you can watch Orange is the New Black while you wait for it all to be ready, then take 2 minutes and throw it all together. RoastedCauliflowerLentilSalad4

Sounds like a great idea to me.  I have some cauliflower in the oven, now all I need is Netflix.


What’s your quick and easy, to-go healthy meal?